Topic connect to sony headphones: Discover the seamless way to connect to Sony headphones, enhancing your audio experience with simple, step-by-step guidance. This ultimate guide ensures effortless pairing across devices, unlocking a world of crystal-clear sound and convenience.
Table of Content
- How to connect Sony headphones to a device for the first time or after initializing?
- Understanding Sony Headphones Connectivity
- Initial Setup for First-Time Connection
- Pairing Sony Headphones with Android Devices
- Pairing Sony Headphones with iOS Devices
- Connecting Sony Headphones to Windows PCs
- Connecting Sony Headphones to Mac Computers
- YOUTUBE: Sony Headphones WH-1000XM4: How to Pair and Connect to iPhones via Bluetooth
- Using NFC to Connect Sony Headphones
- Connecting Multiple Devices with Sony Headphones
- Troubleshooting Connection Issues
- Maximizing Your Sony Headphones\" Battery Life for Connectivity
- Using the Sony Headphones Connect App for Enhanced Features
How to connect Sony headphones to a device for the first time or after initializing?
To connect Sony headphones to a device for the first time or after initializing, follow these steps:
- Make sure the headphones are charged and turned on.
- Put the headphones in pairing mode. This is usually done by pressing and holding the power button or a dedicated pairing button until the LED indicator flashes.
- On the device you want to connect to, go to the Bluetooth settings.
- Enable Bluetooth if it\'s not already turned on.
- In the list of available Bluetooth devices, select the Sony headphones.
- If prompted, enter the passcode or PIN provided with the headphones.
- Wait for the device to establish a connection with the headphones.
- Once connected, you should hear a confirmation sound or see a notification on the device.
After successfully connecting the Sony headphones to a device for the first time, it should automatically connect to that device when it\'s turned on and within range. If you need to connect the headphones to a different device, repeat the above steps.
READ MORE:
Understanding Sony Headphones Connectivity
Connecting your Sony headphones seamlessly integrates with your digital life, whether you\"re on the go, working from home, or enjoying leisure time. Sony offers various connectivity options to suit your device and preferences, including Bluetooth, NFC (Near Field Communication), and wired connections for older devices. The process varies slightly depending on your device\"s operating system and the specific Sony headphone model you own.
- Bluetooth Connectivity: The most common method for connecting Sony headphones, Bluetooth pairing is universal across devices, offering a reliable and wireless connection.
- NFC Pairing: For devices that support NFC, Sony headphones can be connected with just a simple tap, streamlining the pairing process.
- Wired Connection: Some models also support wired connections using a 3.5mm headphone jack or USB cables for devices without Bluetooth capability.
- Sony Headphones Connect App: Enhance your listening experience with the Sony Headphones Connect app, allowing you to customize settings, update firmware, and access advanced features specific to your headphones.
- Multi-device Connectivity: Certain Sony headphone models can connect to multiple devices simultaneously, making it easy to switch between your phone, tablet, or computer without re-pairing.
Understanding these connectivity options allows you to maximize the functionality and enjoyment of your Sony headphones. Whether you prefer the freedom of wireless listening or need the reliability of a wired connection, Sony headphones are designed to provide a high-quality audio experience tailored to your lifestyle.

Initial Setup for First-Time Connection
Setting up your Sony headphones for the first time is a simple process that ensures a seamless connection to your device. Follow these steps to get started:
- Charge Your Headphones: Ensure your Sony headphones are fully charged before attempting to pair them with a device. This can prevent any connection issues due to low battery.
- Enter Pairing Mode: Turn on your headphones and enter pairing mode. For most Sony headphones, you will need to press and hold the power button or the pairing button for about 7 seconds until the LED indicator flashes blue and red, indicating the headphones are in pairing mode.
- Select Your Headphones on Your Device: On your smartphone, tablet, or computer, go to the Bluetooth settings and ensure Bluetooth is turned on. Your Sony headphones should appear in the list of available devices. If they don\"t, refresh the list or make sure your headphones are in pairing mode.
- Complete the Connection: Tap on your headphones\" name in the list of Bluetooth devices on your screen to connect. You may be prompted to accept the pairing; if so, confirm the action.
- Confirmation: Once connected, you will hear a confirmation sound or voice prompt from your headphones, and the LED indicator will stop flashing, indicating a successful connection.
After completing these steps, your Sony headphones should be successfully connected to your device. You can now enjoy your music, videos, or any audio content wirelessly. For future connections, your headphones should automatically reconnect to the last device they were paired with, unless you pair them with a new device.

Pairing Sony Headphones with Android Devices
Connecting your Sony headphones with an Android device is straightforward and can be done in a few simple steps. Here’s how to pair your headphones for a seamless audio experience:
- Enable Bluetooth on Your Android Device: Swipe down from the top of the screen to access the Quick Settings panel, and tap on the Bluetooth icon to turn it on. Alternatively, you can go to Settings > Connected devices > Bluetooth and toggle it on from there.
- Put Your Sony Headphones in Pairing Mode: Press and hold the power button or the dedicated pairing button on your headphones for about 7 seconds, until the LED indicator flashes blue and red. This indicates that your headphones are in pairing mode and ready to connect.
- Search for Your Headphones on Your Android Device: On your Android device, go to the Bluetooth settings page you opened in step 1, and select \"Pair new device\" or \"Search for devices.\" Your Sony headphones should appear in the list of available devices.
- Select Your Headphones to Pair: Tap on your headphones’ name in the list to initiate the pairing process. You may need to confirm the pairing on your device by tapping \"OK\" or \"Pair.\"
- Successful Connection Confirmation: Once the pairing is successful, you will hear a confirmation sound or voice prompt from your headphones, and the LED indicator will turn solid blue. Your device will also display \"Connected\" next to your headphones in the Bluetooth settings.
After completing these steps, your Sony headphones are connected to your Android device, ready for you to enjoy your favorite music, podcasts, or videos wirelessly. Remember, your headphones will automatically connect to the last paired device when turned on and within range, simplifying future use.

Pairing Sony Headphones with iOS Devices
Pairing your Sony headphones with an iOS device, like an iPhone or iPad, is a quick and straightforward process. Follow these steps to connect your headphones and start enjoying your music:
- Turn on Bluetooth on Your iOS Device: Open the Settings app, tap on Bluetooth, and toggle the Bluetooth switch to the ON position.
- Put Your Sony Headphones into Pairing Mode: Press and hold the power button or the pairing button on your headphones for about 7 seconds until you see the LED indicator flash blue and red. This means the headphones are now in pairing mode.
- Find Your Headphones on Your iOS Device: Stay in the Bluetooth menu on your iOS device. Your Sony headphones should appear under \"Other Devices.\" If you don\"t see them immediately, wait a few moments for them to appear.
- Connect to Your Headphones: Tap on your headphones\" name when it appears on the screen. You may need to wait a few seconds for the pairing to complete.
- Confirmation of Connection: Once connected, your headphones\" name will move to the \"My Devices\" section and show \"Connected\" next to it. You might also hear a confirmation from your headphones that the connection is successful.
With these simple steps, your Sony headphones are now paired with your iOS device, ready for you to enjoy high-quality audio whether you\"re listening to music, watching videos, or taking calls.

_HOOK_
Connecting Sony Headphones to Windows PCs
Connecting your Sony headphones to a Windows PC enhances your listening experience, whether for work or leisure. Here\"s a step-by-step guide to pairing your headphones:
- Turn on Your Headphones: Ensure your Sony headphones are charged. Press and hold the power button to turn them on and enter pairing mode. The LED indicator will flash, signaling it\"s ready to pair.
- Open Bluetooth Settings on Your PC: On your Windows PC, go to Start > Settings > Devices > Bluetooth & other devices. Ensure Bluetooth is turned on.
- Add a New Device: In the Bluetooth & other devices menu, click on \"Add Bluetooth or other device\" and select \"Bluetooth\" from the list of options.
- Select Your Headphones: Your Sony headphones should appear in the list of available devices. Click on your headphone\"s name to begin pairing.
- Complete the Pairing: Follow any on-screen instructions to complete the pairing process. Once connected, your headphones will be listed as \"Connected\" in the Bluetooth settings.
After successfully connecting your Sony headphones to your Windows PC, you can enjoy high-quality audio for your games, music, or any multimedia content. Your headphones will automatically connect to your PC when turned on and within range if Bluetooth is enabled, making future connections effortless.

Connecting Sony Headphones to Mac Computers
Pairing your Sony headphones with a Mac computer allows you to enjoy exceptional audio quality while working, gaming, or relaxing. Here\"s how to easily connect your headphones:
- Ensure Bluetooth is Enabled on Your Mac: Click on the Apple menu > System Preferences > Bluetooth, and turn Bluetooth on if it isn\"t already active.
- Put Your Sony Headphones in Pairing Mode: Hold down the power button or the pairing button on your headphones until the LED light flashes blue and red, indicating that your headphones are in pairing mode.
- Connect Your Headphones to Your Mac: Your headphones should appear in the list of devices in the Bluetooth window on your Mac. Click \"Connect\" next to your headphones\" name. If prompted, accept the connection.
- Verify the Connection: Once connected, your Sony headphones will be listed as \"Connected\" in the Bluetooth settings. You might also hear a voice prompt or sound confirming the successful connection.
After following these steps, your Sony headphones will be connected to your Mac, ready for you to enjoy your favorite audio. The next time you turn on your headphones near your Mac, they should automatically reconnect, providing a seamless audio experience.
Sony Headphones WH-1000XM4: How to Pair and Connect to iPhones via Bluetooth
\"Discover the convenience of Bluetooth technology as we delve into the world of wireless connectivity. Our video showcases the amazing capabilities of Bluetooth devices, from headphones to speakers, ensuring a seamless and hassle-free audio experience.\"
Tutorial: How to Pair Sony WH-1000XM4 Wireless Over-the-Ear Headphones
\"Become a pro with our easy-to-follow tutorial video! Our step-by-step guide covers everything you need to know, from basic concepts to advanced techniques. Whether you\'re a beginner or looking to enhance your skills, this tutorial is your one-stop resource.\"
Using NFC to Connect Sony Headphones
Near Field Communication (NFC) offers a quick and easy way to connect your Sony headphones with compatible devices. Follow these steps to use NFC for a hassle-free connection:
- Enable NFC on Your Device: On your smartphone or tablet, open the Settings app and locate the NFC settings. Ensure NFC is turned on. The location of these settings may vary depending on your device.
- Put Your Headphones in NFC Pairing Mode: Ensure your Sony headphones are turned on. Not all models have a specific NFC pairing mode, so just having them on is usually sufficient.
- Touch Your Device to the Headphones: Locate the NFC logo on your headphones. It\"s usually found on one of the earcups. Touch the NFC area of your device to the NFC area of your headphones for a few seconds.
- Confirm the Connection: Your device may prompt you to confirm the pairing. Follow any on-screen instructions to complete the connection. A successful connection is often indicated by a sound or voice prompt from the headphones.
This NFC connection method bypasses the need for manual pairing through Bluetooth settings, making it an incredibly convenient option for quick connections. Remember, NFC must be supported and enabled on both your device and the Sony headphones for this to work.
Connecting Multiple Devices with Sony Headphones
Many Sony headphones support multi-device connectivity, allowing you to switch between two devices seamlessly. This feature is perfect for those who frequently alternate between a smartphone and a computer or tablet. Here\"s how to set it up:
- Initial Pairing: Start by pairing your Sony headphones with both devices you wish to connect, following the standard Bluetooth pairing process for each device.
- Activate Multipoint Connection: Ensure that your headphones support multipoint connections. Refer to your headphone\"s manual to activate this feature, as the process may vary by model.
- Switch Between Devices: Once both devices are paired and the multipoint connection is enabled, your Sony headphones can connect to both devices simultaneously. Audio will be played from the device that is currently in use. For example, if you are watching a video on your tablet and a call comes in on your smartphone, the headphones can switch to the smartphone once you answer the call.
- Manual Switching: If your headphones do not automatically switch between devices, you may need to manually select the headphone output from the Bluetooth settings of the currently active device.
This functionality enhances the versatility of your Sony headphones, making it easier to manage audio from multiple sources without the need to reconnect or re-pair devices constantly.

Troubleshooting Connection Issues
If you\"re experiencing issues connecting your Sony headphones, here are some troubleshooting steps to help resolve common problems:
- Ensure Your Headphones Are Charged: A low battery can cause connection issues. Make sure your headphones are fully charged before attempting to connect.
- Check the Pairing Mode: Confirm that your headphones are in pairing mode. The LED indicator should flash blue and red. If not, consult your headphones\" manual for how to enter pairing mode.
- Forget the Device and Re-pair: On your device, go to Bluetooth settings, find your Sony headphones in the list of devices, and select \"Forget This Device.\" Then, try pairing again from scratch.
- Restart Your Devices: Sometimes, simply restarting your headphones and the device you\"re trying to connect to can resolve the issue.
- Check for Interference: Other wireless devices can interfere with Bluetooth connections. Try turning off other devices or moving away from areas with high wireless interference.
- Update Firmware: Ensure your headphones and your device are updated with the latest firmware. Visit the Sony website or use the Sony Headphones Connect app to check for updates.
- Reset Your Headphones: If all else fails, try resetting your headphones to their factory settings. You\"ll need to refer to the manual for specific instructions on how to do this, as the process can vary by model.
Following these steps can help solve most connectivity issues with Sony headphones. If problems persist, consider contacting Sony support for further assistance.
_HOOK_
Maximizing Your Sony Headphones\" Battery Life for Connectivity
To ensure your Sony headphones maintain a strong connection and last as long as possible between charges, follow these tips to maximize battery life:
- Avoid Overcharging: Remove your headphones from the charger once they are fully charged. Overcharging can reduce battery lifespan over time.
- Use the Right Charging Source: Charge your headphones with the supplied USB cable and compatible charging adapter. Avoid using fast chargers that are not recommended by Sony, as they can damage the battery.
- Turn Off When Not in Use: Conserve battery by turning off your headphones when you\"re not using them. Some models have automatic power-off features that can be customized in the Sony Headphones Connect app.
- Manage Connection Features Wisely: Features like noise cancellation and Bluetooth connectivity consume power. Use the Sony Headphones Connect app to adjust settings or turn off these features when not needed to save battery.
- Keep Firmware Updated: Sony periodically releases firmware updates that can improve battery performance and efficiency. Use the Sony Headphones Connect app to keep your headphones updated.
- Moderate Volume Levels: Listening at high volumes can consume more battery. Enjoy your audio at moderate levels to extend battery life.
- Avoid Extreme Temperatures: Store and use your headphones in environments with moderate temperatures, as both cold and hot conditions can affect battery performance.
By following these tips, you can enjoy longer listening sessions and ensure your Sony headphones are always ready when you need them.
READ MORE:
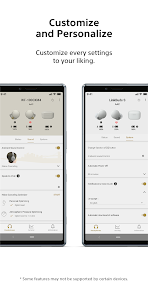
Using the Sony Headphones Connect App for Enhanced Features
The Sony Headphones Connect app is an essential tool for maximizing your Sony headphones experience. It offers personalized settings and advanced features to enhance your listening. Here’s how to use it:
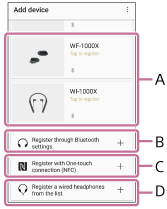
- Download the App: Available for both Android and iOS, download the Sony Headphones Connect app from the Google Play Store or the Apple App Store.
- Connect Your Headphones: Open the app and follow the on-screen instructions to connect your Sony headphones via Bluetooth.
- Customize Your Sound: Use the app to adjust sound levels, set equalizer settings, and select surround sound presets to match your listening preferences.
- Control Noise Cancelling: For headphones with noise cancelling features, you can adjust the level of noise cancellation or switch to Ambient Sound Mode to hear your surroundings without removing your headphones.
- Access Advanced Features: Explore features like Adaptive Sound Control, which automatically adjusts noise cancelling and audio settings based on your activity and location, and Speak-to-Chat, which pauses your audio automatically when you start a conversation.
- Update Your Headphones: Keep your headphones up to date with the latest firmware to ensure optimal performance and access to new features.
By leveraging the Sony Headphones Connect app, you can tailor your audio experience to your exact liking, making every song, podcast, or video sound its best.
Embrace the superior sound and convenience of Sony headphones with our comprehensive guide. From effortless pairing to maximizing battery life, unlock the full potential of your audio experience and elevate every moment.