Topic how to create a sony account: Discover the simplicity of creating a Sony account with our comprehensive guide. Unlock a universe of entertainment, exclusive content, and seamless access across Sony"s digital ecosystem. Start your journey today!
Table of Content
- How do I create a Sony account?
- Step 1: Visit the Official Sony/PlayStation Network Website
- Step 2: Choose Your Country/Language
- Step 3: Navigate to My Account and Click Sign-in
- Step 4: Select \"Create a New Account\" and Follow On-screen Instructions
- Step 5: Account Types - Master and Sub Accounts
- YOUTUBE: Create a PSN Account | Sign Up for PlayStation Network
- Step 6: Enter Personal Information During Sign-Up
- Step 7: Verify Your Email Address
- Step 8: Manage Your Account - Product Registration and Service Requests
- Step 9: Setting Up Family Management for Sub Accounts
- Step 10: Upgrading a Sub Account to a Master Account
How do I create a Sony account?
To create a Sony account, you can follow these steps:
- Open the official PlayStation website on your preferred web browser.
- Click on the \"Sign In\" button located at the top right corner of the page.
- On the sign-in page, click on the \"Create Account\" link below the login form.
- You will be directed to the account creation page.
- Fill in the required information, including your email address, password, and date of birth.
- Choose a unique online ID or username for your account.
- Enter your personal details, such as your name, country/region, and language preference.
- Review the Terms of Service and Privacy Policy, then check the box to confirm your agreement.
- Click on the \"Create Account\" button to finalize the process.
- To verify your email address, Sony will send you a confirmation email. Open the email and follow the instructions provided to complete the verification.
Once you have completed these steps, your Sony account will be created and you can start accessing various Sony services and products.
READ MORE:
Step 1: Visit the Official Sony/PlayStation Network Website
Begin your journey by navigating to the official Sony or PlayStation Network (PSN) website. This is your gateway to creating a new Sony account, offering access to a wide range of services and products. Ensure you\"re visiting the correct site to protect your personal information.
- Open your preferred web browser.
- Type the official Sony or PSN website URL into the address bar. The URL you need might vary depending on your region, but it generally follows the format of \"www.sony.com\" or \"www.playstation.com\".
- Press Enter to proceed to the website.
Once on the site, look for the account creation or sign-in option, which is typically located in the top right corner of the homepage. If you\"re aiming to join the PlayStation Network, the process will be similar, with the PSN site directing you through the steps to create your account.
Step 2: Choose Your Country/Language
After reaching the official Sony or PlayStation Network website, it\"s important to select your specific country or language. This ensures you receive the most relevant content, offers, and support tailored to your location.
- Look for a country or language selector, often found at the bottom of the page or in the website\"s header.
- Click on the selector to display a list of available countries and languages.
- Scroll through the list and select your country or preferred language.
- The page will refresh to display content specific to your chosen location or language.
Selecting your country or language correctly is crucial for a seamless experience. It affects the availability of certain products, services, and promotional offers. In addition, customer support and account management features will be aligned with your region\"s policies and requirements.
Step 3: Navigate to My Account and Click Sign-in
Once you have selected your country and language, the next step is to begin the account creation process. This involves navigating to the \"My Account\" section on the Sony or PlayStation Network website.
- Locate the \"My Account\" option, which is usually positioned at the top right corner of the website.
- Click on \"My Account\" to open a dropdown menu with various options.
- From the dropdown menu, select the \"Sign-in\" option. If you\"re on a PlayStation website, this option might be labeled as \"Log In\" instead.
- On the Sign-in page, you will find an option to create a new account if you do not already have one. Look for a button or link that says \"Create a New Account\" or \"Sign Up.\"
Finding and using the \"Sign-in\" or \"Log In\" feature is crucial as it directs you to where you can officially start the account creation process. This step is straightforward but essential in accessing the full suite of Sony\"s or PlayStation\"s services and products.
Step 4: Select \"Create a New Account\" and Follow On-screen Instructions
Creating your Sony account is a straightforward process. Once you\"ve navigated to the \"Sign-in\" page, you\"re only a few steps away from accessing a world of entertainment and services.
- Click on the \"Create a New Account\" button. This may be presented as \"Sign Up\" on some regional websites.
- You will be prompted to enter your personal information. This typically includes your name, date of birth, and email address. Ensure the accuracy of this information as it will be crucial for account recovery and verification purposes.
- Set up your login credentials. Choose a strong password to secure your account. Some sites may also ask you to create a unique username or use your email as the login ID.
- Agree to the terms and conditions. Make sure to read through these carefully to understand the usage policies and privacy terms associated with your account.
- Verify your email address. Sony will send a verification link to the email address you provided. Clicking on this link will confirm your email and activate your account.
Following these instructions carefully will ensure a smooth account setup process. Once completed, you\"re ready to enjoy the benefits of being a Sony account holder, including access to exclusive content, personalized services, and the latest updates.
:max_bytes(150000):strip_icc()/011_create-a-playstation-network-account-4103872-5bc7a4e5c9e77c00517f0505.jpg)
_HOOK_
Step 5: Account Types - Master and Sub Accounts
Sony offers two main types of accounts to cater to different users: Master Accounts and Sub Accounts. Understanding the difference between these two is crucial for managing access and control within the Sony ecosystem.
- Master Account: This is the standard account type designed for users who meet the minimum age requirement, which varies by country. Master account holders have full access to all Sony services, including the ability to purchase content, manage payment methods, and create Sub Accounts for minors.
- Sub Account: Intended for younger users under the age of the country\"s minimum requirement, Sub Accounts must be created and managed by a Master Account holder. These accounts have restricted access to content and features, which can be adjusted by the Master Account holder.
To create a Sub Account, the Master Account holder must log in and follow the process for adding a new member, providing necessary details and setting appropriate restrictions based on content and spending limits.
- Navigate to the account management section under the Master Account.
- Select the option to create a Sub Account.
- Enter the required information for the new Sub Account user, including restrictions and permissions.
- Complete the setup process by verifying the new account through email confirmation.
Understanding these account types allows you to tailor your Sony experience to fit your family\"s needs, ensuring a safe and controlled environment for all users.
Create a PSN Account | Sign Up for PlayStation Network
Discover the ultimate gaming experience with a brand new PSN account! With seamless account creation, unlock a world of thrilling games, exclusive discounts, and online multiplayer – all at your fingertips. Watch our step-by-step video guide and start your gaming journey today!
How to Create PlayStation Account on Phone
Want to create a PlayStation account on your phone? Look no further! Our easy-to-follow video tutorial shows you how to set up your account in minutes. Join millions of gamers worldwide and experience the excitement of mobile gaming. Don\'t miss out, watch our video now!
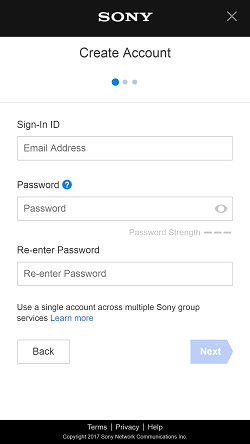
Step 6: Enter Personal Information During Sign-Up
Providing accurate personal information during the sign-up process is crucial for setting up your Sony account. This information helps in personalizing your experience and securing your account.
- Enter your Name: Provide your first and last name as it appears on your legal or official documents.
- Specify your Date of Birth: Your date of birth is required to verify your age. Sony offers different content and services based on the user\"s age, and in some cases, parental consent may be required for underage users.
- Provide a valid Email Address: Your email address will be used for account verification, communication, and recovery purposes. Ensure it is an email you regularly use and have access to.
- Choose your Country/Region: Select your country or region from the dropdown list to receive relevant information and services.
- Create a Password: Choose a strong and secure password for your account. It should be unique and not used for other online accounts.
- Set up a Security Question and Answer: This additional layer of security helps in verifying your identity during account recovery.
After entering all required information, review the terms of service and privacy policy, then proceed to verify your email address to complete the account creation process.
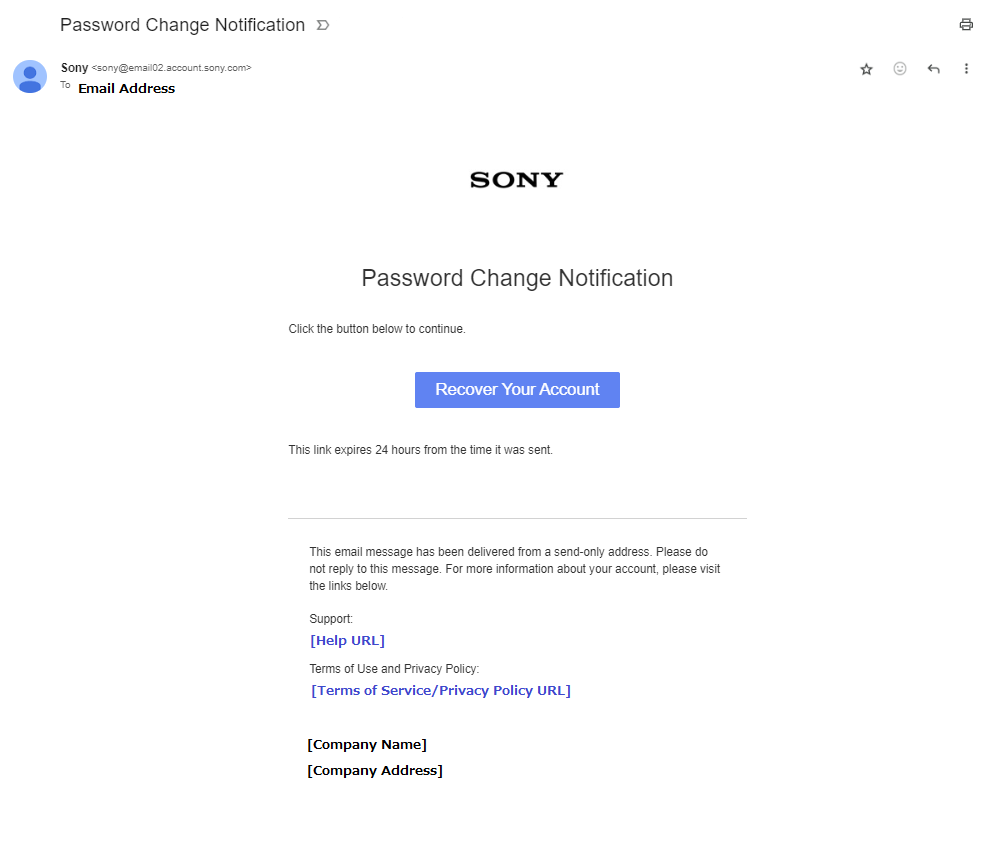
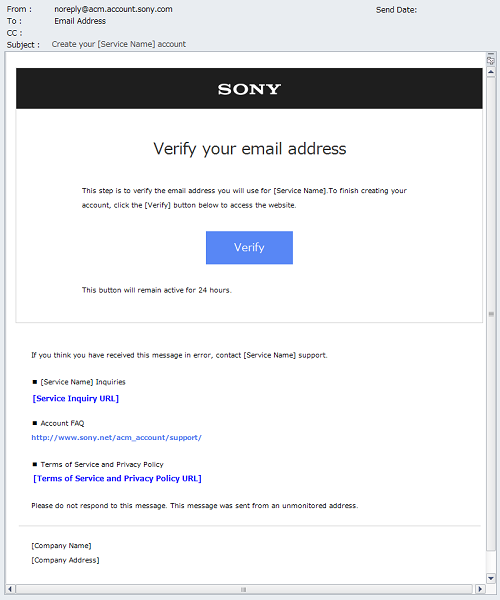
Step 7: Verify Your Email Address
Verifying your email address is a critical step in the Sony account creation process, as it ensures your account security and enables you to recover your account if needed.
- Check your email inbox for a verification email from Sony. This email should arrive shortly after you complete the registration form.
- Open the email and look for the verification link. The email will typically include instructions or a button saying \"Verify Email\" or \"Activate Account.\"
- Click on the verification link or button. This action will open a new tab or window in your browser confirming that your email address has been verified.
- If you do not see the email in your inbox, check your spam or junk mail folder. Some email services may mistakenly filter verification emails.
- If you still cannot find the verification email, there is usually an option to resend the email on the Sony account sign-in page. Use this feature as a last resort.
Once your email address is verified, your Sony account is active, and you can start using Sony\"s services and products. Email verification is a one-time process but crucial for maintaining the security of your account.
:max_bytes(150000):strip_icc()/004_create-a-playstation-network-account-4103872-5a829ac79044424097b761e55aacac8a.jpg)
Step 8: Manage Your Account - Product Registration and Service Requests
After creating your Sony account and verifying your email, the next step is to manage your account effectively. This includes registering your Sony products and submitting service requests when needed. Here’s how to navigate these processes:
- Product Registration:
- Log in to your Sony account and navigate to the \"My Products\" section.
- Click on \"Register a New Product\" and enter the product’s serial number, purchase date, and other required information.
- Product registration can help you receive tailored support, warranty services, and updates specific to your registered products.
- Service Requests:
- If your Sony product needs repair or service, you can initiate a service request from your account.
- Go to the \"Support\" or \"Service Requests\" section and select the product that requires attention.
- Follow the prompts to describe the issue and submit your request. You may need to provide purchase information or warranty details, depending on the service.
Managing your Sony account effectively allows you to maximize the benefits of your Sony products, ensuring you have access to support, updates, and warranty services when needed. Keep your account information up to date to enjoy a seamless Sony experience.
Step 9: Setting Up Family Management for Sub Accounts
Family Management on Sony platforms allows Master Account holders to create and manage Sub Accounts for family members, providing a safe and controlled environment for younger users. Here’s how to set it up:
- Log into your Sony account with your Master Account credentials.
- Navigate to the \"Family Management\" or \"Parental Controls\" section in the account settings.
- Select \"Add a Family Member\" and choose \"Create a New User\" to set up a new Sub Account. If the user already has a Sony account, you can select \"Add an Existing User.\"
- Follow the on-screen instructions to enter the necessary details for the Sub Account, including name, date of birth, and setting appropriate parental controls.
- Customize the parental control settings to restrict content, spending limits, and playtime according to the age and maturity level of the Sub Account user.
- Complete the process by agreeing to the terms and conditions, then verify the email address associated with the Sub Account if required.
Setting up Family Management ensures that children enjoy a safe gaming and entertainment experience tailored to their age. It allows parents to monitor activity, manage spending, and control access to content, providing peace of mind.
_HOOK_
READ MORE:
Step 10: Upgrading a Sub Account to a Master Account
When a user of a Sub Account reaches the age of majority according to their country’s standards, they can upgrade their account to a Master Account. This upgrade grants full access to Sony\"s services without the restrictions of a Sub Account. Here’s how to complete this transition:
- Log into the Sub Account that you wish to upgrade.
- Navigate to the account settings or profile page, where you\"ll find an option to \"Upgrade Account\" or \"Become a Master Account Holder.\"
- Click on this option, and you\"ll be prompted to verify your age. This typically requires entering a credit card number or other forms of identification, depending on your region\"s verification process.
- Follow the on-screen instructions to provide the necessary information and agree to any updated terms and conditions for Master Account holders.
- Once the verification process is complete, the account will be upgraded. You\"ll now have the ability to make purchases, adjust parental controls, and manage other settings that were previously restricted.
Upgrading to a Master Account is a significant milestone for younger users, providing them with independence while ensuring they continue to enjoy Sony\"s digital services safely and responsibly.
Creating a Sony account opens the door to a world of entertainment and personalized experiences. Follow these easy steps to embark on an exciting digital journey, unlocking exclusive content, and maximizing your enjoyment of Sony\"s products and services.