Topic sony vegas how to speed up a clip: Discover the secrets to transforming your videos with Sony Vegas as we guide you on how to speed up a clip, enhancing your editing prowess and captivating your audience.
Table of Content
- How to speed up a clip in Sony Vegas?
- Overview of Speed Adjustment Methods
- Method 1: Changing Playback Rate
- Method 2: Using the Ctrl-trim Technique
- Method 3: Inserting a Velocity Envelope
- Method 4: Applying the Slow Motion Effect
- Advanced Tips for Precise Speed Control
- YOUTUBE: Speed Up Video in Sony Vegas - Tutorial
- Common Issues and Solutions When Speeding Up Clips
- Optimizing Project Settings for High-Speed Playback
- FAQs: Addressing User Queries on Speed Adjustments
How to speed up a clip in Sony Vegas?
To speed up a clip in Sony Vegas, you can follow these steps:
- Select the clip you want to speed up in the timeline.
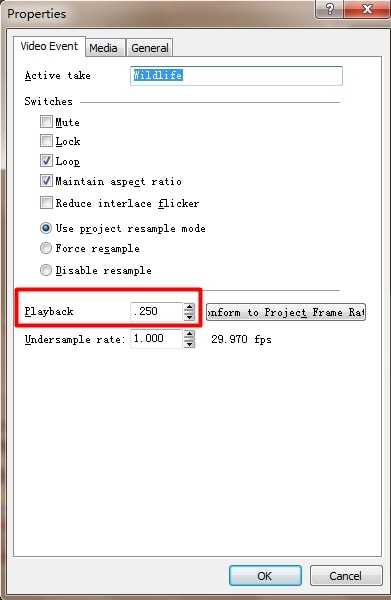
- Right-click on the clip and choose \"Properties\" from the context menu.
- In the \"Event Pan/Crop\" window that appears, make sure the \"Video Event FX\" tab is selected.
- Under the \"Event\" tab, you\'ll find a \"Playback Rate\" option.
- Adjust the playback rate value to increase the speed of the clip. For example, if you set it to 2.0, the clip will play at double the speed.
- Click \"OK\" to apply the changes.
Overview of Speed Adjustment Methods
Speeding up a clip in Sony Vegas offers multiple methods to achieve your desired pace, enhancing both the visual and narrative impact of your project. Understanding these techniques allows for creative flexibility and precision in editing.
- Changing Playback Rate: Directly adjust the clip\"s playback speed in the project media or timeline for quick modifications.
- Ctrl-trim Technique: A simple yet effective method for speeding up footage by dragging the clip\"s edge while holding the Ctrl key.
- Velocity Envelope: Add a velocity envelope to your clip for granular control over speed changes at different points within the clip.
- Slow Motion Effect: Although primarily for slowing down, this effect can be creatively repurposed for speeding up clips under certain conditions.
Each method has its unique advantages, catering to various editing scenarios. Whether you\"re looking to make slight adjustments or significant speed alterations, Sony Vegas equips you with the tools necessary for dynamic video editing.
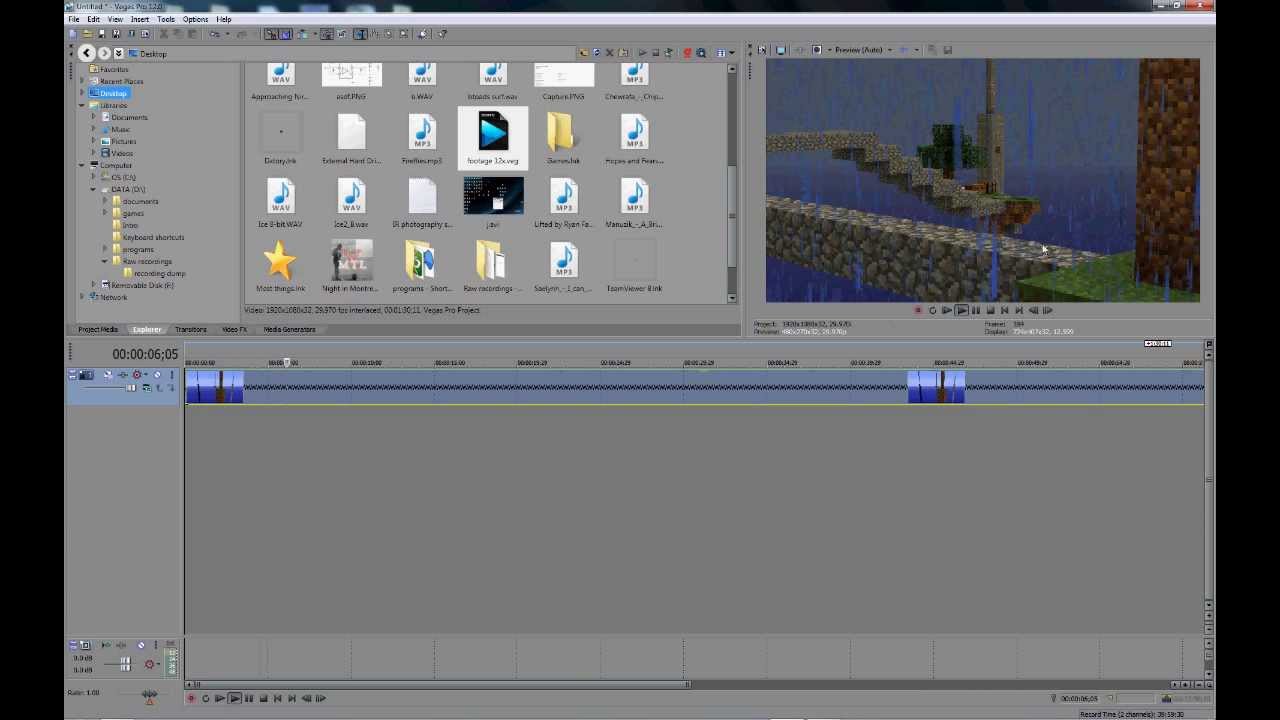
Method 1: Changing Playback Rate
Altering the playback rate is a straightforward method to speed up a clip in Sony Vegas. This technique allows for quick adjustments directly affecting the clip\"s speed, making it ideal for efficiently achieving your desired outcome.
- Right-click on the clip: In your project timeline, right-click on the clip you wish to speed up.
- Select Properties: From the context menu that appears, select \"Properties\".
- Adjust Playback Rate: In the Properties window, locate the \"Playback rate\" option. Increase the value to speed up the clip. The higher the number, the faster the playback speed.
- Preview the change: Close the Properties window and play your timeline to preview the speed change. Adjust as necessary until the desired speed is achieved.
This method is best used for uniform speed changes throughout the clip. It’s a quick and effective way to alter the pace of your video, whether you\"re looking to create a fast-forward effect or simply shorten the duration of a clip without cutting content.

Method 2: Using the Ctrl-trim Technique
The Ctrl-trim technique in Sony Vegas is a quick and effective way to speed up your video clips. This method involves using keyboard shortcuts and the mouse to adjust the speed directly on the timeline, providing an intuitive and straightforward approach to editing.
- Select the clip: Click on the video clip in your timeline that you want to speed up.
- Hold down Ctrl: Move your cursor to the end of the clip. Hold down the Ctrl key on your keyboard.
- Trim the clip: While holding the Ctrl key, click and drag the end of the clip towards the beginning. You\"ll notice the clip\"s length shortening, which indicates an increase in speed. The more you trim, the faster the playback speed.
- Preview your adjustment: Let go of the Ctrl key and play the clip to review the speed change. Continue adjusting until you achieve the desired speed.
This method is particularly useful for making quick speed adjustments without navigating through menus. It allows for precise control over the speed of individual sections of a clip, making it a favorite among editors for its simplicity and effectiveness.

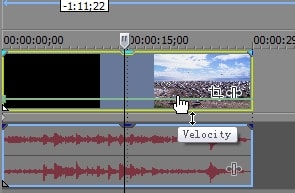
Method 3: Inserting a Velocity Envelope
Inserting a velocity envelope in Sony Vegas allows for detailed control over the speed of your clip at different points, enabling dynamic speed changes within a single clip. This method is ideal for creating smooth transitions between different speeds.
- Open the clip in the timeline: Right-click on the clip you want to adjust and choose \"Insert/Remove Envelope\" > \"Velocity\".
- Add velocity points: Double-click on the velocity envelope line to add points. Position these points where you want the speed changes to occur.
- Adjust the speed: Drag the points up to increase speed (up to 300% for fast motion) or down to decrease speed (down to 0% for a freeze frame). You can create smooth speed transitions by adjusting the slope of the line between two points.
- Preview and refine: Play back the clip to see the effect of the velocity changes. Continue to adjust the points as needed until you achieve the desired speed effect.
This technique offers precise control over the pacing of your video, allowing for creative effects such as speed ramps. It\"s particularly useful for highlighting specific moments or creating a dramatic buildup in your footage.
_HOOK_
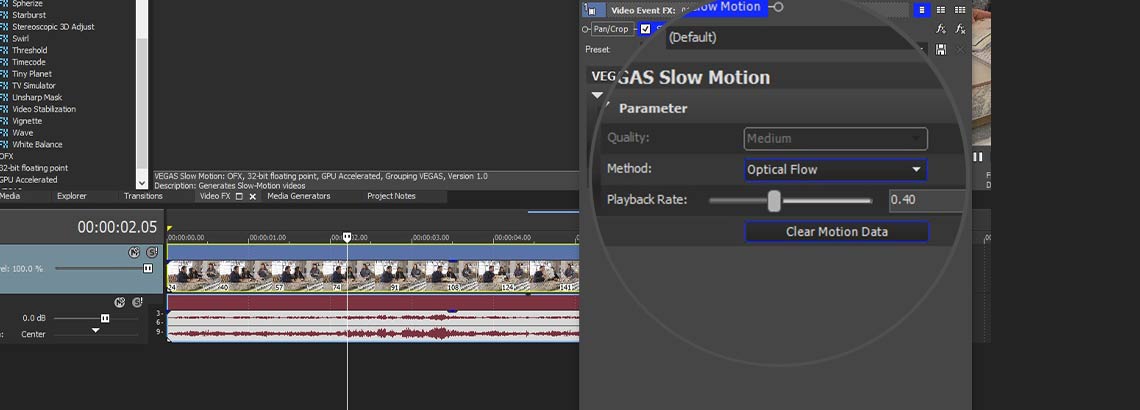
Method 4: Applying the Slow Motion Effect
Though it may seem counterintuitive, the slow motion effect in Sony Vegas can also be adapted to speed up your clips. This method involves manipulating the properties of your video to achieve a faster playback without directly adjusting the clip\"s speed.
- Access the Video Event FX: Right-click on your clip in the timeline and select \"Video Event FX\".
- Choose Slow Motion: From the list of effects, select the \"Slow Motion\" option. Despite its name, you can use this effect to increase the speed of your clip.
- Adjust to Speed Up: In the slow motion effect settings, adjust the speed percentage over 100% to speed up your clip. Values greater than 100% will accelerate the clip\"s playback speed.
- Preview and Adjust: After applying the adjustments, preview your clip to ensure the speed is as desired. You can go back and tweak the settings if necessary.
This technique is particularly useful for creating a fast-paced effect while maintaining smooth motion, making it ideal for highlighting action sequences or creating a stylized video aesthetic.
Advanced Tips for Precise Speed Control
For editors looking to refine their speed adjustments in Sony Vegas, mastering advanced techniques can significantly enhance the precision and creativity of your edits. Here are some expert tips:
- Keyframe Editing for Velocity Envelopes: Utilize keyframe editing within velocity envelopes to create custom speed ramps. This allows for smooth transitions from one speed to another.
- Combine Methods for Complex Edits: Don\"t hesitate to combine different speed adjustment methods (e.g., playback rate and velocity envelopes) for more complex and dynamic edits.
- Use Nesting for Repeated Speed Changes: If you need to apply multiple speed changes to the same clip, consider nesting your clips. This allows you to apply additional effects and speed adjustments without affecting the original edit.
- Adjust Audio Properties: Remember to adjust audio properties to match your video speed changes. This may include pitch correction or synchronization for dialogue and music.
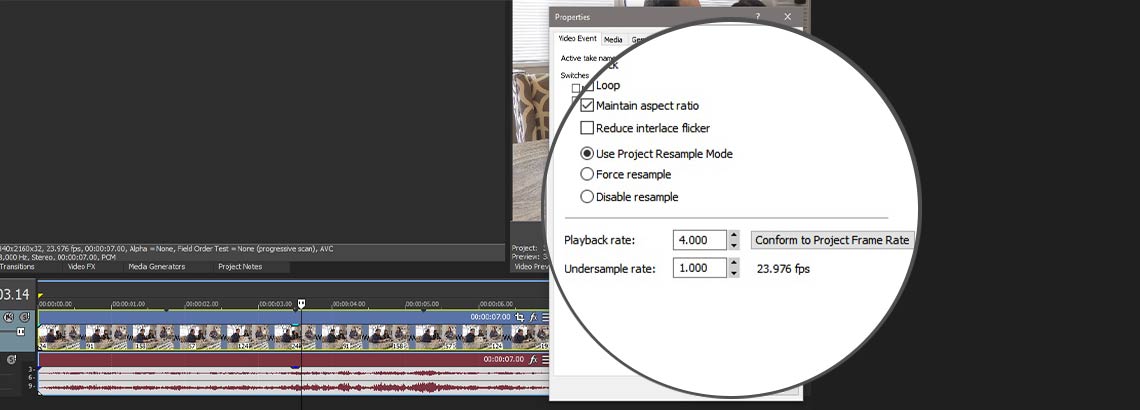
- Experiment with Resampling: Disable resampling for clips that have been significantly sped up to avoid ghosting or blurry frames, ensuring a crisper final product.
By incorporating these advanced techniques, you can achieve precise control over the pacing of your videos, allowing for more creative and impactful storytelling.
Speed Up Video in Sony Vegas - Tutorial
Tutorial: Want to master a new skill? This tutorial video will guide you step-by-step, making it easy for you to learn and implement new techniques. Don\'t miss out on this opportunity to expand your knowledge!
Speed Up and Slow Down Video - Vegas Pro 16 - 2018
Vegas Pro 16: Ready to take your video editing to the next level? Discover the incredible features and capabilities of Vegas Pro 16 in this mind-blowing video. Unleash your creativity and create professional-quality videos like never before.
Common Issues and Solutions When Speeding Up Clips
When working with Sony Vegas to speed up clips, editors often encounter a few common issues. Here are solutions to effectively address them:
- Issue: Loss of Video Quality: Speeding up clips can sometimes reduce video quality. Solution: Ensure you\"re working with the highest quality source material. Consider rendering settings that prioritize quality over file size.
- Issue: Audio Pitch Changes: Speed adjustments can affect the audio pitch. Solution: Use the \"Preserve Pitch\" option in Sony Vegas or adjust pitch manually in the audio event properties to maintain the original pitch.
- Issue: Choppy Playback: High-speed playback may result in choppy or uneven video. Solution: Disable resampling for the sped-up clip to prevent blending frames, which can cause this issue.
- Issue: Syncing Issues with Audio: Speed changes can desynchronize audio and video. Solution: Separate the audio from the video before making speed adjustments and then realign them manually.
- Issue: Not Achieving Desired Speed: Sometimes, the maximum speed increase is not sufficient. Solution: Combine methods, such as first adjusting the playback rate and then applying a velocity envelope for further speed increase.
Addressing these common issues ensures a smoother editing process and enhances the overall quality of your sped-up clips in Sony Vegas.
Optimizing Project Settings for High-Speed Playback
Optimizing your Sony Vegas project settings can greatly improve the playback performance of high-speed clips, ensuring smooth viewing and editing experiences. Follow these steps to fine-tune your project for optimal performance:
- Match Project Video Properties: Ensure your project\"s video properties match your footage\"s frame rate and resolution. This reduces the need for Sony Vegas to perform additional processing, enhancing playback speed.
- Enable GPU Acceleration: Go to Options > Preferences > Video, and if available, enable GPU acceleration. This offloads some processing tasks from your CPU to your GPU, improving overall performance.
- Adjust Preview Quality: Lower the preview quality to draft or preview mode while editing to reduce the strain on your system, allowing for smoother high-speed playback.
- Pre-Render Work Sections: Use the loop region to select parts of your timeline and pre-render them (Shift + B). This can help in reviewing high-speed sections more smoothly.
- Manage Media Bins Efficiently: Keep your project organized and avoid overloading media bins with unused clips. This can help Sony Vegas to run more smoothly by reducing the amount of data it needs to manage.
By carefully adjusting these settings, you can significantly enhance the efficiency of high-speed playback in Sony Vegas, ensuring a more productive editing workflow.
FAQs: Addressing User Queries on Speed Adjustments
When adjusting the speed of clips in Sony Vegas, users commonly have several questions. Here are some of the most frequently asked questions and their answers:
- Can I speed up a clip without affecting its audio pitch? Yes, you can maintain the original audio pitch by using the \"Preserve Pitch\" option in Sony Vegas when speeding up or slowing down a clip.
- How can I achieve a speed greater than 4x in Sony Vegas? To speed up a clip beyond the default maximum, you can use the velocity envelope to increase speed up to 1,000%, or render the clip at a higher speed and re-import it for additional speed adjustments.
- Is it possible to speed up just a portion of a clip? Absolutely. By applying a velocity envelope to your clip, you can create points to adjust the speed at different sections of your clip, allowing for variable speed changes within the same clip.
- Why does my video look choppy after speeding it up? This can happen due to frame blending or insufficient frame rates. Disabling resample on the sped-up clip or ensuring your project frame rate matches your output needs can help smooth out playback.
- How do I reset a clip to its original speed after adjustments? You can reset speed adjustments by right-clicking on the clip, selecting \"Properties\", and then resetting the playback rate to 1.00, or by removing any applied velocity envelopes.
These FAQs aim to solve common issues and provide helpful tips for optimizing your speed editing process in Sony Vegas.
Mastering the art of speeding up clips in Sony Vegas can elevate your video projects to new heights. Embrace these techniques for dynamic storytelling and captivate your audience with engaging, high-paced visuals.
_HOOK_