Topic sony car radio wiring diagram: Discover the essentials of Sony car radio wiring diagrams with our expert guide, simplifying installation and ensuring a smooth audio experience in your vehicle.
Table of Content
- How to install a Sony car stereo or mobile audio system and connect the wired remote control?
- Understanding Sony Car Radio Wiring Harnesses
- Color Codes and Functions for Sony Car Radio Wires
- YOUTUBE: Car Stereo Wiring Harnesses & Interfaces Explained: What Do The Wire Colors Mean?
- Step-by-Step Guide to Wiring Your Sony Car Radio
- Common Issues and Troubleshooting Wiring Connections
- Tools and Materials Needed for Sony Car Radio Installation
- Connecting Speakers, Amplifiers, and Other Components
- FAQs: Tips and Advice for Sony Car Radio Wiring
How to install a Sony car stereo or mobile audio system and connect the wired remote control?
To install a Sony car stereo or mobile audio system and connect the wired remote control, follow these steps:
- Start by gathering all the necessary tools and equipment, including a Sony car stereo or mobile audio system, a wired remote control, a wire harness adapter, wire strippers, crimp connectors, electrical tape, and a wrench or socket set.
- Disconnect the negative terminal of the car battery to ensure safety during the installation process.
- Remove the existing car stereo by using the appropriate tools to unscrew and detach the mounting brackets, trim panels, and wiring connections. Refer to your car\'s specific instructions or consult a professional if needed.
- Connect the wire harness adapter to the car\'s wire harness. Match the color-coded wires from the adapter to the corresponding wires on the car stereo\'s wire harness. Strip the ends of each wire and use crimp connectors to secure them together. Use electrical tape to cover and protect the connections.
- Secure the Sony car stereo into the dash using the provided mounting brackets and screws. Ensure that it is properly aligned and tight.
- Connect the wired remote control to the car stereo. Refer to the user manual of your specific Sony car stereo model to locate the appropriate connection port for the wired remote control.
- Plug the wired remote control into the designated port on the car stereo. Ensure that it is firmly connected and locked in place.
- Reconnect the car battery\'s negative terminal to restore power.
- Turn on the Sony car stereo or mobile audio system and test the functionality of the wired remote control. Adjust the volume, change tracks, or perform any desired actions to ensure that the connection is successful.
This step-by-step guide should help you install a Sony car stereo or mobile audio system and connect the wired remote control. Make sure to follow the instructions provided with your specific model and consult professional assistance as needed.
READ MORE:
Understanding Sony Car Radio Wiring Harnesses
Wiring harnesses are crucial for connecting your Sony car radio to your vehicle\"s electrical system without the need for cutting or splicing factory wiring. Each wire in the harness has a specific purpose, from powering the unit to connecting speakers and external devices.
- Power Wires: Typically red for switched power and yellow for constant power, ensuring your radio retains settings after turning off the engine.
- Ground Wire: Usually black, this wire is essential for a safe and stable connection to your car\"s grounding system.
- Speaker Wires: These are color-coded pairs representing each speaker location in your vehicle, crucial for proper audio distribution.
- Antenna Wire: A blue or blue/white wire that connects to your vehicle\"s antenna for radio reception.
- Amplifier Turn-On Wire: Also typically blue or blue/white, signals your external amplifier to turn on when the radio is powered up.
- Accessory Wires: These can include connections for steering wheel audio controls, external amplifiers, and other auxiliary inputs.
Understanding these connections is key to a successful installation, ensuring your Sony car radio operates seamlessly with your vehicle\"s audio system.

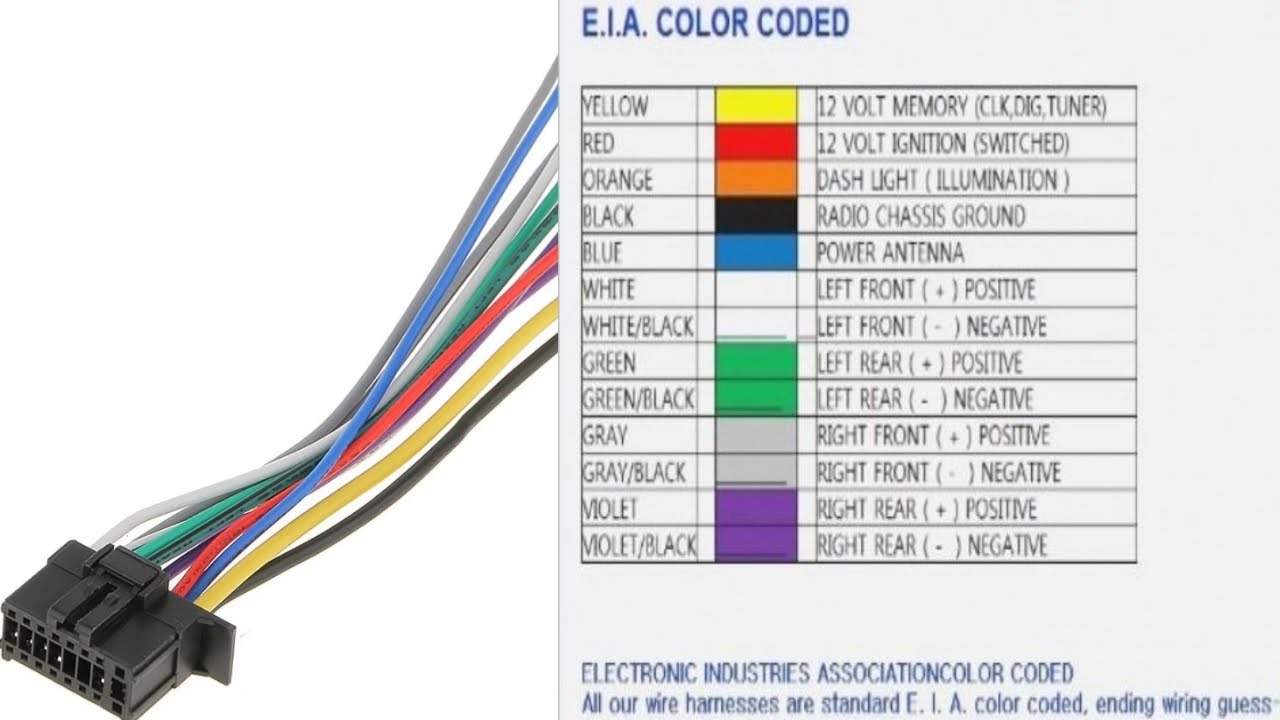
Color Codes and Functions for Sony Car Radio Wires
Understanding the color codes of Sony car radio wires is essential for a proper installation. Each color represents a specific function, making it easier to connect your radio to your vehicle\"s system.
| Wire Color | Function |
| Red | Switched 12V Power (ignition) |
| Yellow | Constant 12V Power (memory) |
| Black | Ground |
| Blue | Antenna Power |
| Blue/White Stripe | Amplifier Turn-On Signal |
| White | Left Front Speaker (+) |
| White/Black Stripe | Left Front Speaker (-) |
| Gray | Right Front Speaker (+) |
| Gray/Black Stripe | Right Front Speaker (-) |
| Green | Left Rear Speaker (+) |
| Green/Black Stripe | Left Rear Speaker (-) |
| Purple | Right Rear Speaker (+) |
| Purple/Black Stripe | Right Rear Speaker (-) |
This table outlines the basic wiring color codes for most Sony car radios, aiding in the correct identification and connection of wires during installation.
Car Stereo Wiring Harnesses & Interfaces Explained: What Do The Wire Colors Mean?
\"Discover the seamless connection with our top-notch wiring harnesses! Learn how our high-quality, easy-to-install harnesses ensure optimal performance and eliminate any wiring hassle. Watch our video to transform your car\'s electrical system effortlessly!\"
Sony Double DIN Receiver Install (Part 1): Car Stereo Wiring Explained - How to Video
\"Upgrade your car\'s audio experience with our cutting-edge Double DIN receiver! Immerse yourself in crystal-clear sound and enjoy advanced features like touchscreen controls and Bluetooth connectivity. Check out our video to unlock a world of entertainment and convenience in your vehicle!\"
Step-by-Step Guide to Wiring Your Sony Car Radio
- Gather Your Tools: Ensure you have a wiring harness adapter, wire strippers, crimping tools, and electrical tape.
- Disconnect the Battery: Always start by disconnecting the car battery to avoid any electrical issues.
- Remove the Existing Radio: Use the appropriate tools to carefully remove the existing car radio from the dashboard.
- Prepare the Wiring Harness: If using a harness adapter, connect it to the car\"s wiring harness. Match the wire colors from the adapter to the car\"s harness.
- Connect the Sony Radio Wires: Match and connect the wire colors from the Sony radio to the wiring harness adapter. Use crimp connectors or solder for a secure connection.
- Ground the Radio: Ensure the black wire (ground) from the Sony radio is securely connected to the car\"s frame or ground wire in the harness.
- Connect the Antenna: Attach the antenna wire from the car to the Sony radio for radio reception.
- Test the Connections: Before fully installing the radio, reconnect the battery and test all functions (power, speakers, controls).
- Secure the Radio in the Dashboard: Once tested, securely mount the Sony radio in the dashboard and reassemble any removed panels.
- Final Testing: Perform a final test to ensure all functions are working correctly, including sound quality and radio reception.
Following these steps will ensure a successful installation of your Sony car radio, providing you with enhanced audio quality and functionality.

Common Issues and Troubleshooting Wiring Connections
- No Power to the Radio: Check the fuse box for any blown fuses, and ensure the red (switched power) and yellow (constant power) wires are correctly connected.
- Poor Radio Reception: Verify the antenna wire is properly connected. If using an aftermarket antenna, ensure it\"s compatible and well-grounded.
- Radio Turns Off Unexpectedly: This may be due to a loose connection. Check the ground wire (black) is securely attached to a clean, metal part of the car\"s frame.
- Speakers Not Working or Only Partially Working: Double-check the speaker wires are correctly connected and not crossed. Inspect for any loose or damaged wires.
- Distorted Sound: This issue often arises from a ground loop. Ensure the radio and amplifier (if used) are grounded to the same point.
- Radio Does Not Save Settings: The yellow wire (constant power) should be connected to a source that receives power even when the car is off. Check this connection for issues.
- Steering Wheel Controls Not Working: If your Sony radio supports steering wheel controls, an additional adapter may be needed. Ensure it\"s correctly installed and programmed.
These common issues can often be resolved with careful inspection and adjustment of your wiring connections. For more complex problems, consulting a professional may be necessary.

_HOOK_
Tools and Materials Needed for Sony Car Radio Installation
- Wiring Harness Adapter: Facilitates the connection between your Sony radio and the car\"s wiring system without cutting any wires.
- Wire Stripper and Crimping Tool: Essential for preparing wires and securing connections, respectively.
- Soldering Iron (Optional): For those who prefer a more permanent connection than crimping.
- Electrical Tape or Heat Shrink Tubing: Provides insulation to exposed wires and connections, preventing short circuits.
- Screwdriver Set: Needed for removing and securing the radio unit and dash panel.
- Panel Removal Tool: Helps in safely removing dash panels and the existing radio without damaging the interior.
- Car Radio Removal Keys (if required): Some vehicles require specific tools to remove the factory radio.
- Antenna Adapter: Necessary if the Sony radio\"s antenna plug does not match the car\"s antenna cable.
- Dashboard Kit: Ensures the new radio fits perfectly into the space of the old unit, matching the car\"s interior.
Having the right tools and materials on hand is crucial for a smooth and successful Sony car radio installation process.

Connecting Speakers, Amplifiers, and Other Components
Integrating speakers, amplifiers, and other components with your Sony car radio enhances your audio system\"s performance. Follow these guidelines for a successful setup:
- Identifying Speaker Wires: Use the wiring diagram to identify speaker wire colors for correct pairing with the Sony radio\"s outputs.
- Connecting Front and Rear Speakers: Connect the speaker wires from the radio to the corresponding speakers, ensuring positive to positive and negative to negative connections.
- Integrating an Amplifier: If adding an amplifier, connect the Sony radio\"s pre-out RCA cables to the amplifier\"s input. Use the blue/white stripe wire from the radio for the amp\"s turn-on signal.
- Subwoofer Connection: For a subwoofer, use the radio\"s sub-out port if available. Otherwise, connect it to the amplifier designated for the subwoofer, adjusting settings for optimal bass.
- Adjusting Settings: Once all components are connected, adjust the Sony radio\"s settings for balance, fader, and equalizer to suit your listening preference.
- Testing the System: After all connections are made, test the system to ensure all components are working harmoniously. Adjust volumes and settings as needed for balanced sound.
Properly connecting speakers, amplifiers, and other components with your Sony car radio will elevate your in-car audio experience, providing you with crisp, clear, and powerful sound.

READ MORE:
FAQs: Tips and Advice for Sony Car Radio Wiring
- Can I install a Sony car radio without a wiring harness adapter? While possible, using a wiring harness adapter simplifies the installation process, ensures compatibility, and avoids voiding your car\"s warranty.
- What should I do if my car\"s wiring colors don\"t match the Sony radio? Refer to both your car\"s and the Sony radio\"s wiring diagram for accurate identification. When in doubt, consult a professional installer.
- How do I know if I need an antenna adapter? If the antenna cable from your car doesn\"t fit into the Sony radio\"s antenna input, you\"ll need an adapter that matches your car\"s connector type.
- What\"s the best way to secure wire connections? Crimping is recommended for a reliable connection, but soldering provides the most secure and long-lasting connection, followed by insulating with heat shrink tubing or electrical tape.
- How can I ensure the best sound quality from my Sony car radio? Proper grounding and using quality cables can significantly reduce noise. Additionally, adjusting the radio\"s built-in settings can optimize sound quality.
- Can I connect a backup camera to my Sony car radio? Yes, if your Sony radio model supports video input, you can connect a backup camera following the radio\"s installation guide for proper setup.
- What do I do if the Sony radio doesn\"t power on after installation? Check all connections, especially the power and ground wires. Also, verify that the fuse hasn\"t blown in either the car\"s fuse box or the radio\"s fuse holder.
These FAQs aim to address common concerns and provide useful tips for a successful Sony car radio wiring and installation, enhancing your overall experience and enjoyment of your car\"s audio system.
With this guide, mastering your Sony car radio installation becomes straightforward, ensuring a superior audio journey. Embrace these insights for a flawless setup and unparalleled listening experience in your vehicle.