Topic sony vegas render settings: Discover the optimal Sony Vegas render settings to elevate your video projects to professional quality, ensuring crisp, clear, and efficient video production every time.
Table of Content
- What are the recommended render settings for Sony Vegas?
- Understanding Sony Vegas Render Settings
- Best Render Settings for 1080p 60FPS
- Optimizing 4K Video Render Settings
- Utilizing GPU Acceleration for Faster Rendering
- Adjusting Bitrate for Quality and File Size
- Choosing the Right Format and Codec
- YOUTUBE: Sony Vegas Pro 16: Best Render Settings MP4 HD 1080p 60fps
- Customizing Frame Rate for Smooth Playback
- Enabling Full-Resolution Rendering Quality
- Disabling Resample Mode for Cleaner Output
- Tips for Rendering for YouTube and Vimeo
- Common Rendering Issues and How to Solve Them
What are the recommended render settings for Sony Vegas?
When it comes to rendering videos in Sony Vegas, there are some recommended settings to ensure high quality and smooth playback. Here\'s a step-by-step guide:
- Open Sony Vegas and go to the \"Project\" tab.
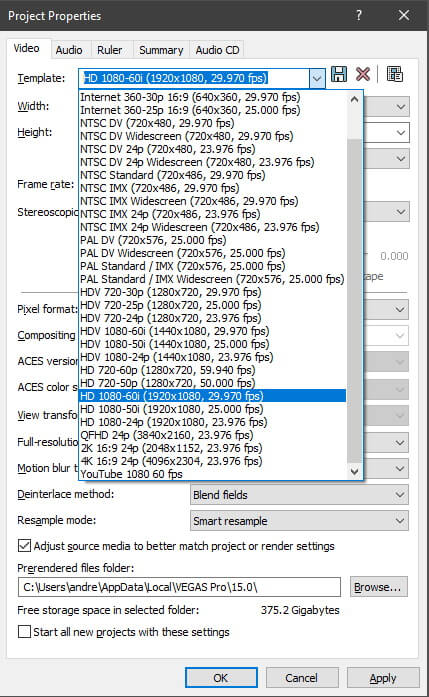
- Make sure the frame size is set to 1920x1080 for HD videos. You can adjust this setting by clicking on \"Properties\" in the \"Project\" tab and entering the desired dimensions.
- Ensure that the \"Allow source to adjust frame size\" option is unchecked. This setting prevents any automatic resizing of your video.
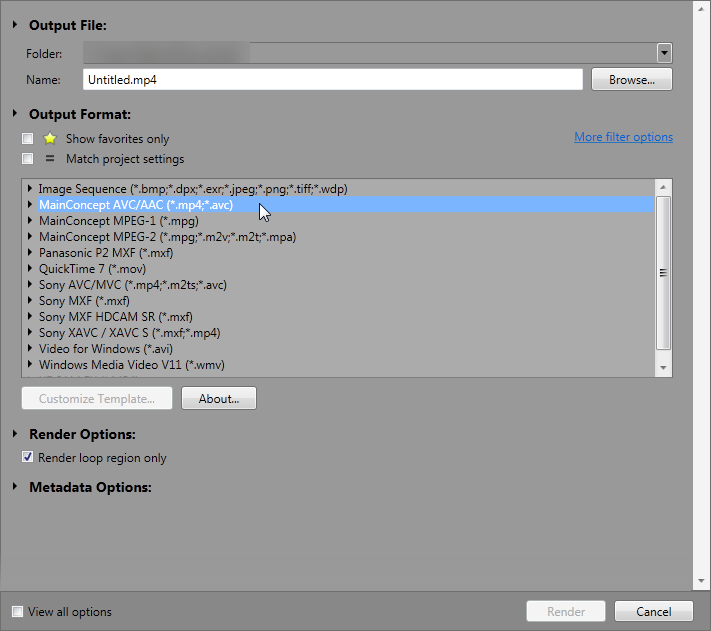
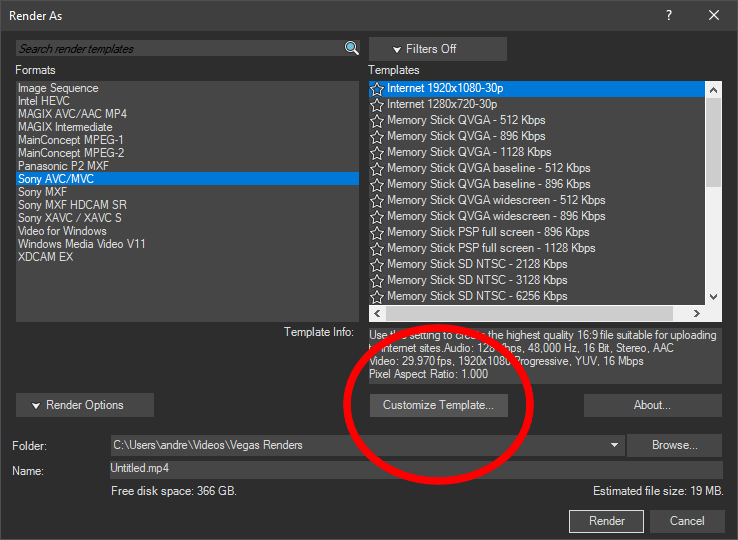
- In the \"File\" menu, click on \"Render As...\" to open the rendering options.
- Choose a video format that suits your needs. Popular formats include MP4, AVI, and WMV.
- Under the \"Template\" dropdown, select a preset that matches your desired output specifications. For example, you can choose \"Internet 1080p\" or \"YouTube 1080p\" for high-quality online videos.
- Adjust the video settings according to your preferences. You can customize parameters such as frame rate, bitrate, and audio settings.
- Specify the output file name and destination folder to save the rendered video.
- Click on the \"Render\" button to start the rendering process.
- Once the rendering is complete, you can find your video in the designated output folder.
By following these recommended render settings in Sony Vegas, you can ensure optimal video quality and compatibility for your desired output format or platform.
READ MORE:
Understanding Sony Vegas Render Settings
Mastering Sony Vegas render settings is crucial for video editors aiming to produce high-quality videos. The render settings in Sony Vegas allow you to customize the output format, resolution, frame rate, and more, ensuring your projects look their best.
- Format Selection: Choose the right format based on your project\"s destination. MP4 is versatile, while AVI offers high quality.
- Resolution: Match your project\"s resolution to its source footage for clarity, typically 1080p or 4K.
- Frame Rate: A higher frame rate, such as 60 fps, ensures smooth playback, especially for action-packed scenes.
- Bitrate: Adjusting the bitrate affects video quality and file size. A higher bitrate means better quality but larger files.
- Audio Settings: Don\"t neglect audio quality. A bitrate of 320 kbps is ideal for clear sound.
- GPU Acceleration: Utilize GPU acceleration to speed up rendering times without compromising quality.
Additionally, understanding the nuances of each setting, such as variable vs. constant bitrate or the implications of different codecs, can significantly impact the final product. Experimenting with these settings in relation to your specific project needs will help you achieve the best results.
Best Render Settings for 1080p 60FPS
For creators aiming to achieve smooth and clear high-definition videos, setting your project to render at 1080p 60FPS in Sony Vegas is ideal. This configuration ensures your videos have both high visual quality and fluid motion, perfect for gaming content, action scenes, or any project where clarity and detail are paramount.
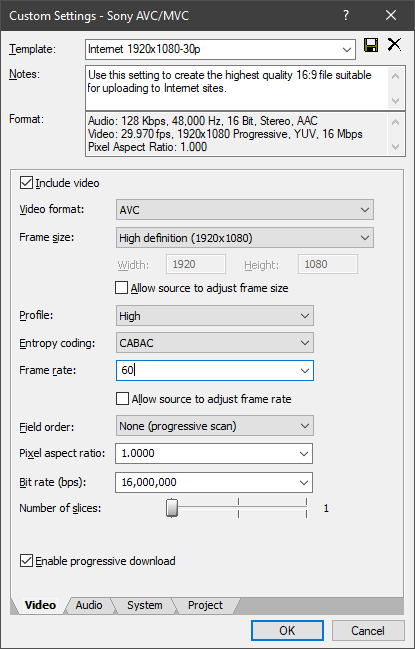
- Select the \"MainConcept AVC/AAC\" format for a balance of quality and file size.
- Under \"Template\", choose \"Internet HD 1080p\" to automatically set your video to 1080p.
- Modify the frame rate to 59.940 (double NTSC) or manually enter 60 FPS for smoother motion.
- Adjust the Bitrate settings to ensure video clarity. A higher bitrate, such as 16 Mbps for video and 192 Kbps for audio, is recommended.
- Enable \"Render using GPU if available\" to speed up the rendering process without sacrificing quality.
- Check the \"Project\" tab and ensure the video rendering quality is set to \"Best\".
Remember, rendering at higher settings like 1080p 60FPS will result in larger file sizes, so ensure you have sufficient storage and your playback platform supports these specifications. Adjusting these settings according to your specific needs and testing different configurations can help you find the perfect balance for your projects.
Optimizing 4K Video Render Settings
Rendering in 4K requires careful consideration of settings to balance quality with file size and rendering time. Here\"s how to optimize your Sony Vegas projects for 4K output, ensuring breathtaking clarity and detail without unnecessary resource expenditure.
- Select \"Sony XAVC S\" or \"MainConcept AVC/AAC\" from the format options for high-quality 4K output.
- Choose a template that supports 4K, such as \"XAVC S Long 4K Bitrate\", and customize it for your needs.
- Set your frame size to 3840x2160 for standard 4K resolution.
- Adjust the frame rate to 24 FPS for cinematic projects or 30 FPS for a balance of smooth motion and file size.
- Increase your video bitrate to at least 60 Mbps for crisp detail. For projects where quality is paramount, consider going higher.
- Ensure \"Render using GPU if available\" is selected to leverage hardware acceleration for faster rendering.
- Under \"Project\" settings, set video rendering quality to \"Best\" to maximize output detail.
Keep in mind that rendering in 4K significantly increases file sizes and rendering times. Make sure your hardware is up to the task, and consider your storage options and delivery method. Testing different settings can help you find the right balance for your specific project needs.
Utilizing GPU Acceleration for Faster Rendering
GPU acceleration can significantly reduce rendering times in Sony Vegas, allowing you to leverage the power of your graphics card to speed up the process. Here\"s how to enable and make the most out of GPU acceleration for your video projects.
- Go to \"Options\" > \"Preferences\" in Sony Vegas and locate the \"Video\" tab.
- Find the section labeled \"GPU Acceleration of Video Processing\" and select your graphics card from the dropdown menu.
- Click \"Apply\" to enable GPU acceleration. You may need to restart Sony Vegas for the changes to take effect.
- Ensure your project settings match your source media to minimize unnecessary processing.
- When rendering, choose formats and codecs that support GPU acceleration, such as \"MainConcept AVC/AAC\" or \"Sony AVC/MVC\".
- Adjust your render settings to balance quality and speed. Higher bitrates and resolutions will still take longer, but the overall time will be reduced.
Note that not all video effects and transitions are supported by GPU acceleration, and your results may vary depending on the power and compatibility of your graphics card. Upgrading your GPU drivers to the latest version can also help improve performance and stability.
_HOOK_
Adjusting Bitrate for Quality and File Size
Bitrate plays a crucial role in video rendering, affecting both the quality of your video and the size of the output file. Here\"s a guide to help you adjust the bitrate in Sony Vegas for the best balance between video quality and file size.
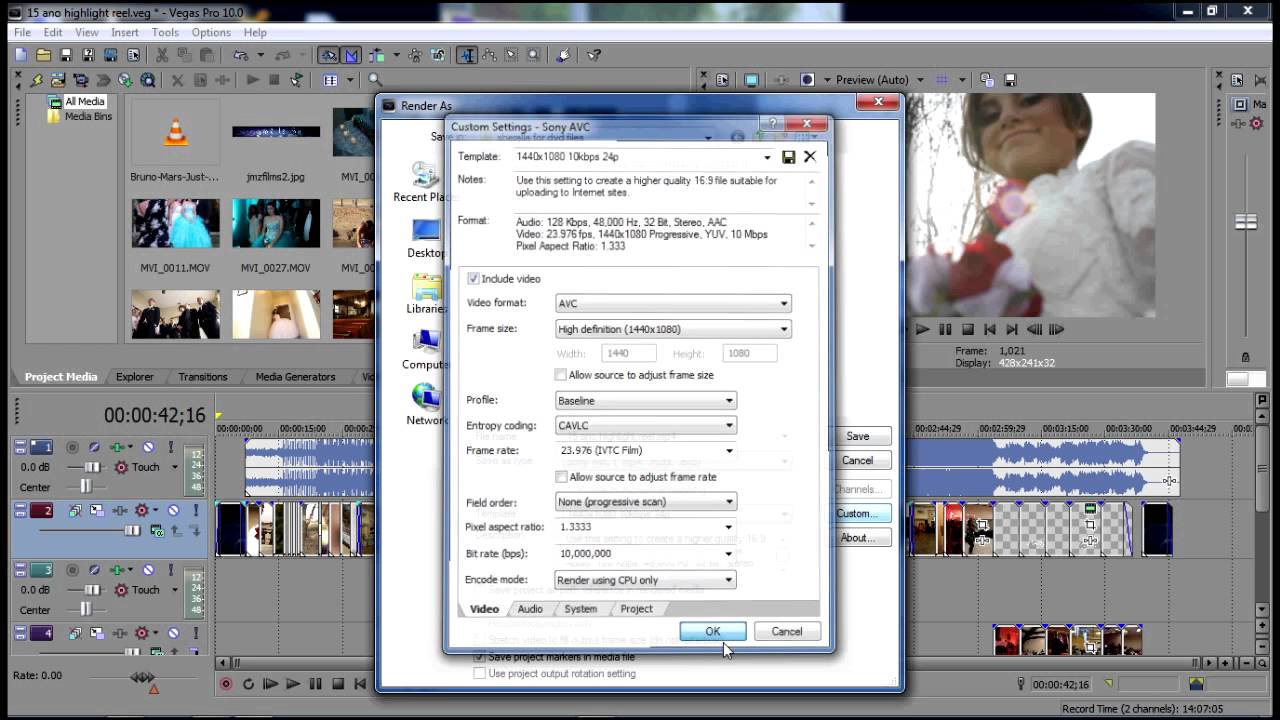
- Open the \"Render As\" dialog in Sony Vegas and choose your desired format.
- Click on \"Customize Template\" to access advanced settings.
- Locate the \"Bitrate\" settings within the \"Video\" tab of the customization window.
- For high-quality HD videos, a bitrate of 8-12 Mbps is recommended. For 4K, consider 40-60 Mbps or higher.
- To reduce file size for online sharing, you can lower the bitrate. For 1080p video, 5-8 Mbps can still provide acceptable quality.
- Use \"Two-pass\" encoding if available. It analyzes your video first to distribute bitrate more efficiently, enhancing quality without increasing file size.
- Adjust the audio bitrate as well. A setting of 192-320 Kbps is suitable for most projects.
Remember, the optimal bitrate depends on your project\"s requirements and the platforms where your video will be viewed. Testing different bitrate settings and viewing the results on various devices can help you find the perfect balance.
Choosing the Right Format and Codec
When rendering videos in Sony Vegas, selecting the appropriate format and codec is crucial for achieving the desired balance between quality, file size, and compatibility. Here’s how to make an informed choice:
- Understand the Difference Between Format and Codec:
- A format is the file type of your video (e.g., MP4, MOV), while a codec is the technology for compressing and decompressing the video and audio data within the file. Knowing the difference helps in choosing the right combination for your project.
- Choose a Format Based on Your Distribution Platform:
- For online platforms like YouTube or Vimeo, MP4 with H.264 codec is widely recommended for its balance of quality and compatibility. For professional use or archival, consider MOV or AVI for higher quality at the expense of larger file sizes.
- Consider the Codec for Quality and Performance:
- H.264 is great for general use, offering a good balance of compression and quality. For higher-end projects or 4K video, consider H.265/HEVC, which offers better compression efficiency, though it requires more processing power for encoding and decoding.
- Balance Quality and File Size:
- Higher bitrates mean better quality but also larger file sizes. Choose a codec that allows for adjustable bitrates. Experiment with different settings to find the right balance for your project.
- Check Compatibility:
- Ensure the selected format and codec are compatible with your distribution channels and playback devices. This is especially important when targeting diverse platforms or audiences.
- Utilize Sony Vegas’s Pre-Set Profiles:
- Sony Vegas provides pre-set profiles optimized for various uses, including online streaming, DVD, Blu-ray, and 4K. These can be a good starting point, especially for beginners.
In conclusion, selecting the right format and codec depends on your project\"s requirements, the intended audience, and where the video will be distributed. Always test different settings to see which works best for your specific needs.
Sony Vegas Pro 16: Best Render Settings MP4 HD 1080p 60fps
Discover the ultimate render settings for Sony Vegas Pro 16 that will take your videos to a whole new level of quality! This step-by-step tutorial will guide you through the process of rendering in MP4 HD 1080p 60fps, ensuring your footage looks breathtakingly smooth and professional.
VEGAS Pro 20: Best Render Settings For YouTube 1080p Tutorial 585
Calling all YouTube creators! Unleash the full potential of VEGAS Pro 20 with our comprehensive tutorial on the best render settings for YouTube. Learn how to optimize your videos for 1080p resolution, guaranteeing stunning visuals and maximum viewer engagement. Don\'t miss out on this game-changing tutorial!
Customizing Frame Rate for Smooth Playback
Ensuring smooth playback is a crucial aspect of video editing and production. The frame rate, or the number of frames displayed per second, plays a significant role in the perception of video smoothness. Here\"s how to customize frame rate in Sony Vegas for optimal playback:
- Determine Your Project\"s Frame Rate:
- Start by deciding the frame rate that suits your project. Common standards include 24 fps for a cinematic look, 30 fps for standard video, and 60 fps for smooth motion, ideal for sports and gaming content.
- Match Your Source Footage:
- For best results, set your project frame rate to match your source footage. This minimizes the need for conversion and prevents playback issues like judder or motion blur.
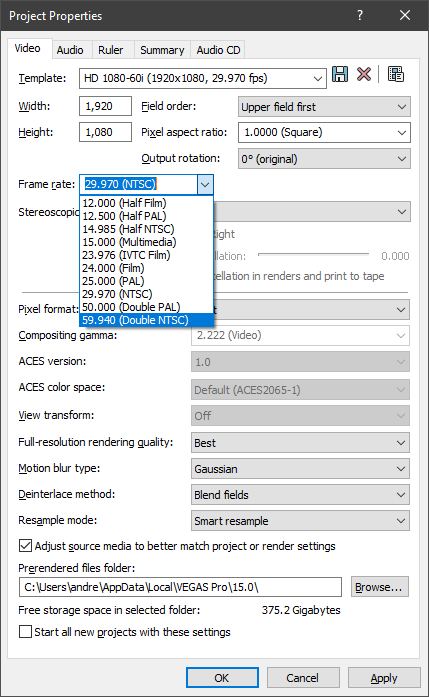
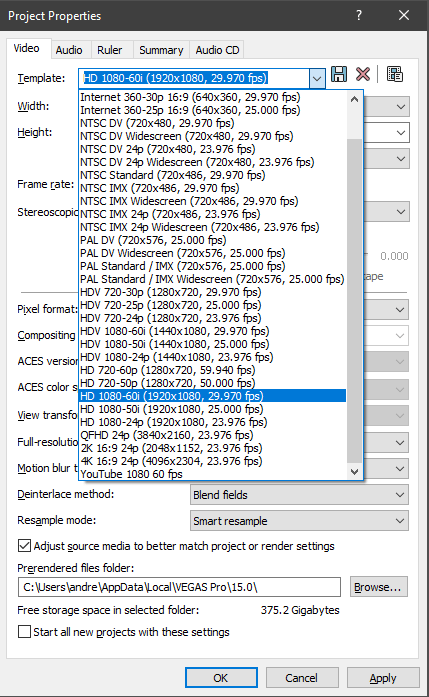
- Accessing Frame Rate Settings:
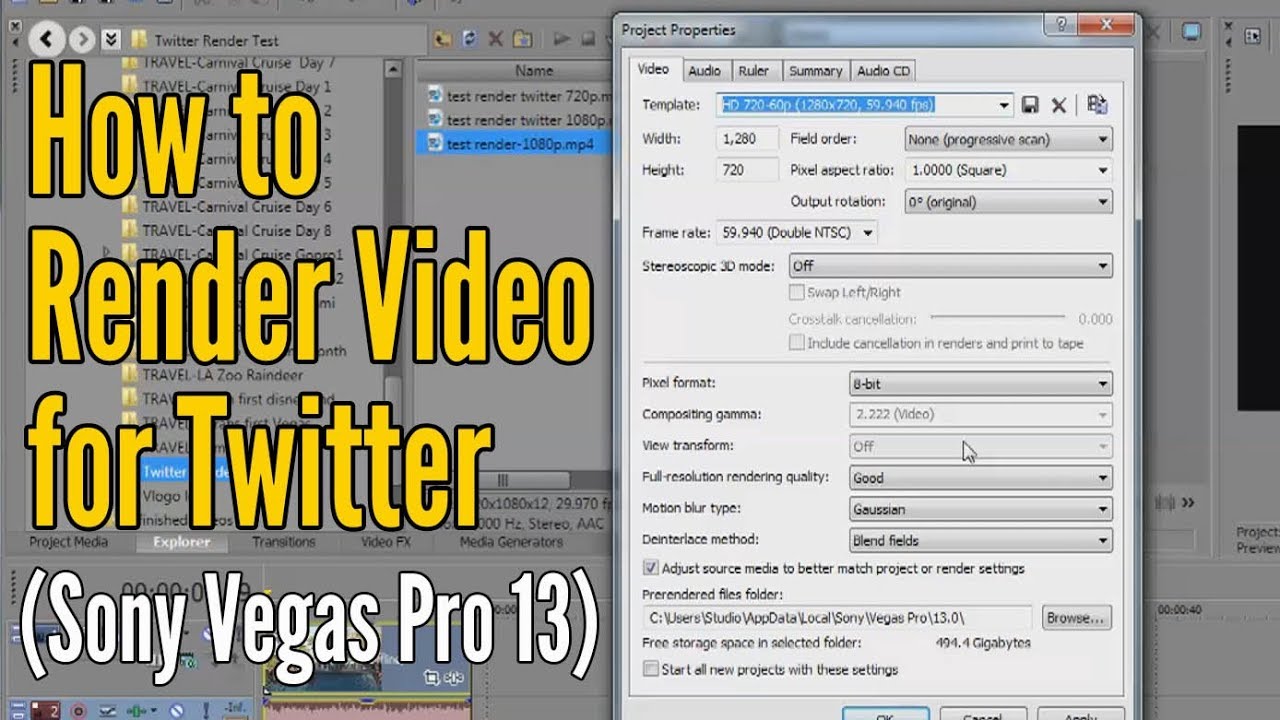
- In Sony Vegas, navigate to File > Properties to access the project properties. Here, you can set your desired frame rate under the \"Video\" tab, ensuring it aligns with your project\"s needs.
- Consider Your Distribution Platform:
- Different platforms may have specific requirements or recommendations for frame rate. For example, online platforms typically support a wide range of frame rates, but achieving the smoothest playback may depend on your audience\"s devices.
- Experiment with Interpolation:
- If you\"re converting frame rates, Sony Vegas offers options like \"Smart Resample\" and \"Disable Resample.\" Experiment with these settings on a clip-by-clip basis to see which provides the smoothest playback without unwanted artifacts.
- Test Before Final Render:
- Before rendering your entire project, export a short segment with your chosen frame rate settings. This allows you to verify playback smoothness and make any necessary adjustments.
Customizing frame rate is about balancing the artistic intent of your video with the technical requirements of your distribution platform and the capabilities of your audience\"s playback devices. By carefully selecting and testing your frame rate settings in Sony Vegas, you can ensure smooth, high-quality playback for your viewers.
Enabling Full-Resolution Rendering Quality
Maximizing the quality of your final video project in Sony Vegas involves ensuring that you render at full resolution. Full-resolution rendering ensures that your video outputs at the highest quality possible, reflecting the true detail and clarity of your work. Here\"s how to enable and utilize full-resolution rendering quality:
- Understand Project Properties:
- Begin by setting your project properties accurately. Go to File > Properties and ensure that your video width and height match your desired output resolution. Common resolutions include 1080p (1920x1080) and 4K (3840x2160).
- Choose the Correct Preview Quality:
- While editing, set your preview quality to \"Full\" to get a better sense of the final output. However, note that this may require more processing power, especially for high-resolution projects.
- Select the Appropriate Render Settings:
- When ready to render, select File > Render As and choose a format that supports your project\"s resolution. Verify the template settings to ensure they match or exceed your project\"s resolution and frame rate.
- Adjust Bitrate for Quality:
- Within the render settings, adjust the bitrate to achieve the best quality. Higher bitrates result in better quality but larger file sizes. For HD, bitrates between 8-12 Mbps are typical, while 4K projects may require 40-60 Mbps or higher.
- Enable Two-Pass Rendering:
- If available, choose two-pass rendering. This process analyzes your video in the first pass and then renders it in the second, optimizing quality and ensuring consistent playback.
- Check the \"Render using CPU only\" Option:
- While GPU acceleration can speed up rendering, using CPU-only rendering may improve output quality in some cases, especially when rendering complex effects or color grading.
- Preview Your Render Settings:
- Before finalizing your render, preview your settings to ensure that everything matches your quality expectations. Sony Vegas allows you to render a small portion of your project as a test.
Enabling full-resolution rendering quality in Sony Vegas is about understanding and adjusting your project and render settings to maximize output quality. By carefully selecting your resolution, bitrate, and rendering method, you can ensure that your final video meets your high-quality standards.
Disabling Resample Mode for Cleaner Output
Disabling the resample mode in Sony Vegas is an essential step for achieving cleaner, sharper video output. Resampling can sometimes cause unwanted blur or ghosting effects, especially when the frame rate of your project does not match your source footage. Here’s how to disable resample mode for a cleaner output:
- Select Your Footage:
- Start by importing your footage into Sony Vegas and adding it to your timeline. Click to select the clip or clips you want to adjust.
- Access Video Properties:
- Right-click on the selected clip(s) in the timeline, then choose \"Properties\" from the context menu to open the Video Event Properties window.
- Disable Resample:
- In the Video Event Properties window, look for a dropdown menu or option labeled \"Resample mode.\" Set this option to \"Disable resample\" or \"None.\" This action prevents Sony Vegas from applying any frame interpolation to the selected footage.
- Apply to All Footage:
- If you have multiple clips in your project, you can select all of them by pressing Ctrl+A (or Cmd+A on Mac), then right-click and follow the same steps to disable resample for the entire project. This ensures consistency across all your footage.
- Understand When to Disable Resample:
- Disabling resample is particularly beneficial when your project and source footage have the same frame rate. If you\"re working with mixed frame rates, consider adjusting your project settings or using resample selectively for clips that require it.
- Preview and Render:
- After disabling resample, preview your project to ensure that the video plays back as expected. If satisfied, proceed to render your project using your desired settings, and enjoy a cleaner, more precise output.
Disabling resample mode in Sony Vegas is a simple yet effective way to improve the visual quality of your video projects, eliminating unwanted artifacts and ensuring that your final product looks as sharp and clear as possible.
_HOOK_
Tips for Rendering for YouTube and Vimeo
Rendering videos for YouTube and Vimeo requires specific considerations to ensure your content looks its best on these platforms. Here are some tips to optimize your Sony Vegas render settings for YouTube and Vimeo:
- Choose the Right Format:
- Both YouTube and Vimeo recommend uploading videos in MP4 format with the H.264 codec. This format provides a good balance between quality and file size, making it ideal for online streaming.
- Optimize Video Bitrates:
- Follow the recommended bitrates provided by YouTube and Vimeo to ensure high-quality video. For 1080p HD video, aim for a bitrate between 8 Mbps and 12 Mbps. For 4K video, aim for a bitrate between 35 Mbps and 45 Mbps.
- Set the Correct Frame Rate:
- Ensure your video frame rate matches the source material to avoid unnecessary frame rate conversion. Common frame rates include 24 fps, 25 fps, 30 fps, 50 fps, and 60 fps.
- Ensure Proper Resolution:
- Render your video at the highest resolution you plan to display. YouTube and Vimeo support up to 4K resolution, so take advantage of this if your source footage is high quality.
- Maintain Aspect Ratio:
- Both platforms use a 16:9 aspect ratio. Ensure your video conforms to this to avoid black bars on the sides or top and bottom of your video.
- Use Two-Pass Encoding:
- If available, select two-pass encoding in your render settings. This process takes longer but improves video quality by optimizing the bitrate distribution across the video.
- Include High-Quality Audio:
- Choose AAC audio format with a bitrate of at least 128 kbps for stereo audio. High-quality audio complements your video and enhances the overall viewing experience.
- Check Platform Specifications:
- Before rendering, check the latest specifications on YouTube and Vimeo websites. They occasionally update their recommendations to align with new technologies and viewer expectations.
- Preview Before Uploading:
- Review your rendered video to ensure it meets your quality standards. Pay attention to details in both high and low-motion scenes to confirm the encoding is consistent throughout.
Following these tips when rendering videos in Sony Vegas for YouTube and Vimeo can significantly improve your video\"s visual quality, ensuring a pleasant viewing experience for your audience.
READ MORE:
Common Rendering Issues and How to Solve Them
Rendering videos can sometimes present challenges, even in Sony Vegas. Here are solutions to some of the most common rendering issues encountered by users:
- Long Rendering Times:
- Rendering can be time-consuming, especially for high-quality or lengthy videos. To reduce rendering times, consider lowering the video bitrate or resolution, if quality permits. Additionally, ensure that GPU acceleration is enabled in your settings, as this can significantly speed up the process.
- Video and Audio Out of Sync:
- This issue often occurs due to variable frame rate footage. Convert your footage to a constant frame rate using a video conversion tool before importing it into Sony Vegas. Also, check your project and render settings to ensure the frame rate matches across your project.
- File Size Too Large:
- If your rendered video file is too large, adjust the bitrate settings. Lowering the bitrate can significantly reduce file size, though it may also affect video quality. Experiment with different settings to find the right balance for your needs.
- Quality Loss After Rendering:
- To minimize quality loss, render your video in the highest quality format supported by your distribution platform. Ensure that your project settings match your source footage in terms of resolution and frame rate. Consider using a higher bitrate or a less compressed format if the file size is not an issue.
- Render Stuck or Crashes:
- Rendering issues can sometimes cause Sony Vegas to freeze or crash. Ensure your software is up to date to fix any known bugs. Splitting your project into smaller sections and rendering them separately can also help, as well as closing other programs to free up system resources.
- Black Screen or Missing Footage:
- A black screen in your rendered video can result from missing footage or incorrect settings. Double-check your timeline to ensure all clips are properly placed and not muted. Also, review your render settings to ensure they match your project settings.
- Audio Distortion or Noise:
- Audio issues can often be fixed by adjusting the audio bitrate or choosing a different audio format. Ensure your audio tracks are not peaking or clipping in the project timeline, and consider applying noise reduction filters if necessary.
Encountering rendering issues can be frustrating, but with the right troubleshooting steps, most problems can be resolved. Always ensure your software is up to date and that your computer meets the system requirements for Sony Vegas to help avoid these issues.
Mastering Sony Vegas render settings can elevate your video projects, ensuring optimal quality and efficiency. Explore our comprehensive guide to unlock the full potential of your creations, making every render smoother, sharper, and more professional.