Topic green screen sony vegas: Discover the magic of green screen technology in Sony Vegas to elevate your video projects, enabling endless creativity and professional-grade results with ease.
Table of Content
- How to use green screen in Sony Vegas for chroma key editing?
- Understanding Green Screen Basics and Setup
- Choosing the Right Green Screen Material
- Setting Up Your Green Screen Environment
- Importing and Managing Your Media in Sony Vegas
- Step-by-Step Guide to Applying Chroma Key in Sony Vegas
- Adjusting Chroma Key Settings for Optimal Results
- YOUTUBE: How to Use a Green Screen in Vegas Pro
- Tips for Fine-Tuning and Troubleshooting Common Issues
- Enhancing Your Green Screen Footage with Additional Effects
- Exporting Your Final Project
- Advanced Techniques and Creative Ideas for Green Screen Videos
- Recommended Gear and Accessories for Green Screen Production
How to use green screen in Sony Vegas for chroma key editing?
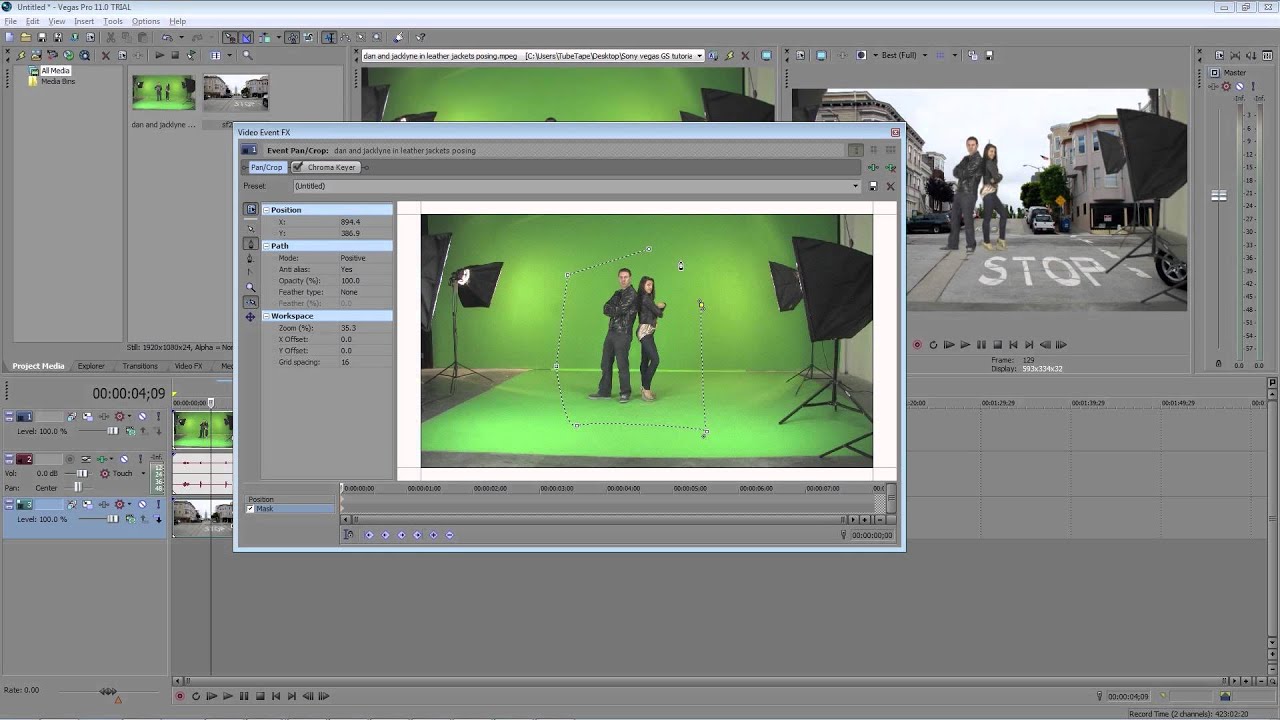
To use green screen in Sony Vegas for chroma key editing, follow these steps:
- Import your footage with the green screen and place it on Track 1 in your timeline.
- In the Video FX tab, search for the \"Chroma Keyer\" effect and apply it to the footage on Track 1.
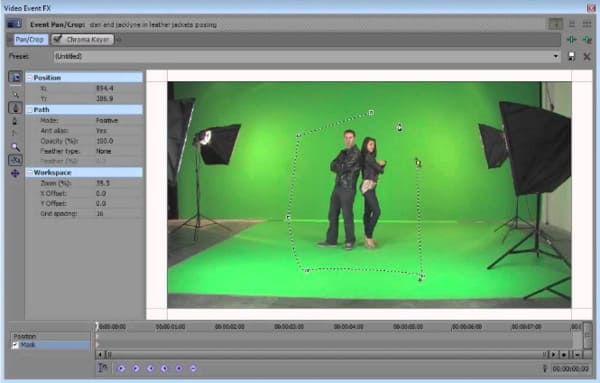
- In the Event FX panel, adjust the settings for the Chroma Keyer effect.
- First, select the \"Key Type\" as \"Color\" and choose the color of your green screen.
- Adjust the \"Tolerance\" slider to fine-tune how much variation in color will be considered for keying.
- Use the \"Edge Correct\" slider to smoothen the edges of the keyed object.
- If needed, use the \"De-Spill\" option to remove any color spill from the green screen onto the subject.
- Play the timeline to see the result. If adjustments are required, tweak the settings until you get the desired effect.
- You can also make further adjustments by using masks or adding additional effects to enhance the composition.
- Once satisfied with the result, you can export or render your video with the green screen effect.
READ MORE:
Understanding Green Screen Basics and Setup
Green screen technology allows you to replace the green background with any digital backdrop, offering endless possibilities for creative video production. Here\"s how to set it up for use with Sony Vegas:
- Select the Right Green Screen: Choose a uniform, brightly colored green backdrop. Avoid wrinkles and shadows for the best keying results.
- Light Your Green Screen Evenly: Use soft, diffused lighting to minimize shadows and ensure even illumination across the entire green screen.
- Position Your Subject: Keep your subject a few feet away from the green screen to prevent shadows and green spill, which is green light reflecting back onto your subject.
- Camera Settings: Use a high-quality camera and set it to manual mode to control the exposure, focus, and white balance for consistent shots.
- Test Your Setup: Record a short clip and import it into Sony Vegas to check the green screen effect and adjust your setup as necessary.
Once your green screen is properly set up, you\"re ready to start filming and using Sony Vegas for post-production to achieve professional-looking results.
Choosing the Right Green Screen Material
Selecting the appropriate green screen material is crucial for achieving a clean, easy-to-key background. Consider these factors to ensure you make the best choice:
- Fabric Material: Opt for a non-reflective, matte fabric that reduces glare. Muslin and polyester are popular choices for their wrinkle-resistant and durable properties.
- Color Consistency: The green should be vibrant and consistent across the entire surface to facilitate easier chroma keying in Sony Vegas.
- Size and Portability: Consider the size of the green screen based on your project needs. Portable and collapsible screens are available for on-location shoots.
- Mounting Options: Ensure the screen can be easily mounted or hung without sagging. A frame or stand can be helpful for maintaining a taut, smooth surface.
- Price vs. Quality: While budget options are available, investing in a higher-quality green screen can yield better results and save time in post-production.
By carefully selecting your green screen material, you set the foundation for successful chroma keying and vibrant, immersive backgrounds in your Sony Vegas projects.
Setting Up Your Green Screen Environment
Creating the right environment for green screen work is essential for seamless keying in Sony Vegas. Follow these steps to set up your green screen environment effectively:
- Choose an Appropriate Space: Select a space large enough to accommodate your green screen and allow for proper subject movement without shadows.
- Mount Your Green Screen: Securely mount your green screen on a stand or wall, ensuring it\"s stretched tight to avoid wrinkles and folds.
- Position Your Lighting: Set up lighting to evenly illuminate your green screen, using softbox lights or LED panels to minimize shadows and hotspots.
- Light Your Subject Separately: Use additional lights to illuminate your subject independently of the green screen to create depth and reduce spill.
- Test the Setup: Record a test clip with your subject performing typical movements to identify any shadows or green spill and adjust your setup accordingly.
With the right setup, your green screen footage will be easy to key out in Sony Vegas, leading to professional-quality video projects.

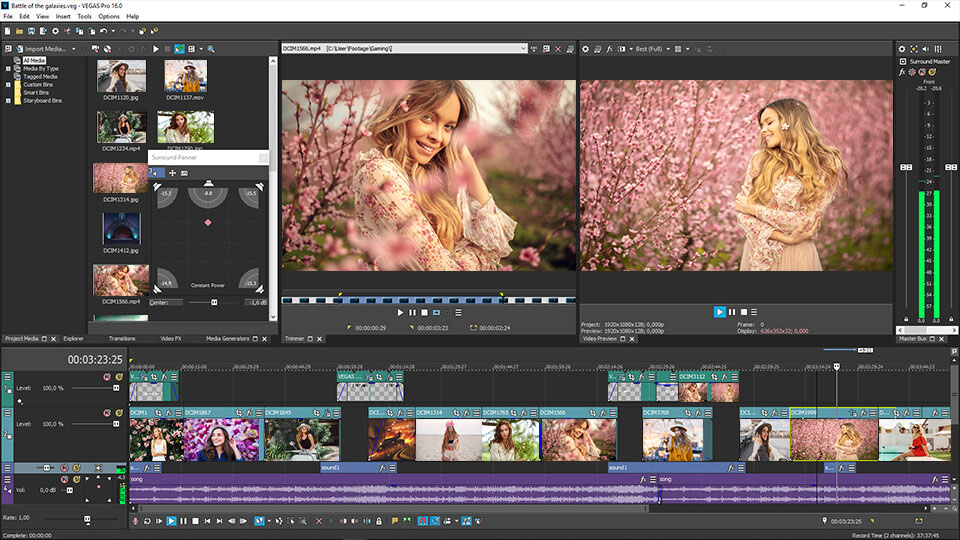
Importing and Managing Your Media in Sony Vegas
Efficiently managing your media files is crucial for a smooth editing process in Sony Vegas. Follow these steps to import and organize your green screen footage and other media:
- Start a New Project: Open Sony Vegas and create a new project. Set your project properties to match your footage settings for optimal editing performance.
- Import Your Footage: Go to the \"File\" menu and select \"Import\" > \"Media\" to bring your green screen footage and any other video clips, images, or audio files into your project.
- Organize Your Media: Use the Project Media tab to organize your files. You can create bins to separate different types of media, such as background images, green screen clips, and sound effects.
- Preview Your Clips: Double-click on any clip in the Project Media window to preview it. This allows you to check the quality of your green screen footage before editing.
- Create a Timeline: Drag your green screen footage and other media onto the timeline to start editing. Arrange your clips in the order you plan to edit them.
By carefully importing and managing your media in Sony Vegas, you can streamline your editing workflow and focus on the creative aspects of your green screen project.
_HOOK_
Step-by-Step Guide to Applying Chroma Key in Sony Vegas
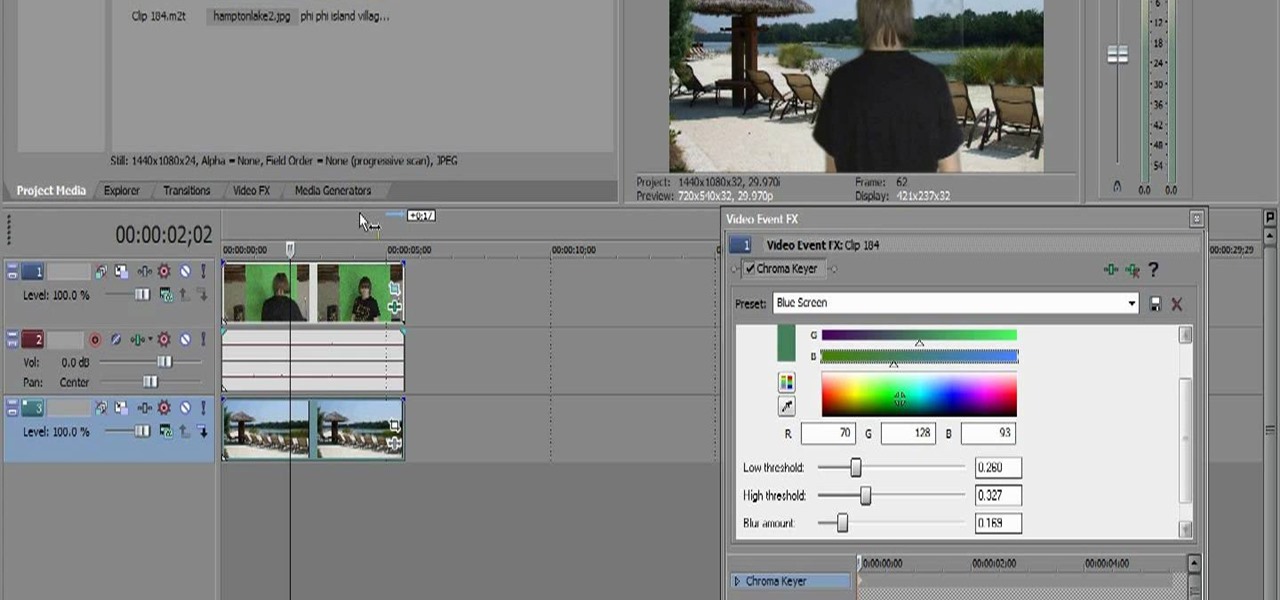
Applying the chroma key effect in Sony Vegas allows you to replace your green screen with any background. Here’s how to do it:
- Place Your Footage on the Timeline: Drag your green screen clip onto the timeline. Place the background you want to use on a track below it.
- Access Video FX: Click on the green screen clip on your timeline, then go to the \"Video FX\" tab within Sony Vegas.
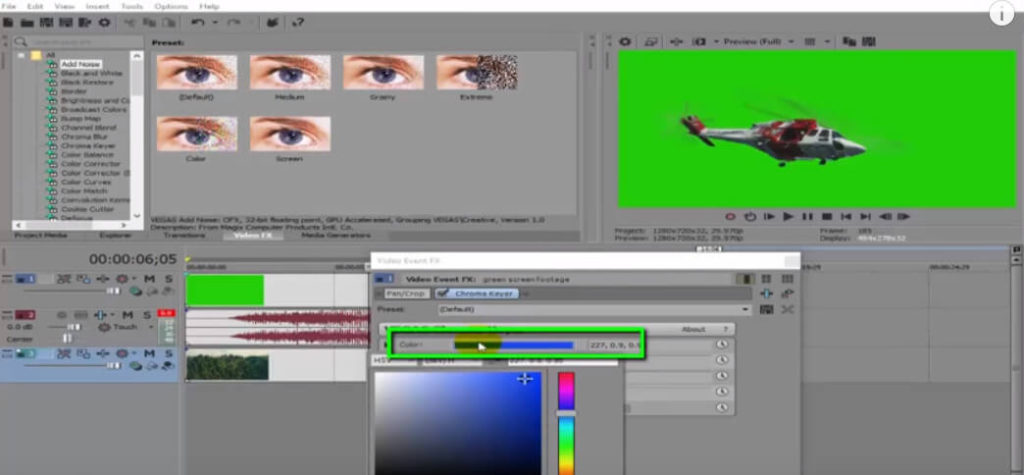
- Select the Chroma Keyer: From the list of effects, choose \"Chroma Keyer\". This will open the chroma key settings.
- Pick the Key Color: Use the eyedropper tool within the Chroma Keyer settings to select the green color on your footage. This tells Sony Vegas which color to make transparent.
- Adjust the Settings: Use the sliders for \"Low Threshold\", \"High Threshold\", and \"Blur Amount\" to refine the key. You aim to remove the green background completely without affecting your subject.
- Preview Your Work: Regularly preview your work by playing the timeline to ensure the background is seamlessly replaced and there are no green edges around your subject.
- Make Final Adjustments: If necessary, adjust the lighting and color correction settings to make sure your subject matches the new background.
This step-by-step process will help you master the chroma key effect in Sony Vegas, creating professional-looking green screen videos.

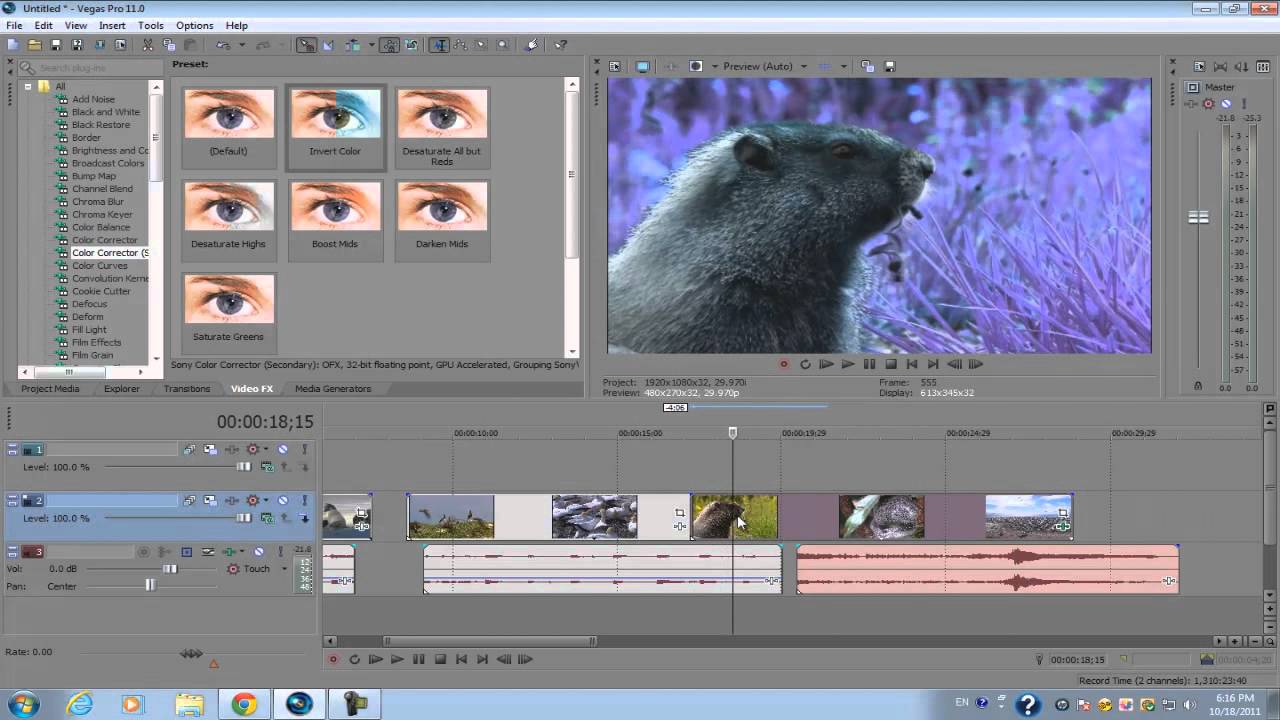
Adjusting Chroma Key Settings for Optimal Results
Getting the perfect chroma key effect in Sony Vegas involves fine-tuning several settings. Here\"s how to adjust your chroma key settings for the best outcome:
- Start with a Clean Key: After selecting your green screen color with the eyedropper, adjust the \"Low Threshold\" and \"High Threshold\" settings to remove as much of the green background as possible without affecting your subject.
- Refine Edges: If your subject\"s edges appear jagged or contain remnants of the green screen, increase the \"Blur Amount\" slightly. This softens the edges, making the blend more natural.
- Adjust the Tolerance: Play with the \"Tolerance\" settings if your green screen wasn\"t evenly lit or if the color varies. This helps in creating a more uniform key.
- Deal with Spill: Green spill is common and can be seen as a green outline or hue around your subject. Use the \"Spill Suppression\" tools within Sony Vegas to neutralize unwanted green reflections.
- Test Different Backgrounds: Sometimes, the effectiveness of your key is influenced by the background you choose. Try different backgrounds to see which one blends best with your keyed subject.
- Use Masking Tools: For tough areas that the chroma keyer can\"t handle alone, consider using masking tools to manually remove unwanted sections.
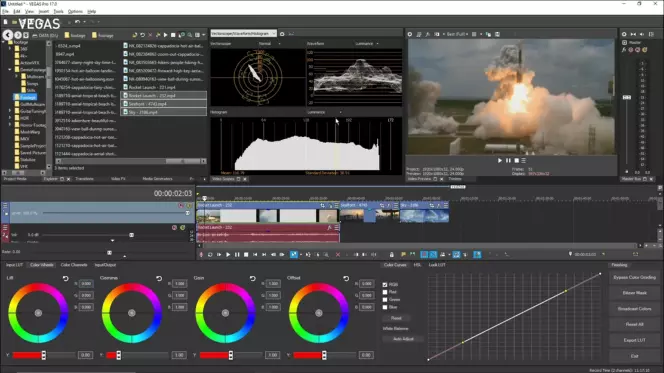
- Final Color Correction: After the chroma key looks good, perform color correction to ensure your subject matches the new background in terms of lighting, color temperature, and saturation.
By carefully adjusting these settings, you can achieve professional and believable chroma key effects in your Sony Vegas projects.
How to Use a Green Screen in Vegas Pro
\"Unlock your creativity and take your videos to the next level with the magic of green screen! Learn how to seamlessly integrate stunning backgrounds and special effects into your footage for a visually captivating experience.\"
How to Remove Green Screen in Sony Vegas (Quick & Easy)
\"Discover the power of Sony Vegas and transform your ordinary videos into cinematic masterpieces! Join us as we delve into the endless possibilities of this professional video editing software, and learn how to create stunning visuals that will leave your audience in awe.\"
Tips for Fine-Tuning and Troubleshooting Common Issues
Even with careful setup and adjustment, you might encounter some challenges while working with green screens in Sony Vegas. Here are some tips for fine-tuning your work and troubleshooting common issues:
- Uneven Green Screen Lighting: If you notice uneven lighting on your green screen, consider adding more lights to your setup or repositioning existing ones for a more uniform distribution.
- Green Spill on Subject: To reduce green spill, adjust the spill suppression settings in Sony Vegas. You can also use backlighting on your subject to help separate them from the green screen.
- Edges Appear Too Soft or Too Sharp: Modify the \"Blur Amount\" in the chroma key settings. If edges are too soft, decrease the blur; if too sharp, increase it slightly for a more natural look.
- Keying Out Multiple Colors: If your scene includes multiple colors that need to be keyed out, apply multiple instances of the chroma key effect, each targeted at a different color.
- Missing Details in Subject: If you lose detail in your subject, like hair or transparent objects, reduce the aggressiveness of your keying settings or use masking tools to manually correct these areas.
- Color Matching: To ensure your subject matches the new background, use Sony Vegas\"s color correction tools to adjust color temperature, contrast, and saturation.
- Preview Regularly: Continuously preview your work on different monitors if possible, to ensure your edits look good on various screens and lighting conditions.
These tips will help you refine your green screen work in Sony Vegas, leading to more polished and professional results.

Enhancing Your Green Screen Footage with Additional Effects
Even with careful setup and adjustment, you might encounter some challenges while working with green screens in Sony Vegas. Here are some tips for fine-tuning your work and troubleshooting common issues:
- Uneven Green Screen Lighting: If you notice uneven lighting on your green screen, consider adding more lights to your setup or repositioning existing ones for a more uniform distribution.
- Green Spill on Subject: To reduce green spill, adjust the spill suppression settings in Sony Vegas. You can also use backlighting on your subject to help separate them from the green screen.
- Edges Appear Too Soft or Too Sharp: Modify the \"Blur Amount\" in the chroma key settings. If edges are too soft, decrease the blur; if too sharp, increase it slightly for a more natural look.
- Keying Out Multiple Colors: If your scene includes multiple colors that need to be keyed out, apply multiple instances of the chroma key effect, each targeted at a different color.
- Missing Details in Subject: If you lose detail in your subject, like hair or transparent objects, reduce the aggressiveness of your keying settings or use masking tools to manually correct these areas.
- Color Matching: To ensure your subject matches the new background, use Sony Vegas\"s color correction tools to adjust color temperature, contrast, and saturation.
- Preview Regularly: Continuously preview your work on different monitors if possible, to ensure your edits look good on various screens and lighting conditions.
These tips will help you refine your green screen work in Sony Vegas, leading to more polished and professional results.
Exporting Your Final Project
Once you\"ve completed your green screen project in Sony Vegas, the final step is to export it. Here’s how to ensure your project is exported with the best quality settings for your intended audience:
- Choose Your Output Format: Go to \"File\" > \"Render As\" to see the list of available formats. Select the one that best suits your delivery platform, such as MP4 for online sharing or AVC for high-quality archives.
- Set the Video Quality: Adjust the bit rate and resolution settings according to your needs. Higher bit rates and resolutions offer better quality but result in larger file sizes.
- Consider the Frame Rate: Ensure the frame rate matches your project settings to avoid playback issues. Common frame rates include 24 fps for film-like quality and 30 fps for standard video.
- Choose Audio Settings: Select an audio format that matches your video quality. AAC is widely used for its balance between size and quality.
- Customize Render Settings: If needed, customize additional settings like aspect ratio, motion blur, and color space to enhance the final output.
- Preview Before Exporting: Use the preview function to check your video one last time. Look for any missed editing errors or export issues.
- Start Rendering: Once you\"re satisfied with the settings, click \"Render\". Sony Vegas will begin exporting your final project. The time taken will depend on your project\"s complexity and length.
Exporting your project properly is crucial for delivering your content in the highest possible quality to your audience. With these steps, you can confidently share your green screen work produced in Sony Vegas.

_HOOK_
Advanced Techniques and Creative Ideas for Green Screen Videos
Push the boundaries of your green screen work in Sony Vegas with these advanced techniques and creative ideas:
- Layering Multiple Backgrounds: Experiment with layering multiple backgrounds to create depth. Use Sony Vegas\"s masking tools to blend these layers seamlessly for a 3D effect.
- Incorporating 3D Elements: Enhance your videos by adding 3D models or animations. Sony Vegas can integrate with 3D software, allowing you to create scenes with realistic depth and movement.
- Using Motion Tracking: Apply motion tracking to your green screen footage to attach text or graphics that move with your subject. This technique is perfect for dynamic, informative videos.
- Creating Virtual Sets: Design elaborate virtual sets for your videos. Use high-resolution images or video clips as backgrounds to simulate real-life environments or fantastical landscapes.
- Simulating Camera Movements: Use keyframing in Sony Vegas to simulate camera movements such as pans, zooms, and tilts, adding dynamic interest to your scenes.
- Applying Color Grading for Atmosphere: Utilize color grading to alter the mood of your green screen footage. Warm or cool tones can significantly affect the feel of your video.
- Experimenting with Lighting Effects: Add lighting effects in post-production to mimic natural light sources or create dramatic lighting scenarios that enhance your narrative.
By adopting these advanced techniques and creative ideas, you can produce captivating green screen videos that stand out for their professionalism and creativity.
Recommended Gear and Accessories for Green Screen Production
To ensure the best quality green screen production, having the right gear and accessories is essential. Here\"s a list of recommended items to get you started:
- High-Quality Green Screen: Invest in a durable, wrinkle-resistant green screen. Look for options that offer easy setup and portability if you need to shoot in various locations.
- Lighting Kit: Consistent, even lighting is crucial. A softbox or LED panel lighting kit can help you achieve the best illumination for your green screen and subjects.
- Stand and Mounting Hardware: Ensure you have a reliable stand and mounting clips to keep your green screen taut and in place during shooting.
- Camera: A camera with manual settings will give you the best control over your footage. Consider resolution, frame rates, and compatibility with your editing software.
- Tripod: A sturdy tripod is necessary for stable shots, especially when incorporating motion effects in post-production.
- Microphones: For projects that include dialogue or narration, high-quality microphones are essential for clear audio.
- Clamps and Tape: Have a set of clamps and gaffer tape on hand for quick fixes and adjustments to your green screen setup.
- Editing Software: Sony Vegas is recommended for its comprehensive features and chroma keying capabilities, but ensure your computer meets the software’s system requirements.
Equipping yourself with these recommended gear and accessories will set the foundation for successful green screen production, leading to professional-quality results.
Mastering green screen techniques in Sony Vegas opens up a world of creative possibilities, allowing you to produce captivating, professional-quality videos that engage and inspire your audience.