Topic sony car stereo wiring diagram: Unlock the full potential of your car audio system with our comprehensive guide to understanding Sony car stereo wiring diagrams, ensuring a seamless installation process.
Table of Content
- How to install a Sony car stereo or mobile audio system?
- Understanding Sony Car Stereo Wiring Diagrams
- Identifying Wire Colors and Their Functions
- Step-by-Step Guide to Wiring Your Sony Stereo
- Common Mistakes and How to Avoid Them
- Tools and Materials Needed for Installation
- Connecting the Stereo to the Vehicle\"s Power Supply
- YOUTUBE: Car Stereo Wiring Harnesses & Interfaces Explained - What Do The Wire Colors Mean?
- Wiring Speakers and Amplifiers
- Integrating the Stereo with Vehicle Accessories
- Troubleshooting Common Wiring Issues
- Maintenance Tips for Your Sony Car Stereo System
How to install a Sony car stereo or mobile audio system?
Installing a Sony car stereo or mobile audio system is a relatively simple process. Follow these step-by-step instructions to ensure a successful installation:
- Gather the necessary materials:
- A Sony car stereo or mobile audio system
- Wire harness adapter
- Mounting kit (if needed for your vehicle)
- Wire strippers
- Electrical tape
- Screwdrivers
- Prepare your car:
- Disconnect the negative terminal of your car battery to prevent any electrical accidents.
- Remove the existing car stereo system (if present) by carefully prying off the trim panel and unscrewing the stereo unit from its mounting bracket.
- Connect the wire harness adapter:
- Locate the car\'s wire harness connector.
- Plug the wire harness adapter into the car\'s wire harness connector.
- Connect the other end of the wire harness adapter to the corresponding connectors on the Sony car stereo unit.
- Mount the Sony car stereo unit:
- Place the mounting kit (if necessary) into the stereo mounting bracket.
- Slide the Sony car stereo unit into the mounting kit or directly into the stereo mounting bracket.
- Screw the stereo unit into place using the screws provided.
- Make wiring connections:
- Connect the power wire from the wire harness adapter to the accessory wire of your car\'s wiring.
- Connect the ground wire from the wire harness adapter to the car\'s metal chassis.
- Connect the speaker wires from the wire harness adapter to the corresponding speaker wires on the car stereo unit.
- Secure all wiring connections with electrical tape to prevent any loose connections.
- Test the Sony car stereo:
- Reconnect the negative terminal of your car battery.
- Turn on the car\'s ignition and test the Sony car stereo to ensure it is functioning properly.
READ MORE:
Understanding Sony Car Stereo Wiring Diagrams
Navigating the complexities of a Sony car stereo wiring diagram is crucial for a successful installation. These diagrams provide a visual representation of how your stereo connects to your car\"s electrical system. Here\"s what you need to know:
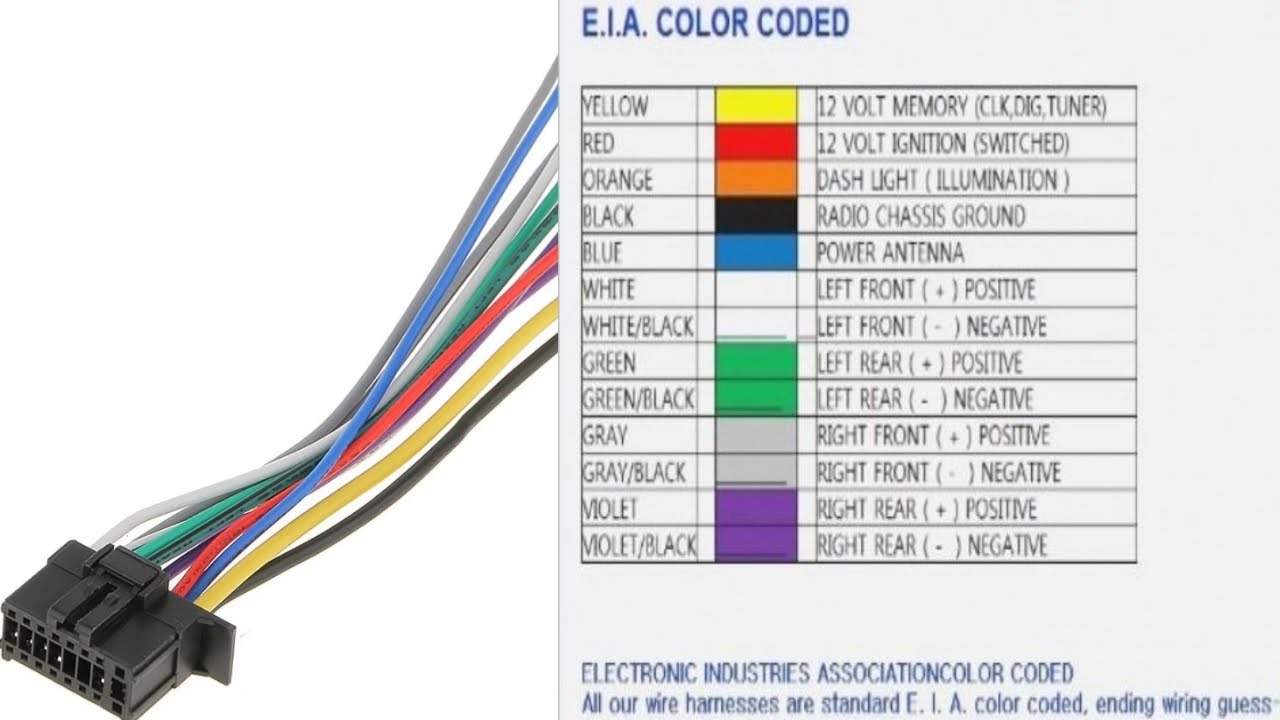
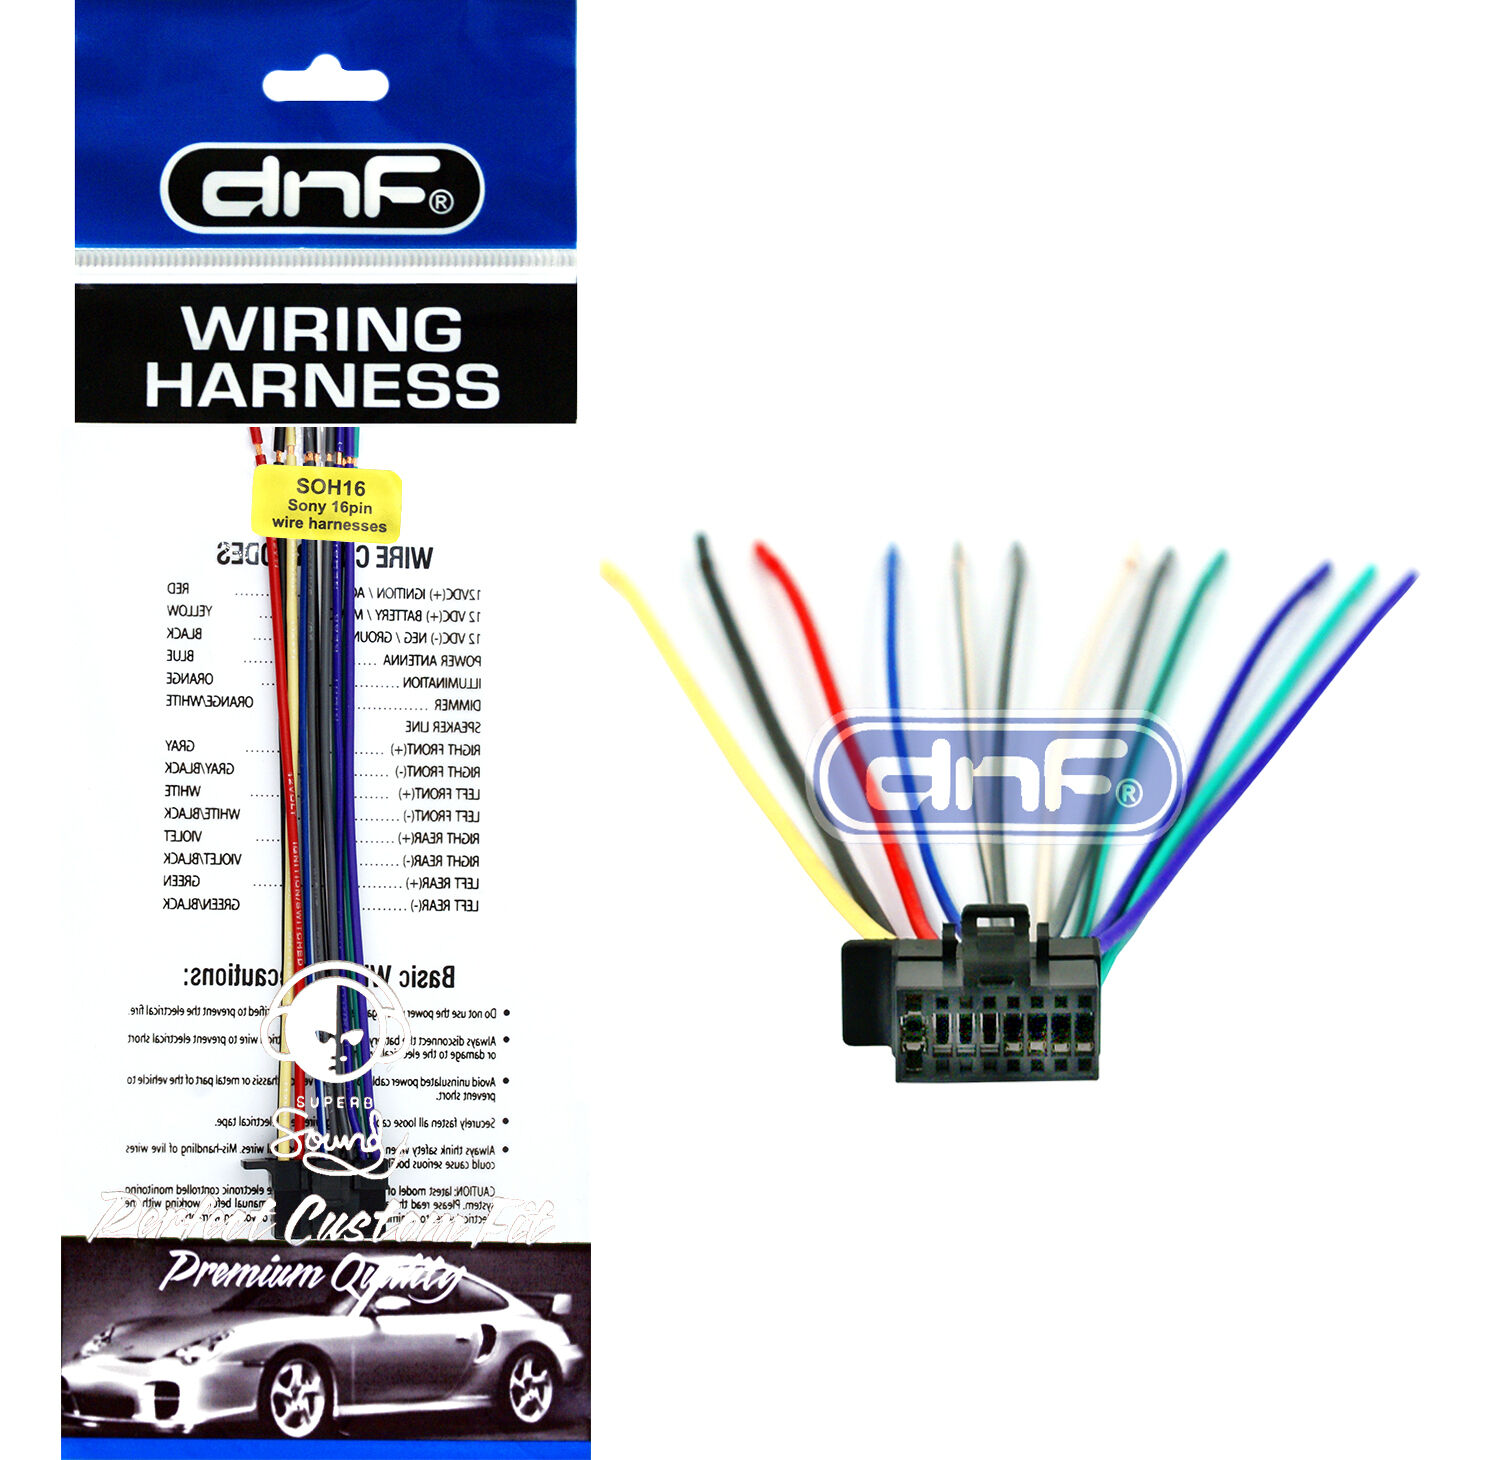
- Wire Color Codes: Sony uses a standard color scheme for the various wires. For example, red typically indicates power, black is ground, and blue is for the antenna or amplifier turn-on wire.
- Connector Types: Familiarize yourself with the different connectors used, such as the power connector, speaker connector, and auxiliary input connector.
- Function Labels: Diagrams often include labels next to each wire or connector, indicating its function (e.g., \"LF Speaker\" for the left front speaker).
- Understanding Symbols: Learn the symbols commonly used in wiring diagrams, such as arrows for signal flow or lines for connections.
By understanding these elements, you can effectively read and interpret Sony car stereo wiring diagrams, ensuring that you connect your stereo correctly and safely.

Identifying Wire Colors and Their Functions
Correctly identifying the wire colors and their functions is essential for any car stereo installation. Sony car stereo systems follow a standardized color-coding scheme to help simplify the installation process. Here\"s a breakdown of common wire colors and their corresponding functions:
- Red: Switched 12V power (only receives power when the ignition is on)
- Yellow: Constant 12V power (maintains power to keep settings and memory)
- Black: Ground wire (connected to the vehicle\"s chassis)
- Blue: Antenna control or amplifier turn-on wire
- Blue/White Stripe: Amplifier turn-on wire
- Orange: Illumination/dimmer wire (adjusts brightness according to vehicle\"s dashboard lighting)
- Orange/White Stripe: Dash light illumination wire
- Gray: Right front speaker (+)
- Gray/Black Stripe: Right front speaker (-)
- White: Left front speaker (+)
- White/Black Stripe: Left front speaker (-)
- Purple: Right rear speaker (+)
- Purple/Black Stripe: Right rear speaker (-)
- Green: Left rear speaker (+)
- Green/Black Stripe: Left rear speaker (-)
This guide serves as a general overview; however, it\"s always recommended to check the specific wiring diagram for your Sony car stereo model. Understanding these wire colors and functions will ensure a safer and more efficient installation.
Step-by-Step Guide to Wiring Your Sony Stereo
Installing a Sony car stereo can be a rewarding project if you follow the correct steps. This guide will walk you through the process from start to finish:
- Prepare Your Tools: Gather all necessary tools and equipment, including wire strippers, crimping tools, electrical tape, and a wiring harness adapter specific to your car model.
- Disconnect the Battery: To prevent any electrical issues, disconnect the negative terminal of your car battery.
- Remove the Existing Stereo: Carefully remove the dashboard panels and unscrew the existing stereo. Disconnect the old unit\"s wiring harness and antenna.
- Understand the Wiring Diagram: Refer to the Sony car stereo wiring diagram to understand the function of each wire.
- Connect the Wiring Harness Adapter: If available, use a wiring harness adapter to simplify the connection between your Sony stereo and the car\"s wiring system. Match the wire colors from the stereo to the adapter.
- Connect the Antenna Adapter: If necessary, connect the antenna adapter to the stereo\"s antenna wire.
- Test the Connections: Before fully installing the stereo, connect the battery terminal and test all functions of the stereo to ensure everything is working correctly.
- Secure the Stereo: Once tested, secure the stereo in the dashboard and reattach any panels or components that were removed.
- Finalize Installation: Reconnect the battery terminal and give your new Sony car stereo a final test to ensure all speakers and functionalities are working as expected.
Following these steps will help ensure a smooth installation of your Sony car stereo, allowing you to enjoy high-quality audio in your vehicle.

Common Mistakes and How to Avoid Them
When installing a Sony car stereo, certain pitfalls can complicate the process. Awareness and preparation can help you avoid these common mistakes:
- Ignoring Wiring Diagrams: Not consulting the Sony wiring diagram can lead to incorrect connections. Always refer to the diagram specific to your model.
- Poor Grounding: Ensure the stereo\"s ground wire is firmly connected to the car\"s chassis. A poor ground can cause electrical issues and interference.
- Mismatching Wire Colors: Assuming wire colors follow universal standards can lead to mistakes. Verify each wire\"s function, as color codes can vary between models.
- Skipping the Test Run: Always test the stereo before finalizing the installation to check for any issues with power, sound, or functionality.
- Forgetting to Disconnect the Battery: Failing to disconnect the battery before starting the installation can result in short circuits or other electrical hazards.
- Using Poor Quality Connectors: Invest in high-quality connectors and crimping tools to ensure secure and reliable connections.
- Overlooking the Antenna Connection: A loose or improperly connected antenna can result in poor reception. Double-check the antenna connection for a clear signal.
By avoiding these common mistakes, you can ensure a smoother and more successful installation of your Sony car stereo, enhancing your driving experience with superior sound quality.
_HOOK_
Tools and Materials Needed for Installation
Having the right tools and materials is essential for the successful installation of a Sony car stereo. Here\"s a comprehensive list to ensure you\"re fully prepared:
- Wire Strippers: For removing insulation from wires without damaging them.
- Crimping Tool: Essential for securing wire connectors and terminals.
- Soldering Iron and Solder: Optional, for those who prefer soldering connections for added security.
- Electrical Tape or Heat Shrink Tubing: To insulate and protect connections.
- Wiring Harness Adapter: Facilitates the connection between your Sony stereo and the car\"s factory wiring, minimizing the need for modifications.
- Antenna Adapter: Necessary if the antenna connector on the new stereo differs from the car\"s.
- Screwdrivers (Phillips and Flathead): For removing and securing components.
- Panel Removal Tools: To safely remove trim pieces and panels without causing damage.
- Flashlight or Headlamp: For better visibility in tight spaces.
- Dashboard Kit: If required, to ensure the new stereo fits perfectly in the dashboard.
This toolkit will help you tackle the installation with confidence, ensuring a smooth and efficient process from start to finish.

Connecting the Stereo to the Vehicle\"s Power Supply
Properly connecting your Sony car stereo to the vehicle\"s power supply is crucial for its operation. Follow these steps to ensure a safe and effective installation:
- Identify the Power Wires: Consult the wiring diagram to locate the power wires. Typically, the yellow wire is for constant 12V power, and the red wire is for switched power.
- Connect the Ground Wire: Securely connect the stereo\"s black ground wire to the vehicle\"s chassis. This is crucial for preventing electrical issues.
- Use a Wiring Harness Adapter: If available for your vehicle, a wiring harness adapter simplifies the process by plugging directly into the factory harness, avoiding the need to cut wires.
- Connecting the Power Wires: If not using an adapter, connect the stereo\"s power wires directly to the vehicle\"s wiring. The yellow wire should be connected to a constant power source, and the red wire to a source that turns on with the ignition.
- Secure the Connections: Use crimp connectors or soldering to secure the wires, and insulate them with electrical tape or heat shrink tubing.
- Test Before Final Installation: Before fully securing the stereo in the dash, reconnect the battery and test the stereo to ensure it powers on correctly.
This process ensures that your Sony stereo is correctly connected to the vehicle\"s power supply, providing you with uninterrupted music and entertainment on the road.

Car Stereo Wiring Harnesses & Interfaces Explained - What Do The Wire Colors Mean?
Discover the fascinating world of wire colors in this captivating video! Uncover the secrets behind each hue and learn how to decipher them with ease. Watch now and unlock a whole new level of electrical knowledge!
Sony Double DIN Receiver Install - Car Stereo Wiring Explained (Part 1: How to Video)
Ready to take charge and install your own equipment? This step-by-step video tutorial will guide you through the process effortlessly. Gain the confidence you need to tackle any installation project with expert tips and tricks. Get started now and become a DIY pro!
Wiring Speakers and Amplifiers
When installing a new Sony car stereo system, correctly wiring your speakers and amplifiers is crucial for achieving the best sound quality and ensuring the longevity of your audio equipment. Follow these detailed steps to ensure your setup is both efficient and effective.
- Identify Speaker Wires: Begin by locating the speaker wire outputs on your Sony car stereo. These are typically color-coded to help identify which wire connects to each speaker.
- Plan Your Wiring Route: Decide on the route for the wires from the stereo to the speakers. Avoid areas that may pinch wires or expose them to moving parts or high heat.
- Connect the Amplifier: If you\"re using an amplifier, connect it to the stereo\"s pre-out connections using RCA cables. Ensure the amplifier is turned off before making connections.
- Power and Ground Connections: Connect the amplifier\"s power cable directly to the car\"s battery for the best performance, and secure a ground wire to a clean, bare metal spot on the car\"s chassis.
- Speaker Wires to Amplifier: Run speaker wires from the amplifier to each speaker location, respecting the polarity (positive to positive, negative to negative) to avoid phase issues.
- Connecting Speakers: Attach the speaker wires to each speaker, again ensuring the correct polarity. Use connectors or solder for a secure and reliable connection.
- Final Checks: Before powering up the system, double-check all connections for tightness and correct polarity. Ensure no bare wires are touching to prevent short circuits.
- System Test: Power on your stereo and gradually increase the volume to test the sound from each speaker. Adjust the balance and fader settings on your stereo to fine-tune the audio output.
Remember, the key to a successful car stereo installation is careful planning and attention to detail. Properly wiring your speakers and amplifier not only enhances the sound quality but also protects your equipment from potential damage. Enjoy your new Sony car audio system!

Integrating the Stereo with Vehicle Accessories
Integrating your Sony car stereo with the vehicle\"s existing accessories can enhance your driving experience by allowing you to control features seamlessly. Here are detailed steps to ensure successful integration with vehicle accessories such as steering wheel controls, backup cameras, and more.
- Understand the Wiring Harness: The wiring harness is crucial for connecting your Sony stereo to the vehicle\"s electrical system. Identify the harness adapter that matches your car model and the stereo system.
- Steering Wheel Control Integration: If your vehicle has steering wheel audio controls, use a steering wheel control adapter to connect them to your new stereo. This adapter translates the steering wheel control signals to the stereo.
- Backup Camera Connection: For vehicles equipped with a backup camera, ensure your Sony stereo supports camera input. Use the correct cable to connect the camera output to the stereo\"s camera input port.
- AUX and USB Ports: To maintain the use of AUX and USB ports in your vehicle, find the appropriate adapters that plug into the back of the stereo unit and extend to the vehicle\"s AUX and USB ports.
- Power Antenna and Amplifier Integration: If your car has a power antenna or an external amplifier, make sure to connect the stereo’s remote turn-on wire to these components for proper operation.
- Connect the Illumination Wire: The illumination wire allows the stereo\"s display and buttons to dim along with the car\"s dashboard lights. Connect this wire to the corresponding wire in the harness adapter.
- Testing All Functions: Before finalizing the installation, test all integrated functions. Check the steering wheel controls, backup camera operation, AUX and USB connectivity, and any other integrated accessories to ensure they work as expected with the new stereo.
Integrating your Sony car stereo with vehicle accessories requires careful attention to detail and understanding of both your vehicle\"s and the stereo\"s capabilities. By following these steps, you can enjoy a fully functional and seamless audio experience in your vehicle.

Troubleshooting Common Wiring Issues
Even with careful installation, you might encounter some common wiring issues with your Sony car stereo system. Here’s how to troubleshoot and resolve these problems to get your system working perfectly.
- No Power to the Stereo:
- Check the fuse on the back of the stereo and the car\"s fuse box for any blown fuses. Replace if necessary.
- Ensure all power connections, including the red (ignition) and yellow (constant power) wires, are secure and correctly connected.
- Speakers Not Working or Only Partially Working:
- Verify that the speaker wires are properly connected to both the stereo and the speakers. Check for correct polarity and secure connections.
- Inspect the speaker wires for any signs of damage or shorts. Replace damaged wires if found.
- Poor Sound Quality:
- Ensure there are no loose connections at the speakers or the stereo. A loose wire can cause static or intermittent sound.
- Check if the speakers are correctly phased (positive to positive and negative to negative) to avoid sound cancellation.
- Interference in Audio:
- Keep power wires and RCA cables as separate as possible to avoid electrical interference.
- If using an amplifier, ensure it\"s properly grounded to a clean, metal part of the car\"s body.
- Stereo Doesn\"t Save Settings:
- This usually occurs if the yellow (constant power) wire is not connected or has a bad connection. Check and secure this wire to ensure it has power even when the car is off.
- Steering Wheel Controls Not Working:
- If you\"ve installed a steering wheel control interface, recheck the programming and connections. It might need reprogramming to communicate with the new stereo.
By methodically going through these troubleshooting steps, you can identify and fix common issues, ensuring your Sony car stereo system operates smoothly. Remember, safety first—always disconnect the battery before making any changes to your car\"s electrical system.

_HOOK_
READ MORE:
Maintenance Tips for Your Sony Car Stereo System
Maintaining your Sony car stereo system is essential to ensure its longevity and optimal performance. Follow these tips to keep your system sounding great and functioning reliably.
- Regular Cleaning:
- Use a soft, dry cloth to gently wipe the faceplate and controls. Avoid harsh chemicals or abrasive materials that could damage the surface.
- For touchscreen units, use a microfiber cloth slightly dampened with water or a screen cleaner designed for electronics.
- Check Connections Periodically:
- Every few months, check the wiring connections behind the stereo for looseness or corrosion. Tighten or clean connections as needed.
- Ensure that the wiring harness and any adapters are securely connected and not frayed or damaged.
- Protect from Extreme Temperatures:
- Avoid exposing your stereo to extreme heat or cold, which can affect its performance. Use sunshades in hot weather and try to park in shaded or covered areas when possible.
- Software Updates:
- For stereos with digital displays and connectivity options, check for software updates regularly. Updates can improve functionality and add new features.
- Speaker Care:
- Keep the volume at reasonable levels to prevent speaker damage. Prolonged exposure to high volume can wear out speakers over time.
- Check speaker mounts and grills periodically for signs of wear or looseness.
- Prevent Moisture Buildup:
- Avoid leaving windows open during rain or in high-moisture environments to prevent water damage to the stereo and speakers.
- Professional Inspection:
- If you encounter any issues with your system\"s performance or after installing new components, consider having a professional inspect the installation to ensure everything is correctly set up and functioning.
By following these maintenance tips, you can enjoy a high-quality audio experience and ensure your Sony car stereo system remains in excellent condition for years to come.
With these expert insights into wiring, integrating, troubleshooting, and maintaining your Sony car stereo system, you\"re equipped to enjoy superior sound and performance. Dive into the world of seamless audio experiences with confidence and ease.