Topic sony vegas text animation: Unlock the secrets of Sony Vegas text animation to elevate your video projects with stunning, dynamic effects that captivate your audience and bring your stories to life.
Table of Content
- How to use text animations in Sony Vegas?
- Understanding Sony Vegas Text Animation
- Step-by-Step Guide to Creating Text Animations in Sony Vegas
- Exploring Text Animation Presets in Sony Vegas
- Customizing Text Animations for Unique Effects
- Animating Text with Keyframes in Sony Vegas
- Advanced Text Animation Techniques in Sony Vegas
- YOUTUBE: Learn How To Create UNIQUE Text Animations - VEGAS Pro Tutorial
- Adding 3D Text Animations in Sony Vegas
- Tips for Smooth and Professional Text Animations
- Using BorisFX for Enhanced Text Animations in Sony Vegas
- Examples of Creative Text Animations in Sony Vegas
- Optimizing Playback and Render Settings for Text Animations
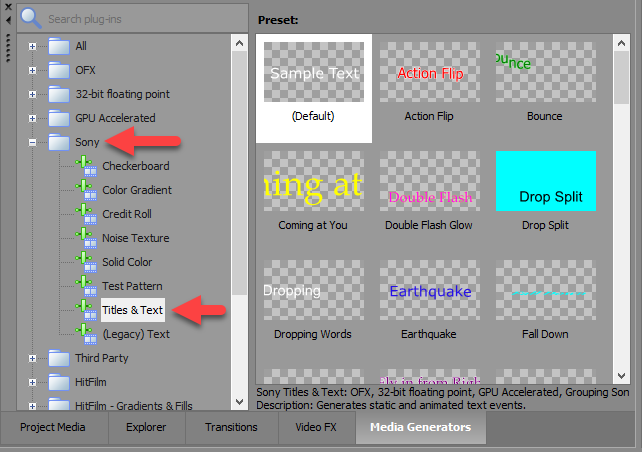
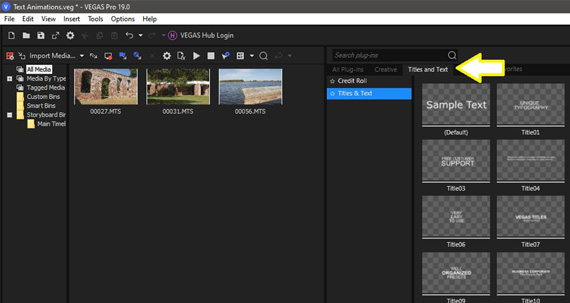
How to use text animations in Sony Vegas?
To use text animations in Sony Vegas, follow these steps:
- Drag your video to the timeline.
- Open the Media Generators window by clicking on it.
- Click on the Titles and Text tab in the Media Generators window.
- Choose the text animation you want to use from the available options.
- Drag and drop the selected text animation onto the timeline.
- Customize the text animation by adjusting its properties, such as font, color, size, etc.
- Preview the text animation by playing the video.
- Make any necessary adjustments or edits to the text animation.
- Export your video with the text animation.
READ MORE:
Understanding Sony Vegas Text Animation
Sony Vegas text animation is a powerful feature that allows creators to add dynamic and engaging text effects to their videos. This tool can transform simple text into captivating visual elements that enhance storytelling and viewer engagement.
- Text Animation in Sony Vegas offers a wide range of customizable options, including font size, color, and animation style.
- Animations can be applied through keyframing, allowing for precise control over the movement and appearance of text over time.
- Presets provide a quick start to animating text, with the ability to further customize effects for a unique look.
- Advanced features such as 3D text animations and integration with plugins like BorisFX expand the possibilities for creative expression.
By mastering text animation in Sony Vegas, editors can significantly enhance the visual appeal and professionalism of their projects, making them more engaging for the audience.
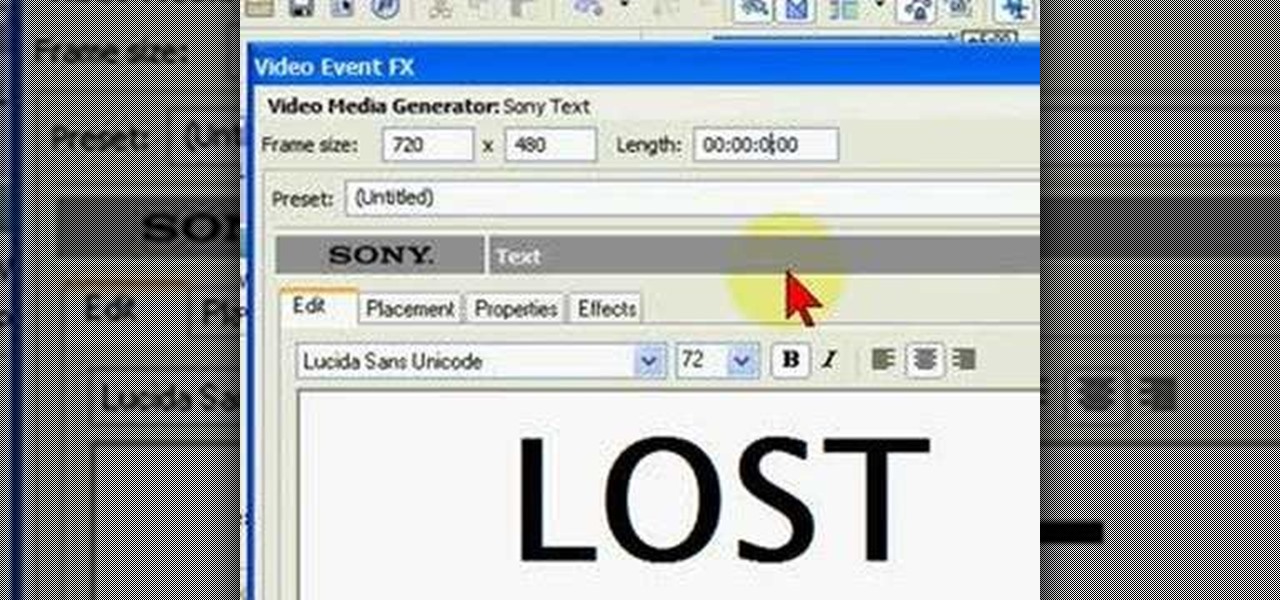
Step-by-Step Guide to Creating Text Animations in Sony Vegas
Creating text animations in Sony Vegas can enhance your videos with dynamic visuals. Follow this step-by-step guide to bring your text to life.
- Open Your Project: Start Sony Vegas and open your video project or create a new one.
- Insert Text: Go to the Media Generators tab, select \"Text\" and drag it onto your timeline where you want the animation.
- Customize Your Text: In the text editor window, customize your text\"s font, size, color, and alignment as desired.
- Open the Event Pan/Crop Tool: Right-click on the text event and select \"Event Pan/Crop\" to open the pan/crop window.
- Create Keyframes: In the pan/crop window, move the playhead to where you want the animation to start and end, creating keyframes by adjusting the position, scale, or rotation of the text.
- Preview Your Animation: Use the preview window to play back your animation and make any necessary adjustments.
- Add Effects: For more advanced animations, explore the Video FX tab for effects that can be applied to your text.
- Render Your Video: Once satisfied with the text animation, render your video to see the final product.
This guide simplifies the process of creating engaging text animations in Sony Vegas, making your videos more visually appealing and dynamic.
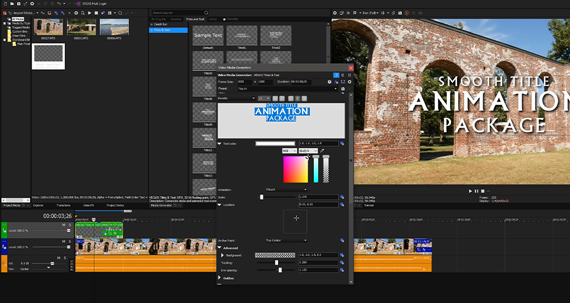
Exploring Text Animation Presets in Sony Vegas
Sony Vegas includes a variety of text animation presets that can make your editing workflow faster and more creative. Here’s how to explore and apply these presets.
- Accessing Presets: Open the Media Generators tab, select \"Text,\" and drag the default text to your timeline. In the text editing window, click on the \"Animations\" tab to view available presets.
- Previewing Presets: Hover over a preset to preview the animation effect in the video preview window. This helps you choose the most suitable animation for your project.
- Applying a Preset: Once you find a preset you like, simply click to apply it to your text. The animation will automatically adjust to the duration of your text event on the timeline.
- Customizing Presets: After applying a preset, you can customize it further by adjusting parameters such as duration, intensity, and more in the text property window.
- Combining Presets: For more complex animations, consider combining multiple presets. Apply one preset, adjust its settings, then add another preset and tweak as necessary.
Exploring text animation presets in Sony Vegas not only speeds up your editing process but also inspires creativity, allowing you to produce captivating text animations with ease.
Customizing Text Animations for Unique Effects
Creating unique text animations in Sony Vegas involves more than just applying presets. Customizing animations allows you to produce truly distinctive effects. Here\"s how to customize your text animations for unique visual impacts.
- Start with a Preset: Choose a preset that closely matches the effect you\"re aiming for as your starting point.
- Adjust Keyframe Properties: Open the event pan/crop window and manually adjust the keyframes for position, scale, and rotation to modify how the text moves and appears over time.
- Experiment with Opacity: Altering the opacity of your text at different keyframes can create fading effects, making your animation more dynamic.
- Utilize Motion Blur: Adding motion blur to your text animation can make the movement look more fluid and natural. This can be adjusted in the video FX tab.
- Combine Effects: Don\"t hesitate to combine multiple video effects from the Video FX tab. Layering effects like glow, shadow, or outline can add depth to your text animation.
- Play with Colors: Change the text color over time by creating keyframes in the text color settings, allowing for gradients or color shifts that enhance the animation.
- Use 3D Options: For advanced users, exploring the 3D text options can offer a new dimension of customization, making text pop out or rotate in three-dimensional space.
By customizing each aspect of your text\"s animation, you can achieve unique effects that elevate your video\"s overall aesthetic and storytelling power.
_HOOK_
Animating Text with Keyframes in Sony Vegas
Keyframes are crucial for creating precise and customizable text animations in Sony Vegas. They allow you to define specific points of animation for your text, giving you complete control over movement, opacity, size, and more. Here\"s how to animate text using keyframes:
- Insert Text: Add a text media generator to your timeline where you want the animation to occur.
- Open Event Pan/Crop: Right-click on the text event and select \"Event Pan/Crop\" to start creating your animation.
- Set Your First Keyframe: Move the timeline cursor to where you want the animation to begin. Adjust the position, size, or rotation of the text box to set the starting point of your animation.
- Add More Keyframes: Move the cursor to another point in time and adjust the text box to create a new animation frame. Sony Vegas automatically creates a keyframe when you make a change.
- Adjust Keyframe Interpolation: Right-click on a keyframe to change its interpolation method (e.g., linear, smooth, slow, fast) to control the animation\"s speed and style between keyframes.
- Preview and Refine: Use the preview function to watch your animation. Adjust the keyframes as needed to refine the movement and achieve the desired effect.
- Apply Additional Effects: Combine your keyframe animations with text effects from the Video FX tab for even more dynamic results.
Animating text with keyframes in Sony Vegas offers endless possibilities, allowing you to bring your text to life in unique and creative ways.

Advanced Text Animation Techniques in Sony Vegas
For those looking to push the boundaries of text animation in Sony Vegas, advanced techniques can unlock new dimensions of creativity. Here’s how to elevate your text animations:
- 3D Text Animations: Utilize the 3D source alpha and track motion features to create text that moves through three-dimensional space, offering a more dynamic viewer experience.
- Bezier Masking for Text: Apply Bezier masking to text events to create custom animation paths or to reveal text in creative ways.
- Using Scripts for Animation: Scripts can automate complex animations, saving time and allowing for precision that manual keyframing might not achieve.
- Combining Video FX: Layer multiple video effects on your text to create unique and visually striking animations that stand out.
- Syncing Text to Music: Use the audio waveform as a guide to sync your text animation with music or sound effects, enhancing the impact of your video’s audiovisual harmony.
- Particle Effects for Text: Integrate particle effects with your text animations for visually stunning effects, such as making text appear to dissolve or emerge from smoke.
- Animating Text Along a Path: Create custom paths for your text to follow, allowing for sophisticated animations that go beyond simple linear or circular movements.
By mastering these advanced techniques, you can create text animations in Sony Vegas that captivate your audience and elevate your video projects to new heights.
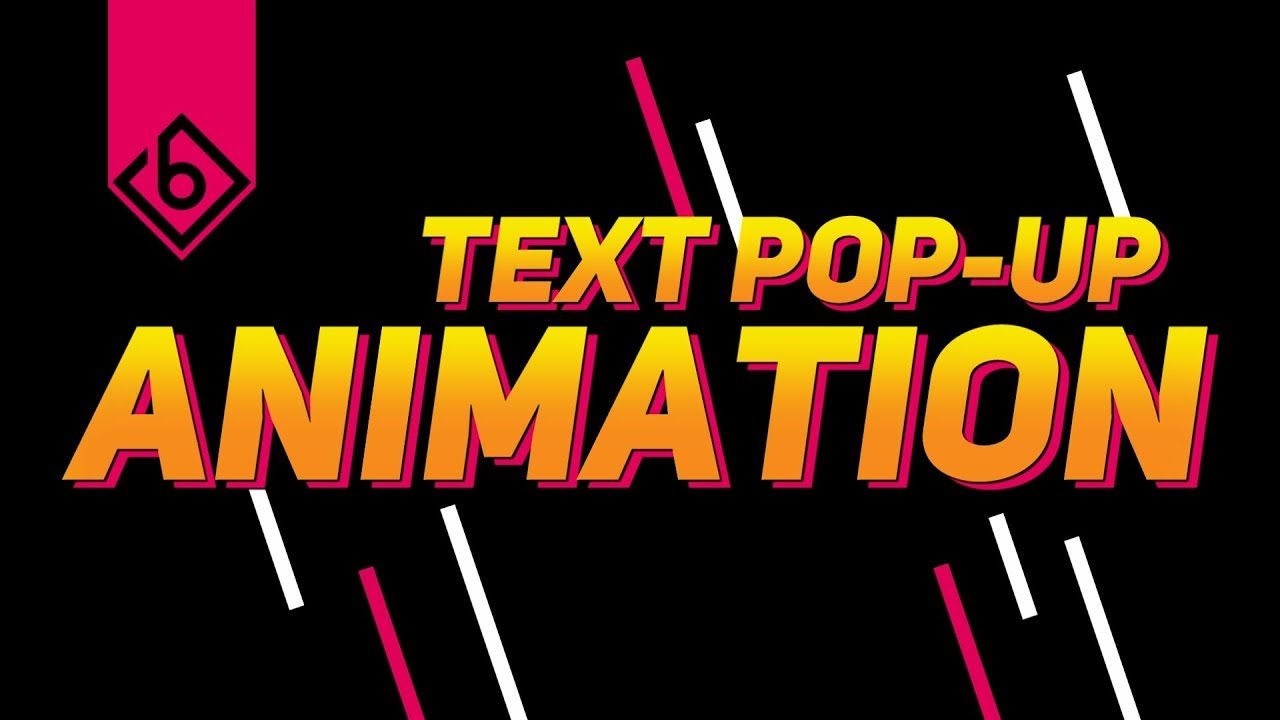
Learn How To Create UNIQUE Text Animations - VEGAS Pro Tutorial
Get ready to bring your text to life with mesmerizing animations that will make your words jump off the screen! Watch this video to learn how to create stunning text animations that will captivate your audience.
Vegas Pro 16: How To Create Unique Text Animations - Tutorial 428
Upgrade your video editing game with Vegas Pro 16! This powerful software offers an array of advanced features and tools, allowing you to create professional-quality videos. Watch this video tutorial to discover the endless possibilities Vegas Pro 16 has to offer.
Adding 3D Text Animations in Sony Vegas
3D text animations can add a significant impact to your videos, making them more engaging and professional-looking. Here’s how to incorporate 3D text animations in Sony Vegas:
- Access 3D Options: Begin by selecting a text event on your timeline. Look for 3D options within the text properties or media generators tab.
- Enable 3D Mode: In the video event FX or track motion settings, switch to 3D mode. This enables you to manipulate text in three dimensions.
- Adjust 3D Settings: Use the track motion window to adjust the X, Y, and Z axes, rotating and moving your text in 3D space.
- Keyframe 3D Movements: Create keyframes within the track motion timeline to animate your text’s movement through 3D space over time.
- Apply 3D Effects: Enhance your 3D text with effects such as depth of field or shadows for a more realistic appearance.
- Combine with Other Effects: Integrate your 3D text animations with video effects and transitions to create a cohesive and dynamic video project.
By adding 3D text animations, you can elevate the visual quality of your videos, making them more immersive and captivating for your audience.

Tips for Smooth and Professional Text Animations
Creating smooth and professional text animations in Sony Vegas requires attention to detail and an understanding of the software\"s capabilities. Here are some tips to elevate your text animations:
- Start with High-Quality Fonts: Choose clear and high-quality fonts to ensure your text is readable and looks professional.
- Use Keyframes Sparingly: Overusing keyframes can make animations look erratic. Use them judiciously for smoother transitions.
- Experiment with Motion Blur: Adding motion blur to moving text can make the animation appear smoother and more natural.
- Keep It Simple: Sometimes, less is more. Simple animations often look more professional than overly complex ones.
- Adjust Animation Speed: Ensure the speed of your animation matches the tone and pacing of your video. Too fast or too slow can distract from the message.
- Preview as You Go: Regularly preview your animations to check for smoothness and make adjustments as needed.
- Learn from Tutorials: Watch tutorials to learn new techniques and get inspiration for your animations.
- Utilize Presets Wisely: Presets can be a great starting point, but customizing them can add a unique touch to your project.
By following these tips, you can create text animations in Sony Vegas that are both smooth and professional, enhancing the overall quality of your video projects.
Using BorisFX for Enhanced Text Animations in Sony Vegas
BorisFX offers a range of advanced plugins that can take text animations in Sony Vegas to the next level. Here\"s how to use BorisFX to enhance your text animations:
- Install BorisFX: Ensure you have BorisFX installed and it\"s compatible with your version of Sony Vegas.
- Explore BorisFX Features: Familiarize yourself with the BorisFX options available for text animations. Look into Continuum and Sapphire for dynamic effects.
- Apply BorisFX to Text: In Sony Vegas, apply BorisFX effects directly to your text events from the Video FX tab.
- Customize Effects: Use the effect controls within BorisFX to adjust parameters like animation speed, style, and complexity for a custom look.
- Combine Effects: Don\"t hesitate to layer multiple BorisFX effects together for complex and unique text animations.
- Use Presets: BorisFX comes with presets that can serve as a great starting point for your animations. Customize them to fit your project.
- Animate with Keyframes: Enhance your BorisFX animations by adding keyframes in Sony Vegas, giving you precise control over the timing and progression of effects.
Integrating BorisFX with Sony Vegas text animations allows for unparalleled creativity and professionalism, setting your video projects apart from the rest.

_HOOK_
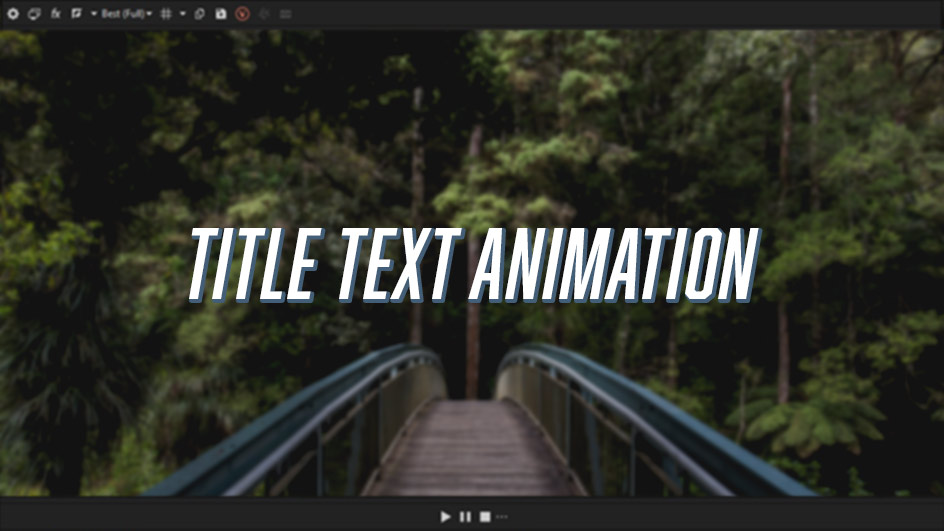
Examples of Creative Text Animations in Sony Vegas
Text animations can significantly enhance the visual appeal of your videos. Here are examples of creative text animations you can achieve in Sony Vegas:
- Flying Text: Animate text to fly into the scene from off-screen, creating a dynamic entrance effect.
- Text Reveal: Use masks to reveal text gradually, simulating a handwriting effect or the text being uncovered.
- 3D Text Rotation: Utilize 3D capabilities to rotate text around multiple axes, adding depth and perspective to your animations.
- Bouncing Text: Apply a bouncing animation to make your text appear lively and energetic, great for upbeat videos.
- Text Along Path: Create custom paths for your text to follow, such as curves or waves, for sophisticated animation styles.
- Opacity Fades: Animate the opacity of text to fade in or out, perfect for intros or transitions between scenes.
- Color Shifts: Change the color of your text over time, creating a dynamic visual effect that captures attention.
These examples showcase the versatility and creative potential of text animations in Sony Vegas, offering endless possibilities for enhancing your video projects.
READ MORE:
Optimizing Playback and Render Settings for Text Animations
Optimizing playback and render settings is crucial for ensuring smooth text animations in Sony Vegas. Here\"s how to adjust your settings for the best results:
- Choose the Right Preview Quality: Lower the preview quality to draft or preview mode to enhance playback performance during editing.
- Adjust Dynamic RAM Preview: Increase the Dynamic RAM preview size in Preferences to allocate more memory for previewing complex animations.
- Use GPU Acceleration: Enable GPU acceleration in the Video Preferences to speed up rendering times and improve playback of text animations.
- Select Appropriate Render Settings: When rendering your final video, choose a setting that matches your project\"s resolution and frame rate for optimal quality.
- Render to Appropriate Formats: Render your animations to formats that support high quality, such as H.264 for web or AVC for broadcasting.
- Test Render Small Segments: Before rendering the entire project, render small segments to ensure the text animations look as expected.
- Optimize Project Settings: Match your project settings, including frame rate and aspect ratio, with your intended output to avoid unnecessary processing.
By fine-tuning these settings, you can achieve smooth playback and high-quality renders of your text animations in Sony Vegas, ensuring your final product looks professional and engaging.
Mastering text animation in Sony Vegas unlocks endless creative possibilities, transforming your videos into captivating stories. Dive into these techniques to elevate your projects and engage your audience like never before.