Topic how to remove sony car stereo: Discover the simple steps to safely remove your Sony car stereo, whether you"re upgrading your system or fixing a problem. This guide will walk you through the process, ensuring a smooth and damage-free removal.
Table of Content
- How do I remove a Sony car stereo?
- Essential Tools for Removal
- Disconnecting the Battery
- Removing the Trim Panel
- Unmounting the Sony Car Stereo
- Disconnecting Wiring Connections
- Installing a Replacement Stereo (Optional)
- YOUTUBE: How to Remove Car Stereo Aftermarket from Dashboard (SONY) in 4 Steps
- Reconnecting Wiring Connections
- Tips for Successful Removal
How do I remove a Sony car stereo?
To remove a Sony car stereo, follow the steps below:
- First, make sure to turn off your vehicle\'s ignition and remove the keys.
- Gently pry off any decorative panels or trim surrounding the stereo using a trim removal tool or a flathead screwdriver wrapped in cloth to prevent damage.
- Locate and remove any screws or bolts securing the stereo to the dashboard. These may be located on the sides or underneath the unit.
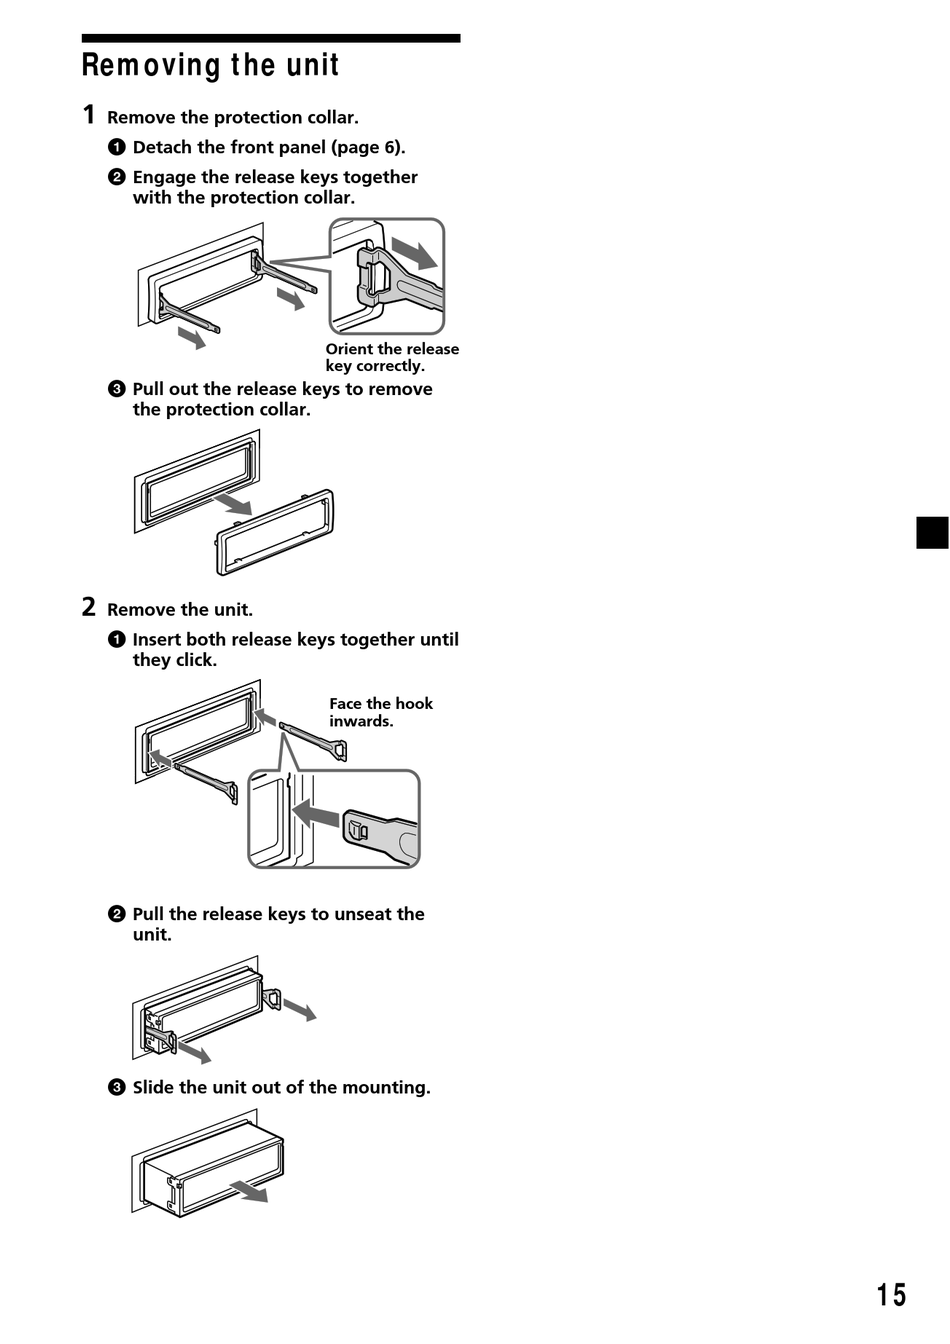
- Once the screws are removed, use stereo removal keys or a stereo removal tool to release the locking mechanism. Insert the keys into the corresponding slots on each side of the stereo until they click into place.
- Gently pull the keys (or the tool) outward while applying even pressure to release the stereo. Be careful not to force it out or pull too hard to avoid damaging the wiring.
- Disconnect any wiring harnesses or antenna cables attached to the back of the stereo. These can usually be detached by pressing a release button or lever.
- Once all the connections are detached, carefully slide the stereo out of the mounting bracket.
By following these steps, you should be able to successfully remove your Sony car stereo.
READ MORE:
Essential Tools for Removal
Removing a Sony car stereo is a straightforward process that requires a few basic tools. Having the right tools at hand will ensure that you can safely and efficiently remove your car stereo without damaging your vehicle\"s interior or the stereo unit itself. Here\"s what you\"ll need:
- Stereo Removal Keys: These are specific to Sony models and are designed to unlock the stereo from its mounting brackets.
- Screwdriver Set: A set of flathead and Phillips screwdrivers will be useful for removing screws that may be securing the stereo or trim.
- Trim Panel Removal Tool: This tool is designed to safely pry off the trim pieces without scratching or damaging your car\"s interior.
- Socket Wrench Set: Some stereos are secured with bolts instead of screws, so a socket wrench set with various sizes is helpful.
- Electrical Tape: If you need to cut wires, use electrical tape to safely insulate exposed wire ends.
- Wire Cutter/Stripper: This tool is necessary if you plan to cut or strip any wiring during the removal process.
Before you begin, ensure your vehicle\"s engine is off and the battery is disconnected to prevent any electrical shorts or shocks. Then, gather your tools and prepare your workspace. With these essential tools, you\"re ready to remove your Sony car stereo safely.

Disconnecting the Battery
Before starting the removal process of your Sony car stereo, it\"s crucial to ensure your safety and the protection of your vehicle\"s electrical system by disconnecting the battery. Here\"s a step-by-step guide to do it properly:
- Locate the Battery: Open your vehicle\"s hood and locate the battery. It\"s typically found in the engine bay, but some models may have it in the trunk or under a seat.
- Identify the Terminals: Batteries have two terminals, positive (+) and negative (-). The positive terminal is usually covered with a red cap or marked with a plus sign.
- Disconnect the Negative Terminal: Always start with the negative terminal to prevent the risk of electrical shorts. Use a wrench to loosen the nut or bolt on the terminal clamp. Once loosened, carefully remove the clamp from the battery post.
- Secure the Negative Cable: Ensure the negative cable is placed away from the battery and any metal parts to avoid accidental contact.
- Optional - Disconnect the Positive Terminal: Though not always necessary, you can also disconnect the positive terminal using the same method for added safety.
With the battery disconnected, you can safely proceed with the removal of your Sony car stereo without the risk of electrical shock or damaging the vehicle\"s electronic components. Remember to reconnect the battery following the reverse order once your maintenance is complete.
Removing the Trim Panel
Accessing your Sony car stereo typically requires removing the trim panel that surrounds the stereo unit. This step must be performed carefully to avoid damage to your vehicle\"s interior. Follow these instructions to remove the trim panel safely:
- Prepare Your Tools: You\"ll need a trim panel removal tool or a flathead screwdriver. If using a screwdriver, wrap its tip with tape to prevent scratching the trim or dashboard.
- Locate Trim Panel Fasteners: Examine the trim panel closely to locate any visible screws or fasteners that hold it in place. Some vehicles use hidden clips instead of screws.
- Remove Screws or Fasteners: Using the appropriate screwdriver, remove all screws or fasteners. Keep them in a safe place as you will need them for reassembly.
- Gently Pry the Trim Panel: Insert the trim panel removal tool or the flathead screwdriver\"s tip into the gap between the trim panel and the dashboard. Gently pry the trim panel away from the dashboard. If the panel is held by clips, you will feel them release as you apply gentle pressure.
- Disconnect Any Electrical Connectors: If the trim panel has electrical components (like buttons or lights), disconnect any electrical connectors by pressing the release tab and gently pulling the connector apart.
- Remove the Trim Panel: Once all fasteners, clips, and connectors are disconnected, carefully remove the trim panel and set it aside in a safe location.
With the trim panel removed, you will have access to the screws or bolts securing the Sony car stereo in place, allowing you to proceed with its removal.

Unmounting the Sony Car Stereo
After removing the trim panel, the next step is to unmount the Sony car stereo from its position. This process requires precision and care to avoid damaging the stereo or the vehicle\"s interior. Here’s how to do it:
- Identify Mounting Screws or Brackets: Look for screws or brackets that secure the car stereo to the dashboard. These are usually found on the sides or the top of the stereo unit.
- Remove Screws: Using the appropriate screwdriver, remove all the screws holding the stereo in place. Remember to keep these screws safe for reassembly.
- Slide the Stereo Out: Carefully pull the stereo out from its slot. If it doesn\"t slide out easily, check to make sure all screws have been removed and that no wires are snagging on the back.
- Disconnect Wiring Harnesses: Behind the stereo, you\"ll find several wiring harnesses connected to it. Press down on the clip or tab on each connector to detach it from the stereo. Handle these connectors gently to avoid damage.
- Remove Antenna Cable: Locate the antenna cable, which is typically a thick cable plugged into the back of the stereo. Gently pull this cable out of its socket.
- Complete Removal: With all cables and harnesses disconnected, you can now fully remove the Sony car stereo from your vehicle.
Unmounting your Sony car stereo properly ensures that you can upgrade, repair, or replace it without causing harm to the unit or your car\"s dashboard.
_HOOK_
Disconnecting Wiring Connections
Once the Sony car stereo is unmounted, the next crucial step involves safely disconnecting the wiring connections. This step is vital to prevent damage to the stereo or your car\"s electrical system. Follow these steps to disconnect the wiring connections properly:
- Identify the Wiring Harness: Locate the main wiring harness connected to the back of the car stereo. This harness typically has a bundle of wires leading into a single connector.
- Release the Harness Connector: Most connectors have a safety clip or a release mechanism. Press down on the clip or squeeze the release mechanism to detach the connector from the stereo.
- Disconnect Additional Cables: Apart from the main wiring harness, there may be additional cables such as the antenna cable, auxiliary input cables, or amplifier connections. Gently pull these cables out from their respective ports on the stereo.
- Organize the Cables: Once disconnected, carefully organize the cables to prevent tangling or damage. This organization will assist in the reconnection process or the installation of a new stereo.
- Check for Other Connections: If the stereo has additional features like a GPS or a microphone for hands-free calling, ensure that these connections are also safely disconnected.
Disconnecting the wiring connections carefully is crucial to avoid snapping cables or damaging the car\"s electrical system. Take your time, and if unsure about a connection, consult the stereo\"s manual for specific instructions.

Installing a Replacement Stereo (Optional)
Upgrading your car\"s audio system with a new stereo can enhance your driving experience. After removing the old Sony car stereo, follow these steps to install a replacement stereo:
- Check Compatibility: Ensure the new stereo fits your car model. You may need an adapter kit for a seamless fit and integration with your vehicle\"s electrical system.
- Prepare the Wiring Harness: If the new stereo\"s wiring harness doesn\"t match your car\"s, use a harness adapter to connect the stereo to your vehicle\"s wiring system without cutting any wires.
- Connect the Wiring Harness: Attach the wiring harness adapter to your new stereo, ensuring each wire is correctly matched by color or function according to the stereo\"s wiring diagram.
- Attach the Mounting Kit: If required, install the mounting kit to your new stereo. This kit helps the stereo fit securely within the dashboard without gaps.
- Connect the Antenna Cable: Plug the antenna cable into the new stereo to ensure you receive radio broadcasts.
- Test the Stereo: Before securing the new stereo in the dashboard, connect the battery temporarily and test the stereo to ensure it powers on and all functions work as expected.
- Secure the Stereo in Place: Once you\"ve confirmed the stereo works correctly, slide it into the dashboard. Use the screws or bolts provided with the mounting kit to secure the stereo.
- Reassemble the Trim Panel: Carefully place the trim panel back, reconnecting any electrical components if detached. Ensure the panel fits snugly around the new stereo.
With your new stereo installed, you can enjoy improved sound quality and additional features like Bluetooth connectivity, navigation, and more. Always refer to the installation manual that comes with your replacement stereo for specific instructions.
How to Remove Car Stereo Aftermarket from Dashboard (SONY) in 4 Steps
\"Unlock the full potential of your Sony devices and experience unparalleled entertainment! Don\'t miss out on our informative video that highlights the top features and hidden gems of Sony products. Enhance your tech-savvy lifestyle today!\"
How to Get My Sony XPLOD Stereo Out of the Dash: Car Audio
\"Upgrade your car audio experience with the ultimate Sony car stereo system! With crystal-clear sound and seamless connectivity, our video showcases the unparalleled audio quality and user-friendly features that will transform your driving journeys into musical adventures.\"
Reconnecting Wiring Connections
After installing a new stereo or when putting back your Sony car stereo, correctly reconnecting the wiring connections is crucial for functionality and safety. Follow these steps to ensure a proper reconnection:
- Review Wiring Diagrams: Before reconnecting, review the wiring diagrams for your vehicle and the stereo. This ensures that you understand which wire goes where.
- Connect the Main Harness: Start by connecting the main wiring harness to the back of the stereo. Ensure each connector snaps securely into place.
- Reattach Additional Cables: Connect any additional cables such as the antenna cable, auxiliary inputs, or amplifier wires, according to their specific ports on the stereo.
- Secure Ground Wire: If the stereo has a separate ground wire, ensure it is securely attached to a metal part of the vehicle\"s frame or a designated ground point.
- Reconnect the Battery: Once all the wiring connections are secure and double-checked, reconnect your vehicle\"s battery, starting with the positive terminal followed by the negative.
- Test the Stereo: Before reassembling the dashboard, turn on your vehicle and test the stereo. Check all functions including radio, Bluetooth connectivity, and sound quality to ensure everything works as expected.
Properly reconnecting the wiring ensures your stereo functions correctly without any risk of electrical issues. If you encounter any problems during this process, it may be helpful to consult a professional installer or refer back to the stereo and vehicle manuals for guidance.

READ MORE:
Tips for Successful Removal
Removing a Sony car stereo can be a smooth process with the right approach and preparation. Here are some tips to ensure successful removal:
- Read the Manual: Before starting, consult your vehicle and stereo manuals for specific removal instructions and any special requirements.
- Use the Right Tools: Ensure you have all the necessary tools beforehand, including stereo removal keys, screwdrivers, and trim panel removal tools to avoid damage.
- Disconnect the Battery: Always disconnect the battery before starting the removal process to prevent any electrical issues or short circuits.
- Be Gentle: When removing trim panels and the stereo, apply gentle pressure to avoid breaking clips or damaging the dashboard.
- Keep Track of Screws: As you remove screws and bolts, keep them in a safe place to ensure you can easily reassemble everything.
- Label Wiring Connections: If you\"re disconnecting wiring harnesses, label them to make reconnection easier and prevent confusion.
- Ask for Help: If you\"re unsure about any step, don\"t hesitate to seek help from a professional to avoid costly mistakes.
- Stay Organized: Keep your workspace organized to ensure no parts get lost and everything is within reach when needed.
By following these tips, you can remove your Sony car stereo safely and efficiently, paving the way for repairs, upgrades, or replacements.
With the right tools and guidance, removing a Sony car stereo is a task you can confidently accomplish. Embrace the challenge, and soon you\"ll be ready to upgrade your car\"s audio experience or address any issues with ease.
:format(webp)/cdn.vox-cdn.com/uploads/chorus_asset/file/24337184/DSCF1086.jpg)