Topic wiring diagram sony car stereo: Discover the secrets to seamlessly install your Sony car stereo with our comprehensive guide on wiring diagrams, ensuring a flawless audio experience in your vehicle.
Table of Content
- How to install a Sony car stereo or mobile audio system?
- Understanding the 16-pin Wiring Harness
- YOUTUBE: Car Stereo Wiring Harnesses & Interfaces Explained: What Do The Wire Colors Mean?
- Installation Tips
- Installation Tips
- Introduction to Sony Car Stereo Wiring
- Understanding the Wiring Diagram Symbols
- Common Sony Car Stereo Models and Their Wiring Diagrams
- Step-by-Step Guide on Reading Sony Wiring Diagrams
- Color Codes and Their Meanings in Sony Car Stereos
- Tools and Materials Needed for Wiring Installation
- DIY Installation Tips for Sony Car Stereo
- Troubleshooting Common Wiring Issues
- Enhancing Your Audio System: Connecting Amplifiers and Speakers
- Professional Installation vs. DIY: Pros and Cons
- Safety Precautions When Working with Electrical Wiring
- Conclusion: Maximizing Your Sony Car Stereo Experience
How to install a Sony car stereo or mobile audio system?
To install a Sony car stereo or mobile audio system, follow these steps:
- Start by gathering all the necessary tools and equipment, including a Sony car stereo, wire harness adapter, wire cutters/strippers, electrical tape, and a screwdriver.
- Disconnect the negative terminal of the car battery to ensure safety.
- Using the wire harness adapter, connect it to the car\'s wire harness connector. Match the color-coded wires from the adapter to the corresponding wires on the car\'s harness, and twist them together.
- Next, connect the other end of the wire harness adapter to the Sony car stereo. Again, match the wire colors and twist them together. You may also need to use crimp connectors or solder the connections for a more secure fit.
- Secure the wires and connections with electrical tape or wire connectors to prevent any loose or exposed wires.
- Double-check all the connections to ensure they are secure and properly matched.
- Mount the Sony car stereo into the car\'s dashboard or designated slot. Use the screwdriver to secure it in place according to the manufacturer\'s instructions.
- Reconnect the negative terminal of the car battery that was previously disconnected.
- Turn on the car and test the Sony car stereo to ensure it is functioning properly. Check the sound, radio reception, and other features to ensure everything is working as expected.
- If necessary, adjust the settings on the Sony car stereo to personalize the audio preferences and set up any additional features.
READ MORE:
Understanding the 16-pin Wiring Harness
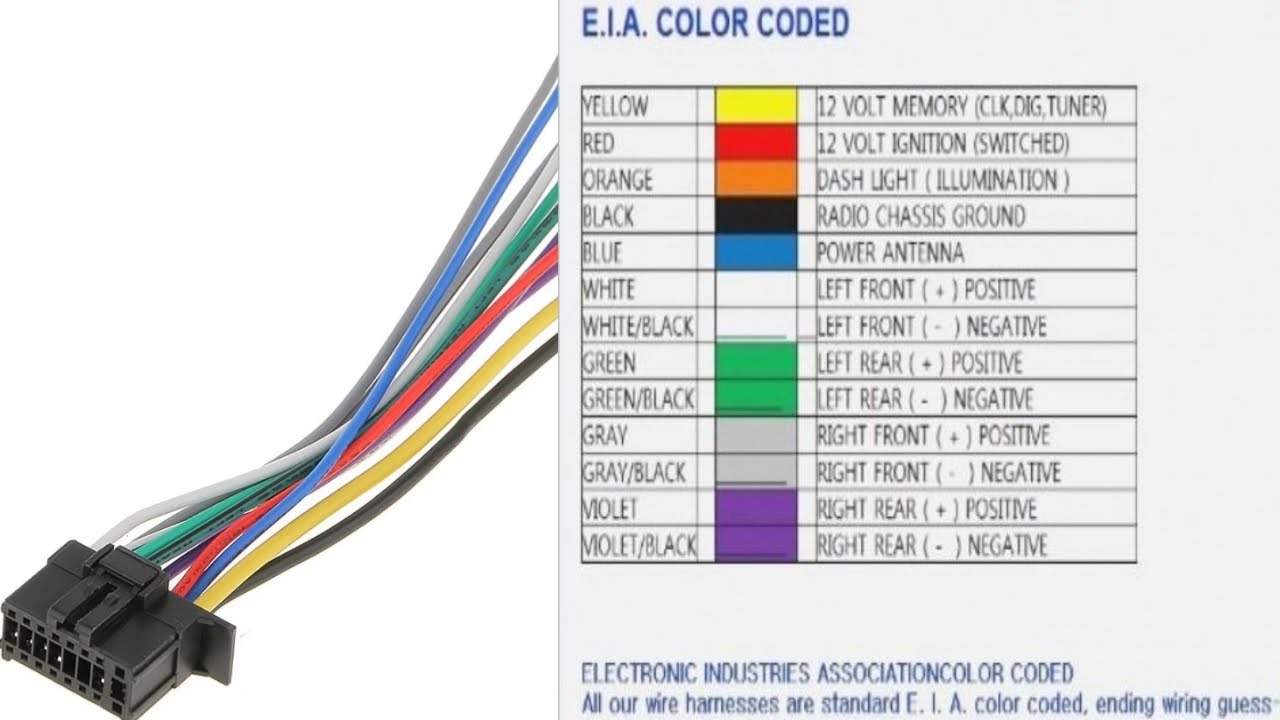
The 16-pin wiring harness is a common connector for Sony car stereos. Each pin on the harness serves a specific function, crucial for the correct installation of your car stereo.
Color Codes and Functions
| Pin Number | Wire Color | Function |
| 1 | Yellow | Constant 12V |
| 2 | Red | Accessory (Switched 12V) |
| 3 | Black | Ground |
| 4 | Blue | Antenna/Amp Remote Turn On |
| 5 | Blue/White | Amplifier Turn On |
| 6 | White | Left Front Speaker (+) |
| 7 | White/Black | Left Front Speaker (-) |
| 8 | Gray | Right Front Speaker (+) |
| 9 | Gray/Black | Right Front Speaker (-) |
| 10 | Green | Left Rear Speaker (+) |
| 11 | Green/Black | Left Rear Speaker (-) |
| 12 | Purple | Right Rear Speaker (+) |
| 13 | Purple/Black | Right Rear Speaker (-) |
| Note: This table is a general guide; consult your Sony car stereo manual for specific wiring information. |

Car Stereo Wiring Harnesses & Interfaces Explained: What Do The Wire Colors Mean?
Car Stereo Wiring: Learn the secrets to professional-grade car stereo installation with our comprehensive video guide. Get step-by-step instructions on wiring your car stereo system, ensuring optimum sound quality and a seamless integration into your vehicle. Upgrade your audio experience today!
Sony Double DIN Receiver Install (Part 1): Car Stereo Wiring Explained (How to Video)
Sony Double DIN Receiver: Discover the power of the Sony Double DIN Receiver in our captivating video demonstration. Experience crystal-clear sound, enhanced connectivity options, and an intuitive interface that will transform your driving experience. Elevate your car\'s audio system with the best-in-class Sony technology.
Installation Tips
- Ensure the ignition is off before starting the installation to avoid electrical shorts.
- Use a multimeter to verify connections and voltages.
- Properly secure all connections with solder or crimp connectors and electrical tape to prevent loosening over time.
- Always refer to the specific model\"s manual for any special instructions or information.
Important Note
Installation and wiring can vary based on the car stereo model and vehicle. It\"s recommended to consult a professional installer if you are unsure about the wiring process.

Introduction to Sony Car Stereo Wiring
Installing a Sony car stereo involves understanding the wiring diagram specific to your model. This section aims to demystify the process, providing a solid foundation for anyone looking to enhance their car\"s audio system. Whether you\"re a DIY enthusiast or a professional installer, grasping the basics of car stereo wiring is crucial.
Every Sony car stereo comes with a unique wiring harness, designed to connect the stereo to your vehicle\"s electrical system seamlessly. Recognizing the wires and their functions is the first step towards a successful installation.
- Power Wires: These include the yellow (constant power), red (switched power), and black (ground).
- Speaker Wires: Typically color-coded, these wires connect directly to your speakers and are crucial for sound output.
- Additional Connections: Blue and blue/white wires are used for remote turn-on for amplifiers and antennas, while other colors may represent connections for steering wheel controls, external amplifiers, and more.
Understanding the wiring diagram of your Sony car stereo is not just about making connections. It\"s also about ensuring that the audio system works in harmony with your vehicle\"s electrical system. A correctly installed stereo not only delivers superior sound quality but also integrates seamlessly with the vehicle\"s overall functionality.
Here are the steps to follow for a basic installation:
- Identify your Sony car stereo model and obtain the corresponding wiring diagram.
- Prepare the necessary tools, including wire strippers, soldering iron, and electrical tape.
- Carefully match the wire colors according to the diagram, ensuring each connection is secure.
- Test the stereo before finalizing the installation to check for any issues.
By paying close attention to the wiring diagram and following these steps, you can achieve a professional-quality installation that enhances your driving experience with rich, dynamic audio.

_HOOK_
Understanding the Wiring Diagram Symbols
Wiring diagrams for Sony car stereos include various symbols that represent the different components and connections within your audio system. Familiarizing yourself with these symbols is essential for a successful installation. This section will help you decode the symbols commonly found in Sony car stereo wiring diagrams.
- Solid Lines: Represent the wires. The color of the line often matches the wire color, indicating its purpose and connection points.
- Dashed Lines: Usually indicate optional or secondary connections, such as those for external amplifiers or steering wheel audio controls.
- Arrowheads: Show the direction of signal flow, crucial for understanding how audio signals are routed through the system.
- Squares, Circles, and Rectangles: Denote connectors, terminals, or other components. Specific shapes may represent different types of devices or connection points.
- Plus and Minus Signs: Indicate power supply connections, with plus for positive and minus for ground or negative.
Each symbol in a wiring diagram is designed to convey specific information about the component it represents. Here are additional symbols you might encounter:
- Speaker Symbols: Depicted as lines with one end wider than the other, representing the speaker\"s shape and its polarity.
- Battery Symbol: Indicates the power source, usually connected to the vehicle\"s battery for constant power.
- Ground Symbol: Shown as a line that fans out into three, resembling an upside-down tree, marking the ground connection.
Understanding these symbols allows you to accurately follow the wiring diagram for your Sony car stereo, ensuring each component is correctly connected for optimal performance. Whether you\"re a novice attempting your first install or a seasoned professional, mastering these symbols will streamline the installation process and help avoid common mistakes.

Common Sony Car Stereo Models and Their Wiring Diagrams
Sony car stereos are renowned for their quality sound and reliability. Each model comes with its unique set of features and wiring diagram. Understanding the specific wiring diagram for your Sony stereo model is crucial for a correct installation. This section highlights some of the most common Sony car stereo models and provides insights into their wiring configurations.
- Sony Xplod Series: Known for its powerful sound output, the Xplod series requires careful attention to the wiring of speakers and power supply to maximize its performance.
- Sony MEX Series: This series often includes Bluetooth connectivity and requires additional wiring for microphone and control units.
- Sony WX Series: With its double DIN setup, the WX series may have more complex wiring for video connections in addition to the standard audio wiring.
For each of these models, the wiring diagram will detail the necessary connections for power, speakers, and any additional features such as external amplifiers or USB inputs. Here are general tips for understanding the wiring diagrams:
- Look for the diagram\"s legend to identify the color codes used for different wires.
- Pay close attention to the symbols indicating the type of connection (e.g., solid line for main connection, dashed line for optional).
- Note the position of each wire in the stereo\"s harness to ensure correct connection to your vehicle\"s wiring.
It\"s essential to refer to the specific manual for your Sony car stereo model for the most accurate wiring diagram. The manual will provide detailed instructions and diagrams tailored to your stereo, ensuring a smooth and successful installation process.

Step-by-Step Guide on Reading Sony Wiring Diagrams
Reading a Sony car stereo wiring diagram is crucial for a successful installation. To ensure you connect the wires correctly, follow these step-by-step instructions:
- Identify Wire Colors: Begin by identifying the wire colors on the diagram. Typical colors include Yellow for Constant 12V, Red for Accessory, and Black for Ground.
- Understand Symbol Meanings: Familiarize yourself with the symbols used in the diagram, such as stripes for remote turn-on or illumination wires.
- Speaker Wires: Locate speaker wires, usually represented in pairs with one having a solid color (positive) and the other with a stripe (negative). Colors like White and Gray denote front speakers, while Green and Purple represent rear speakers.
- Power Connections: Identify the power wires. The Yellow wire is for constant power, and the Red wire connects to the ignition to power the stereo only when the car is on.
- Ground Connection: The Black wire is your ground wire, which should be connected to a metal part of the vehicle\"s frame.
- Additional Connections: Look for any additional wires such as the Blue/White striped wire for amplifier turn-on, Orange/White for illumination, or Purple/White for reverse signal in models like the Sony XAV-AX1000.
- Check for Special Wires: Some models may have unique wires like the Light Green for the parking brake switch or Orange/White striped for illumination signal, especially in units like the Sony XAV-AX1000.
- Final Review: Double-check each connection according to the diagram to ensure accuracy and prevent any potential issues.
Remember, careful attention to the wiring diagram before starting your installation can save time and avoid mistakes. Ensure all connections are secure and properly insulated to prevent short circuits.

Color Codes and Their Meanings in Sony Car Stereos
Understanding the color codes of wires in Sony car stereos is crucial for a correct installation. Each color represents a specific function, making it easier to connect components correctly. Here\"s a breakdown of common color codes and their meanings:
Additional wires such as the Light Green for the parking brake, Orange/White for illumination in models like the Sony XAV-AX1000, and others for specific features like Bluetooth, steering wheel controls, or external amplifiers, might also be present depending on the model. Always refer to the specific wiring diagram for your Sony car stereo model for accurate installation.

Tools and Materials Needed for Wiring Installation
Properly installing a Sony car stereo requires not just technical know-how but also the right set of tools and materials. Ensuring you have everything you need before starting can make the installation process smoother and more efficient. Here\"s a comprehensive list:
- Wire Strippers: Essential for removing the insulation from the ends of wires without damaging the metal.
- Crimping Tool: Used to crimp connectors onto wires, ensuring a solid electrical connection.
- Soldering Iron and Solder: For permanent connections, soldering is recommended. Ensure you have some experience before attempting to solder.
- Heat Shrink Tubing or Electrical Tape: After making connections, it\"s important to insulate them to prevent short circuits. Heat shrink tubing provides a more professional finish, but electrical tape can also be effective.
- Wire Connectors: These include butt connectors, spade connectors, and others depending on the connection types needed for your specific installation.
- Screwdrivers (Phillips and Flathead): Needed for removing panels and securing the stereo and other components.
- Panel Removal Tools: Plastic pry tools that help remove interior panels without damaging them.
- Wiring Harness Adapter: This adapter connects the car\"s factory wiring plug to your new stereo, making installation easier and preventing the need to cut factory wires.
- Antenna Adapter (if required): Some cars need an adapter to connect the factory antenna to the new stereo.
- Car Stereo Mounting Kit: This includes brackets and faceplates to fit the stereo into your car\"s dashboard seamlessly.
- Multimeter: For testing connections, ensuring power is present, and troubleshooting.
Before starting, organize your workspace and ensure all tools and materials are within easy reach. Double-check the wiring diagram for your Sony car stereo and your vehicle\"s wiring to plan the installation steps. Taking the time to prepare can lead to a smoother installation process and a better final result.

_HOOK_
DIY Installation Tips for Sony Car Stereo
Installing a Sony car stereo can be a rewarding DIY project. Here are some tips to ensure a smooth installation process:
- Gather the Necessary Tools: Before you start, make sure you have all the necessary tools and materials, including a wiring harness adapter, screwdrivers, wire strippers, and electrical tape.
- Disconnect the Battery: Safety first! Always disconnect the car battery before starting the installation to prevent any electrical shorts or other hazards.
- Use a Wiring Harness Adapter: A wiring harness adapter makes the installation process much simpler and eliminates the need to cut the factory wiring, preserving your car\"s resale value.
- Follow the Wiring Diagram: Refer to the Sony wiring diagram for your specific model. This will guide you in connecting the wires correctly according to their color codes and functions.
- Secure Connections: Ensure all wire connections are secure. Use solder or crimp connectors for a solid connection, and finish with electrical tape or heat shrink tubing to insulate the connections.
- Test Before Finalizing: Before reassembling everything, test the stereo to make sure all components (radio, speakers, controls) are working correctly.
- Mount the Stereo: Once tested, carefully mount the stereo into the dash. Use the mounting kit that came with your stereo or an aftermarket kit designed for your vehicle.
- Reconnect the Battery: With everything in place, reconnect the car battery and give your new Sony car stereo a final test before hitting the road.
Remember, patience is key to a successful DIY car stereo installation. Take your time, double-check your connections, and enjoy the satisfaction of upgrading your car\"s audio system.

Troubleshooting Common Wiring Issues
Encountering wiring issues during or after a Sony car stereo installation is not uncommon. Here are steps to troubleshoot some of the most frequent problems:
- No Power to the Stereo:
- Check the fuse on the back of the stereo and the car\"s fuse box for any blown fuses.
- Ensure the yellow (constant power) and red (accessory power) wires are connected correctly.
- Poor Radio Reception:
- Verify that the antenna cable is firmly connected to the back of the stereo.
- Inspect the antenna itself for any damage or poor grounding.
- Audio Quality Issues:
- Check speaker wires (white, gray, green, purple) for proper connections and polarity.
- Ensure there are no loose connections or damaged wires leading to the speakers.
- Intermittent Functioning:
- Inspect all wire connections for looseness or corrosion.
- Make sure the ground wire (black) has a solid connection to the vehicle\"s chassis.
- Stereo Turns Off Unexpectedly:
- Check for a secure connection on the red (accessory power) wire, as it might be loose or connected to an unreliable power source.
- Ensure the unit is not overheating due to poor ventilation or placement.
If these steps don\"t resolve the issue, consult the Sony car stereo manual for model-specific troubleshooting tips or consider seeking professional assistance. Remember, proper wiring is crucial for the performance and longevity of your car stereo system.
Enhancing Your Audio System: Connecting Amplifiers and Speakers
Upgrading your Sony car stereo with additional amplifiers and speakers can significantly enhance your audio system\"s quality and power. Here\"s how to connect these components for an optimal listening experience:
- Choosing the Right Amplifier:
- Select an amplifier that matches the power requirements of your new speakers and the output capabilities of your Sony stereo.
- Connecting the Amplifier:
- Use the blue/white striped wire (remote turn-on wire) from your Sony stereo to signal the amplifier to power on.
- Connect the RCA cables from the stereo\"s pre-out jacks to the amplifier\"s input jacks.
- Ensure the amplifier is grounded to a clean, metal part of the car\"s frame.
- Installing New Speakers:
- Choose speakers that complement your car\"s interior and meet your sound quality expectations.
- Mount the speakers securely in their designated locations, using any adapters if necessary.
- Wiring the Speakers to the Amplifier:
- Run speaker wires from the amplifier\"s output terminals to your new speakers, observing proper polarity to maintain phase.
- Use high-quality speaker wires for better signal transmission and durability.
- Setting Up the System:
- Once everything is connected, adjust the amplifier\"s gain and filters according to your preference and the type of music you enjoy.
- Test the system with various music genres to ensure the sound is clear, and there are no distortions or rattling.
Enhancing your car\"s audio system by adding amplifiers and speakers can be a rewarding project. With careful planning, the right tools, and attention to detail, you can achieve a sound system that brings the best out of your music while on the move.
Professional Installation vs. DIY: Pros and Cons
When it comes to installing a Sony car stereo, you have two main options: professional installation or doing it yourself (DIY). Each approach has its benefits and drawbacks:
- Professional Installation
- Pros:
- Expertise and Experience: Professionals have the knowledge and tools to ensure your stereo is installed correctly.
- Time-Saving: A professional can complete the installation quickly, allowing you to enjoy your new system sooner.
- Warranty and Support: Many installers offer warranties on their work, providing peace of mind and support if issues arise.
- Cons:
- Cost: Professional services can be expensive, especially for high-end audio setups.
- Availability: Finding a reputable installer might be challenging in some areas, leading to potential delays.
- DIY Installation
- Pros:
- Cost-Effective: DIY installations can save you money, as you\"re only paying for parts and not labor.
- Learning Experience: Installing the stereo yourself can provide valuable knowledge and a sense of accomplishment.
- Customization: DIY allows for more personal customization of your audio system.
- Cons:
- Risk of Mistakes: Without the proper knowledge and tools, there\"s a higher risk of errors that could damage your stereo or vehicle.
- Time-Consuming: DIY installations can take much longer, especially if you\"re new to car audio.
Whether you choose professional installation or DIY, consider your skills, budget, and the complexity of the installation. Weighing the pros and cons of each option will help you decide the best route for your Sony car stereo installation.
Safety Precautions When Working with Electrical Wiring
Working with electrical wiring, especially during the installation of a Sony car stereo, requires adherence to certain safety precautions to prevent accidents and ensure a successful setup. Here are essential safety tips:
- Disconnect the Battery: Always disconnect the vehicle\"s battery before starting the installation to prevent electric shocks and protect the car\"s electrical system.
- Use Insulated Tools: Employ insulated tools designed for electrical work to reduce the risk of short circuits and electric shocks.
- Wear Protective Gear: Consider wearing safety glasses to protect your eyes from any unexpected sparks or debris.
- Understand Wiring Diagrams: Familiarize yourself with the wiring diagram of your Sony stereo and your vehicle\"s electrical system to avoid incorrect connections.
- Check Wire Insulation: Inspect all wires for any damage or wear in the insulation. Exposed wires can lead to short circuits.
- Secure Connections: Ensure all wire connections are secure and properly insulated with electrical tape or heat shrink tubing to prevent short circuits.
- Test Before Finalizing: Before reassembling the dash and reconnecting the battery, test your connections with a multimeter to ensure there are no shorts or incorrect connections.
- Avoid Water Exposure: Keep all electrical components and wiring away from moisture to prevent corrosion and electrical failures.
- Follow Manufacturer Instructions: Adhere strictly to Sony\"s installation guidelines and your vehicle\"s manual to ensure compatibility and safety.
- Seek Professional Help if Unsure: If you\"re uncertain about any part of the installation process, consult with a professional to avoid potential hazards.
Taking these precautions seriously will not only protect you from harm but also ensure the longevity and optimal performance of your Sony car stereo system.
_HOOK_
READ MORE:
Conclusion: Maximizing Your Sony Car Stereo Experience
Installing a Sony car stereo can transform your driving experience by providing superior sound quality and a range of multimedia options. To maximize your enjoyment and ensure long-lasting performance, consider the following tips:
- Follow the Installation Guide: Adhere closely to the wiring diagram and installation instructions provided by Sony to ensure correct setup and functionality.
- Invest in Quality Accessories: Use high-quality cables, connectors, and installation kits to maintain the integrity of your audio system and avoid interference.
- Regular Maintenance: Keep your car stereo system clean and check the wiring periodically for signs of wear or damage to prevent issues before they arise.
- Upgrade When Necessary: Consider upgrading components like speakers or adding amplifiers to enhance the sound quality further and tailor the audio experience to your preferences.
- Stay Updated: Keep your Sony car stereo firmware updated to ensure compatibility with new devices and access the latest features.
- Learn the Features: Take the time to familiarize yourself with all the features your Sony car stereo offers, including Bluetooth connectivity, app integration, and customizable settings, to get the most out of your system.
- Seek Professional Advice: If you encounter any issues or wish to make complex upgrades, don\"t hesitate to consult with a professional for guidance and support.
By following these guidelines, you can enjoy a rich and immersive audio experience in your vehicle, making every journey more enjoyable. Whether you\"re a DIY enthusiast or prefer professional installation, a Sony car stereo is a worthwhile investment in your vehicle\"s entertainment system.
Discover the ultimate guide to Sony car stereo wiring diagrams, ensuring a seamless DIY installation and an enhanced audio experience in your vehicle.