Topic connect sony camera to computer: Discover the seamless process to connect your Sony camera to your computer, enhancing your photography workflow and enabling easy file transfer and remote shooting capabilities.
Table of Content
- How to connect a Sony camera to a computer?
- 1. Connecting via USB Cable
- 2. Connecting Wirelessly
- 3. Using as a Webcam
- 4. Transferring Pictures and Videos
- Troubleshooting Connection Issues
- 2. Connecting Wirelessly
- YOUTUBE: How to Use Your Sony as a WEBCAM HDMI or USB Setup
- 3. Using as a Webcam
- 4. Transferring Pictures and Videos
- Troubleshooting Connection Issues
- 3. Using as a Webcam
- 4. Transferring Pictures and Videos
- Troubleshooting Connection Issues
- 4. Transferring Pictures and Videos
- Troubleshooting Connection Issues
- Troubleshooting Connection Issues
- Introduction to Connecting Sony Cameras to Computers
- Step-by-Step Guide for USB Connection
- Wireless Connection Options
- Setting Up Your Sony Camera as a Webcam
- Transferring Photos and Videos to Your Computer
- Using Sony\"s Imaging Edge Software
- Troubleshooting Common Connection Issues
- Advanced Tips for Professionals
- FAQs: Frequently Asked Questions
How to connect a Sony camera to a computer?
Connecting a Sony camera to a computer is a straightforward process. Here\'s a step-by-step guide on how to do it:
- First, make sure your Sony camera is powered off.
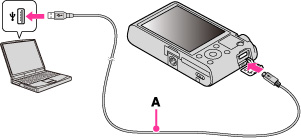
- Locate the USB cable that was supplied with your Sony camera.
- Take one end of the USB cable and insert it into the USB port on your computer.
- Now, take the other end of the USB cable and connect it to the appropriate USB port on your Sony camera. The port is usually labeled \"USB\" or has a specific icon.
- Turn on your Sony camera. Once it\'s powered on, your computer should recognize the camera as a connected device.
- If prompted on your camera\'s screen, select the option to establish a connection with the computer.
- On your computer, open the file explorer or finder and navigate to the location where you want to transfer your camera\'s files.
- You should see your Sony camera listed as a removable storage device. Double-click on it to open it.
- Now, you can browse through the folders on your Sony camera and copy or transfer the desired files to your computer. Simply drag and drop the files to the desired location on your computer.
- Once the file transfer is complete, safely disconnect your Sony camera from the computer. To do this, right-click on the removable storage device icon and select the \"Eject\" or \"Safely Remove\" option.
- Finally, unplug the USB cable from both your computer and Sony camera.
That\'s it! Your Sony camera is now successfully connected to your computer, and you can transfer files between the two devices.
READ MORE:
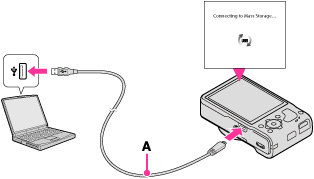
1. Connecting via USB Cable
- Turn off your camera.
- Locate the micro USB port on your camera. It may be labeled as \"Multi\" or \"USB\".
- Connect the micro USB end of the cable to your camera.
- Connect the other end of the USB cable to your computer’s USB port.
- Turn on your camera. Your computer should prompt you to access the camera’s storage.

2. Connecting Wirelessly
Wi-Fi Connection
- Ensure both your camera and computer are connected to the same Wi-Fi network.
- On your camera, go to Network Settings and select Access Point Settings.
- Type in your Wi-Fi password when prompted.
- Select PC Remote Function and then Pairing to complete the connection.
Using Imaging Edge Mobile App
For transferring pictures and videos wirelessly to a mobile device, use Sony’s Imaging Edge Mobile app.
3. Using as a Webcam
- Download and install the Imaging Edge Webcam application from Sony’s support page.
- Connect the camera to your computer using a USB cable.
- Select your Sony camera in your video chat or livestreaming software.
4. Transferring Pictures and Videos
Via USB Connection
- Connect the camera to your computer with a USB cable.
- Select the Autoplay dialog on your computer.
- Choose File Explorer and navigate to the DCIM folder on your camera’s storage to transfer files.
Using PlayMemories Home Software
Download and install the PlayMemories Home software for easier management and transfer of your photos and videos.
_HOOK_
Troubleshooting Connection Issues
- Ensure the camera is set to the correct USB connection mode in its menu settings.
- If the computer does not recognize the camera, try turning the camera off and on again.
- For wireless connections, make sure both devices are connected to the same Wi-Fi network.

2. Connecting Wirelessly
Wi-Fi Connection
- Ensure both your camera and computer are connected to the same Wi-Fi network.
- On your camera, go to Network Settings and select Access Point Settings.
- Type in your Wi-Fi password when prompted.
- Select PC Remote Function and then Pairing to complete the connection.
Using Imaging Edge Mobile App
For transferring pictures and videos wirelessly to a mobile device, use Sony’s Imaging Edge Mobile app.

How to Use Your Sony as a WEBCAM HDMI or USB Setup
\"Capture your memories in stunning clarity with the Sony webcam! Experience crystal clear video quality and exceptional detail, making every video call or vlog a masterpiece worth re-watching. Let Sony revolutionize your online communication.\"
3. Using as a Webcam
- Download and install the Imaging Edge Webcam application from Sony’s support page.
- Connect the camera to your computer using a USB cable.
- Select your Sony camera in your video chat or livestreaming software.
How To Connect Your Sony Camera To Your Computer Sony Imaging Edge
\"Discover a seamless connection between your Sony camera and your computer with Sony Imaging Edge. Effortlessly transfer and manage your photos and videos, edit and enhance them with powerful features, and share your creativity with the world. Unleash the full potential of your Sony camera now!\"
4. Transferring Pictures and Videos
Via USB Connection
- Connect the camera to your computer with a USB cable.
- Select the Autoplay dialog on your computer.
- Choose File Explorer and navigate to the DCIM folder on your camera’s storage to transfer files.
Using PlayMemories Home Software
Download and install the PlayMemories Home software for easier management and transfer of your photos and videos.
Troubleshooting Connection Issues
- Ensure the camera is set to the correct USB connection mode in its menu settings.
- If the computer does not recognize the camera, try turning the camera off and on again.
- For wireless connections, make sure both devices are connected to the same Wi-Fi network.
_HOOK_
3. Using as a Webcam
- Download and install the Imaging Edge Webcam application from Sony’s support page.
- Connect the camera to your computer using a USB cable.
- Select your Sony camera in your video chat or livestreaming software.

4. Transferring Pictures and Videos
Via USB Connection
- Connect the camera to your computer with a USB cable.
- Select the Autoplay dialog on your computer.
- Choose File Explorer and navigate to the DCIM folder on your camera’s storage to transfer files.
Using PlayMemories Home Software
Download and install the PlayMemories Home software for easier management and transfer of your photos and videos.
Troubleshooting Connection Issues
- Ensure the camera is set to the correct USB connection mode in its menu settings.
- If the computer does not recognize the camera, try turning the camera off and on again.
- For wireless connections, make sure both devices are connected to the same Wi-Fi network.
_HOOK_
Troubleshooting Connection Issues
- Ensure the camera is set to the correct USB connection mode in its menu settings.
- If the computer does not recognize the camera, try turning the camera off and on again.
- For wireless connections, make sure both devices are connected to the same Wi-Fi network.
Introduction to Connecting Sony Cameras to Computers
Connecting your Sony camera to a computer is a fundamental skill for photographers looking to transfer files, use their camera as a webcam, or manage photos and videos with ease. This section will guide you through the various methods available, ensuring a smooth connection process.
- Understanding the Benefits: Connecting your Sony camera to a computer not only simplifies the process of transferring images and videos but also opens up opportunities for editing, sharing, and archiving your work with greater efficiency.
- Choosing Your Connection Method: Whether you prefer a wired connection using a USB cable or a wireless connection via Wi-Fi, Sony provides flexible options to cater to your needs.
- Preparation: Before connecting, ensure your camera\"s battery is charged to avoid interruptions and install any necessary software or drivers on your computer.
Following these preliminary steps will ensure a successful connection, allowing you to focus on what you love most—capturing and creating stunning visual content.
Step-by-Step Guide for USB Connection
Connecting your Sony camera to a computer via USB is a straightforward process. Follow these detailed steps to ensure a smooth and successful connection for transferring your photos and videos.
- Turn Off Your Camera: To begin, ensure your Sony camera is turned off before connecting it to your computer. This prevents any potential data corruption during the connection process.
- Identify the USB Port on Your Camera: Locate the USB port on your Sony camera. It is typically marked as \"Multi\", \"USB\", or similar. This is where you will connect the USB cable.
- Connect the USB Cable: Take the micro USB end of the cable and plug it into your camera\"s USB port. Then, connect the other end of the USB cable to an available USB port on your computer.
- Turn On Your Camera: With the USB cable connected, turn on your Sony camera. Your computer should automatically detect the camera and may prompt you to choose what action to take.
- Access Your Camera\"s Storage: Once your computer recognizes the camera, you can access it like any external storage device. Navigate to the camera’s storage to view, transfer, or manage files.
By following these simple steps, you\"ll be able to connect your Sony camera to your computer using a USB cable, enabling you to transfer files with ease.
Wireless Connection Options
For photographers who prefer a cable-free workspace, Sony cameras offer several wireless connection methods to computers. These options provide flexibility and convenience for transferring files, controlling your camera remotely, or even using it as a high-quality webcam. Explore the wireless connection options below.
- Wi-Fi Connection: Most Sony cameras come equipped with built-in Wi-Fi, allowing you to connect directly to a computer or laptop on the same network. To set this up, navigate to your camera\"s network settings, select Wi-Fi settings, and connect to your desired network.
- Imaging Edge Mobile Application: Sony\"s Imaging Edge Mobile app facilitates easy transfer of images and videos from your camera to a mobile device, which can then be moved to a computer. Download the app on your smartphone, connect to your camera, and follow the prompts for transferring files wirelessly.
- Bluetooth Connection: Some Sony camera models support Bluetooth for a low-power, wireless connection. While this is more commonly used for controlling camera settings remotely rather than file transfer, it\"s a convenient option for wireless camera operation.
- Direct Connection via QR Code: Certain models allow for a direct connection to a computer by scanning a QR code displayed on the camera\"s screen. This method simplifies the process of establishing a wireless connection without the need for manual network setup.
Each wireless option offers its own set of advantages, depending on your specific needs and workflow. By utilizing these wireless connections, you can enjoy a more flexible and efficient photography experience.
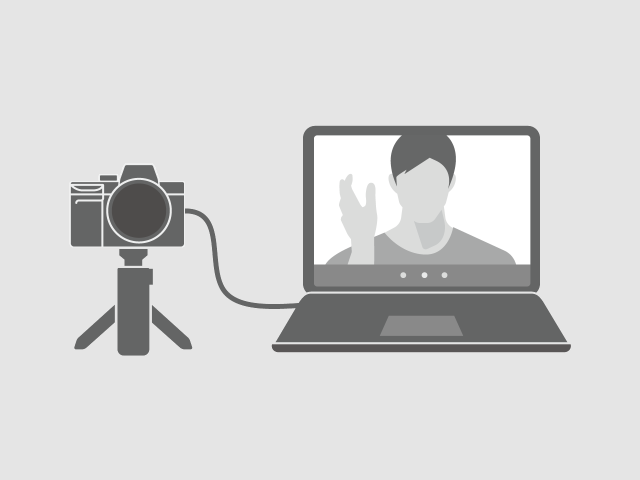
Setting Up Your Sony Camera as a Webcam
Using your Sony camera as a webcam can significantly enhance your video conferencing or live streaming quality. This setup requires specific steps to ensure your camera functions correctly as a webcam. Follow this guide to get started.
- Check Camera Compatibility: Ensure your Sony camera model is compatible with being used as a webcam. Most recent Sony models support this feature.
- Download and Install Imaging Edge Webcam: Sony offers the Imaging Edge Webcam software that allows your camera to be recognized as a webcam by your computer. Download and install this software from the official Sony website.
- Connect Your Camera to the Computer: Use a USB cable to connect your camera to the computer. Make sure the camera is turned off when you connect it, then turn it on once the connection is established.
- Select the Camera in Your Video Application: Open your video conferencing or streaming software. Go to the settings and select the Sony camera as your webcam source. If correctly set up, your Sony camera should now be listed as one of the webcam options.
- Adjust Camera Settings: For the best video quality, adjust your camera’s settings such as exposure, ISO, and focus mode. Manual settings will give you more control over the video output compared to automatic modes.
By following these steps, you can leverage the superior image quality of your Sony camera to elevate your video calls and live streams, providing a professional-grade visual experience.
_HOOK_
Transferring Photos and Videos to Your Computer
Transferring your cherished photos and videos from your Sony camera to your computer is a crucial step in managing your digital memories. Follow this comprehensive guide to easily move your media files.
- Using a USB Connection: The most straightforward method to transfer files is by connecting your Sony camera to your computer using a USB cable. Once connected and the camera is turned on, your computer should recognize it as an external storage device, allowing you to access and transfer files using File Explorer (Windows) or Finder (Mac).
- Wireless Transfer: If your Sony camera supports Wi-Fi, you can transfer files wirelessly. Connect your camera and computer to the same Wi-Fi network, and use Sony\"s wireless transfer software or app to select and transfer files directly to your computer without the need for cables.
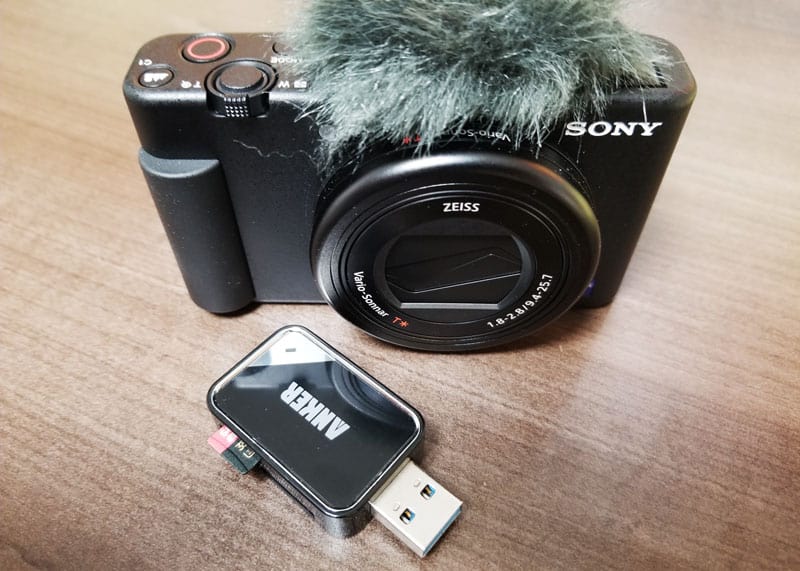
- Using Memory Card Readers: An alternative method is to use a memory card reader. Simply remove the SD card from your camera, insert it into the card reader, and then plug the reader into your computer. This method is often faster than transferring directly from the camera and does not require the camera to be turned on.
- Utilizing Sony’s PlayMemories Home or Imaging Edge Software: For a more organized transfer, Sony offers software solutions like PlayMemories Home or Imaging Edge. These programs provide additional functionality, such as organizing, editing, and sharing your photos and videos directly from the software.
Regardless of the method you choose, transferring your photos and videos is a simple process that ensures your media is safely stored and accessible on your computer for further editing, sharing, or archiving.
Using Sony\"s Imaging Edge Software
Sony\"s Imaging Edge software suite enhances your photography experience, offering tools for shooting, editing, and sharing your photos and videos directly from your computer. Follow this guide to get started with Imaging Edge and unlock advanced features for your Sony camera.
- Download and Install Imaging Edge: Visit the official Sony website to download the Imaging Edge software. Choose the version compatible with your operating system, and follow the installation instructions.
- Connect Your Camera: You can connect your Sony camera to your computer either using a USB cable or through a Wi-Fi connection. Ensure your camera is turned on and set to the appropriate connection mode.
- Launch the Application: Open the Imaging Edge software on your computer. The application should automatically detect your camera, allowing you to access its features.
- Remote Shooting: Use the Remote application within Imaging Edge for live view photography, allowing you to control your camera settings directly from your computer.
- Edit Your Photos: The Edit application offers advanced editing features, such as adjusting brightness, contrast, and sharpness, as well as cropping and converting RAW files into JPEGs.
- Organize and Share: The Viewer application lets you organize your photos and videos, rate them, and easily share your work on social media or with clients.
Imaging Edge provides a comprehensive set of tools for Sony camera users, from capturing the perfect shot to post-processing, enhancing your overall photography workflow.
Troubleshooting Common Connection Issues
Encountering issues when trying to connect your Sony camera to your computer can be frustrating. However, many common connection problems can be resolved with a few simple steps. Here are solutions to some frequently encountered issues.
- Camera Not Recognized by the Computer: Ensure the camera is turned on and set to the correct USB connection mode. Try using a different USB port or cable if the problem persists.
- Connection Drops or Is Unstable: For wireless connections, ensure both your camera and computer have a strong Wi-Fi signal. Avoid physical obstructions and interference from other wireless devices.
- Files Not Transferring: Check if the storage mode is correctly selected on your camera. Some cameras have specific modes for connecting to PCs that must be enabled.
- Software Does Not Recognize the Camera: Update the Imaging Edge software to the latest version. Also, ensure your camera\"s firmware is up to date.
- Using the Camera as a Webcam Issues: Make sure the Imaging Edge Webcam software is correctly installed and that the camera is selected as the video source in your streaming or video conferencing application.
These steps can resolve most issues related to connecting your Sony camera to your computer. If problems persist, consider consulting Sony\"s official support for further assistance.
Advanced Tips for Professionals
For professional photographers and videographers looking to optimize their workflow when connecting a Sony camera to a computer, these advanced tips can enhance efficiency and performance.
- Use Tethered Shooting: For studio work, consider tethered shooting to instantly view your photos on a larger screen. This requires a stable USB connection and software like Sony\"s Imaging Edge. It allows for immediate feedback and adjustments.
- Configure Network Settings for Faster Wireless Transfers: If using Wi-Fi to transfer files, ensure your network is optimized for speed. Use a 5 GHz band if available and minimize distance and obstructions between your camera and router.
- Utilize RAW File Transfer for Quality: When transferring files, especially for post-processing, ensure you\"re transferring RAW files to maintain the highest quality. Adjust your camera\"s settings to save files in RAW format.
- Automate Your Workflow with Software: Explore automation features in Sony\"s Imaging Edge or other third-party software. Automating repetitive tasks like importing, renaming, and backing up files can save valuable time.
- Invest in High-Quality Cables and Card Readers: To ensure reliability and speed, use high-quality USB cables and card readers. This is especially important for tethered shooting and high-volume transfers.
Implementing these advanced techniques can significantly improve your workflow, allowing you to focus more on creative aspects of your photography and videography projects.
READ MORE:
FAQs: Frequently Asked Questions
- Can I connect any Sony camera to a computer? Most Sony cameras, especially newer models, can be connected to a computer either via USB or wirelessly. Check your camera\"s manual for specific connectivity options.
- Do I need special software to transfer photos and videos? While not strictly necessary, Sony\"s Imaging Edge software can streamline the transfer, editing, and organization of your photos and videos.
- How can I use my Sony camera as a webcam? Download and install the Imaging Edge Webcam software from Sony\"s official website. Connect your camera via USB, and select it as the video source in your streaming or video conferencing application.
- Why isn\"t my computer recognizing my Sony camera? Ensure the camera is turned on and set to the correct USB connection mode. Try a different USB port or cable if the issue persists.
- Can I connect my Sony camera to a Mac? Yes, Sony cameras can connect to both Windows and Mac computers. The process and available software are similar for both operating systems.
- Is it possible to transfer files wirelessly from my Sony camera? Yes, if your camera supports Wi-Fi connectivity, you can transfer files wirelessly. You may need to install and configure Sony\"s wireless transfer software or apps.
These FAQs cover the basics of connecting and using your Sony camera with a computer. For more detailed information or specific issues, refer to your camera\"s user manual or Sony\"s support website.
Connecting your Sony camera to a computer unlocks a world of possibilities, from effortless file transfers to professional-grade live streams. Embrace these tips to enhance your photography workflow and unleash your creative potential.
_HOOK_