Topic connect sony a6000 to computer: Discover how to effortlessly connect your Sony A6000 to your computer, enhancing your photography workflow with our comprehensive guide on USB, wireless options, and troubleshooting tips.
Table of Content
- How to connect Sony a6000 to computer?
- Overview of Connecting Sony A6000 to Computer
- Step-by-Step Guide for USB Connection
- Transferring Photos and Videos via USB
- Using Sony’s Imaging Edge Software
- Wireless Connection Options
- YOUTUBE: Connect Sony Camera to Computer with Sony Imaging Edge
- Troubleshooting USB Connection Issues
- How to Use Sony A6000 as a Webcam
- Best Practices for File Transfer
- Advanced Settings and Tips for Efficient Workflow
- FAQs and Common Problems Solved
How to connect Sony a6000 to computer?
To connect the Sony a6000 to your computer, you can follow these steps:
- Make sure you have the USB cable provided with the camera.
- Turn off your camera before connecting it to the computer.
- Locate the USB port on your camera and the USB port on your computer.
- Connect one end of the USB cable to the camera\'s USB port.
- Connect the other end of the USB cable to the USB port on your computer.
- Turn on your camera.
- Your computer should detect the camera and install any necessary drivers.
- Once the camera is recognized by your computer, you can access and transfer your files.
Make sure to use the appropriate cable and if you encounter any difficulties, you can try using a different USB cable or port on your computer. Also, ensure that the camera is set to the appropriate mode for connecting to a computer, which is usually \"Mass Storage\" or \"PC Remote\".
READ MORE:
Overview of Connecting Sony A6000 to Computer
Connecting your Sony A6000 to a computer opens up a world of possibilities for photographers and videographers alike. Whether you\"re looking to transfer photos and videos for editing, use your camera as a high-quality webcam, or manage files directly on your computer, understanding the connection process is crucial. This overview will guide you through the different methods of connecting your A6000, including USB and wireless options, and introduce you to Sony’s Imaging Edge software for enhanced functionality.
Connection Methods
- USB Connection: The most straightforward method to connect your A6000 to a computer. It requires a USB cable (usually micro USB to USB-A) and allows for the transfer of files directly from your camera to your computer.
- Wireless Connection: Offers a convenient way to transfer files without the need for cables. This method uses Wi-Fi to connect your camera to your computer or smartphone, enabling remote file transfer and camera control.
Benefits of Connecting to a Computer
- Transfer photos and videos quickly and efficiently.
- Use the camera as a webcam for streaming or video conferencing with superior image quality.
- Access and manage files directly, allowing for a streamlined workflow.
- Update camera firmware directly from Sony\"s website to ensure optimal performance.
Regardless of your preferred connection method, setting up your Sony A6000 with your computer will enhance your photography workflow, making it easier to manage, edit, and share your creations. Follow the detailed steps in the subsequent sections to get started.

Step-by-Step Guide for USB Connection
Connecting your Sony A6000 to your computer via USB is a simple process that allows for easy transfer of your photos and videos. Follow these detailed steps to establish a connection and start transferring your media.
- Turn Off Your Camera: Before you connect the Sony A6000 to your computer, make sure the camera is turned off. This ensures a safe connection.
- Prepare the USB Cable: Locate the micro USB cable that came with your camera. If you do not have the original cable, any micro USB to USB cable should work.
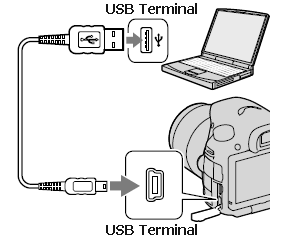
- Connect the Cable to the Camera: Insert the micro USB end of the cable into the USB port on your Sony A6000. This port is typically covered by a small flap labeled \"USB.\"
- Connect to Your Computer: Plug the other end of the USB cable into a free USB port on your computer. Make sure to use a direct connection rather than through a USB hub for the most reliable connection.
- Turn On Your Camera: With the camera connected to the computer, turn on your Sony A6000. Your computer should recognize the camera as a removable drive.
- Access Your Camera’s Storage: On your computer, navigate to \"This PC\" (Windows) or \"Finder\" (Mac). You should see your camera listed as a drive. If prompted, select the option to \"Open folder to view files.\"
- Transfer Files: Navigate through the folders on your camera’s storage to find your photos and videos. You can then copy or move these files to your computer by dragging them to your desired location.
- Safely Disconnect: Once you have transferred all desired files, make sure to safely eject your camera before disconnecting the USB cable. This can be done by right-clicking on the camera’s drive icon and selecting \"Eject\" on Windows, or by dragging the drive icon to the trash on Mac, which will change to an eject icon.
Following these steps will ensure a safe and efficient transfer of your photos and videos from your Sony A6000 to your computer using a USB connection.
Transferring Photos and Videos via USB
Once your Sony A6000 is connected to your computer via USB, transferring photos and videos is straightforward. This section will guide you through the process, ensuring you can quickly access and back up your media files on your computer.
- Ensure the Camera is Properly Connected: Follow the steps outlined in the previous section to connect your Sony A6000 to your computer using the USB cable. Make sure the camera is turned on after connecting.
- Access the Camera Storage: Your computer will recognize the camera as an external storage device. On a Windows PC, look for the camera under ‘This PC’ as a removable drive. On a Mac, the camera will appear on the desktop or in the Finder under ‘Locations’.
- Navigate the Camera’s Folder Structure: Open the camera’s storage on your computer. Photos and videos are typically stored in the \"DCIM\" folder. Inside, you may find multiple folders—navigate through these to find your files.
- Select the Files to Transfer: Once you locate your photos and videos, select the ones you want to transfer. You can select individual files by clicking on them or select multiple files by holding the ‘Ctrl’ key (Windows) or ‘Command’ key (Mac) while clicking.
- Copy or Move the Files: After selecting the files, right-click on one of the selected files and choose ‘Copy’ or ‘Cut’. Navigate to the location on your computer where you want to store these files, right-click in the folder, and select ‘Paste’.
- Wait for the Transfer to Complete: The time it takes to transfer your files will depend on the number and size of the files. Wait until the transfer is fully complete before proceeding to the next step.
- Safely Disconnect Your Camera: To prevent data loss or corruption, safely eject your camera before disconnecting it. On Windows, right-click the removable drive icon in ‘This PC’ and select ‘Eject’. On Mac, click the eject icon next to the camera’s name in Finder.
By following these steps, you can efficiently transfer your photos and videos from your Sony A6000 to your computer, ensuring they are safe and ready for editing, sharing, or storage.

Using Sony’s Imaging Edge Software
Sony’s Imaging Edge software suite enhances the functionality of your Sony A6000, providing powerful tools for transferring, editing, and managing your photos and videos. This guide will walk you through the process of using Imaging Edge with your camera.
- Download and Install Imaging Edge: Visit the official Sony website to download the Imaging Edge software. Ensure you select the version compatible with your computer\"s operating system. Follow the installation instructions provided on the website.
- Connect Your Camera: Using a USB cable, connect your Sony A6000 to your computer. Ensure the camera is turned on to be recognized by the software.
- Launch Imaging Edge: Open the Imaging Edge software on your computer. The software suite includes several applications, such as \"Remote\", \"Viewer\", and \"Edit\".
- Transfer Files Using Viewer: The \"Viewer\" application allows you to browse, rate, and organize your photos and videos. Once your camera is connected, you can import your files into the \"Viewer\" for easy management.
- Edit Photos: Open the \"Edit\" application within Imaging Edge to access a range of editing tools designed specifically for Sony cameras. Here, you can adjust exposure, color, and other settings to enhance your photos.
- Remote Shooting: The \"Remote\" application offers the capability to control your Sony A6000 remotely from your computer. This feature is particularly useful for studio shooting, allowing you to adjust settings and shoot without physically touching the camera.
- Update Camera Firmware: Imaging Edge also provides an easy way to check for and install firmware updates for your Sony A6000, ensuring your camera operates with the latest features and improvements.
By integrating Sony’s Imaging Edge software into your workflow, you can significantly expand the capabilities of your Sony A6000, from streamlined file management to advanced editing and remote camera control.

_HOOK_
Wireless Connection Options
Wirelessly connecting your Sony A6000 to your computer offers a convenient way to transfer files without the need for cables. This section explores the various wireless connection options available, providing a seamless way to manage and share your photos and videos.
- Prepare Your Camera: Ensure your Sony A6000\"s Wi-Fi is enabled. Navigate to the camera\"s network settings and select the Wi-Fi function. You may need to set your camera to \"Access Point Mode\" or \"Send to Smartphone\" depending on your model and firmware version.
- Connect to Your Computer\"s Wi-Fi Network: If your computer and camera are on the same Wi-Fi network, you can easily transfer files. Some models require you to connect the camera directly to the computer\"s Wi-Fi network, which might appear as a direct connection option on your camera.
- Use Sony\"s PlayMemories Home Software: Download and install Sony\"s PlayMemories Home software on your computer. This software facilitates the wireless transfer of photos and videos from your camera to your computer. Open the software and follow the on-screen instructions to connect your camera.
- Transfer Files Wirelessly: Once connected, you can select the photos and videos you wish to transfer from your camera to your computer using the PlayMemories Home interface. The software may also offer an automatic transfer feature for new photos and videos.
- Utilize Imaging Edge Mobile: For a more mobile-oriented solution, download the Imaging Edge Mobile app on your smartphone. This app allows you to transfer files from your camera to your phone, and from there, you can move files to your computer. Ensure both your camera and smartphone are connected to the same Wi-Fi network.
Wireless connections offer the flexibility to transfer files without physical cables, making it easier to share your creations quickly. Remember, the performance and speed of wireless transfers can vary based on your Wi-Fi network\"s strength and congestion.

Connect Sony Camera to Computer with Sony Imaging Edge
Discover the incredible features of Sony Imaging Edge and take your photography game to the next level. Learn how this powerful software can enhance your images and unleash your creative potential. Watch the video now and unlock a whole new world of possibilities!
Fixing Sony USB Connection Not Recognized Issue
Are you struggling with a USB connection not being recognized on your device? No worries, we have the solution for you! In this informative video, we\'ll guide you through step-by-step troubleshooting to fix this issue and get your device connected in no time. Don\'t let technology hurdles hold you back, watch the video now and get back to seamless USB connections.
Troubleshooting USB Connection Issues
If you encounter issues while trying to connect your Sony A6000 to your computer via USB, don\"t worry. Many common problems have simple solutions. This section will guide you through troubleshooting steps to resolve USB connection issues effectively.
- Check the USB Cable: Ensure that the USB cable is securely connected to both your camera and computer. Try using a different USB cable if possible, as the cable might be damaged.
- Use the Correct USB Port: Connect the USB cable to a different USB port on your computer. Avoid using USB hubs or ports on keyboards and monitors, as they might not provide a stable connection.
- Turn On the Camera After Connecting: Make sure your camera is turned off when you connect it to the computer. Then, turn on the camera after it\"s connected. Some computers recognize the camera only after it\"s powered on while already connected.
- Set the Camera to the Correct USB Mode: Some Sony cameras have multiple USB connection modes. Check your camera’s settings to ensure it’s set to \"Mass Storage\" or \"Auto\". This setting is usually found in the camera’s main menu.
- Restart Your Computer and Camera: Restarting both your computer and camera can resolve many connection issues. This refreshes the system and can help your computer recognize the camera.
- Update Camera Firmware: Ensure your camera has the latest firmware from Sony. An outdated firmware version can cause compatibility issues with newer operating systems.
- Install or Update Drivers: For Windows users, make sure that the drivers for your camera are installed and up to date. Windows should automatically install the necessary drivers, but you can also manually update them through the Device Manager.
- Try a Different Computer: If possible, try connecting your camera to a different computer. This can help determine if the issue is with the camera or the original computer.
By following these troubleshooting steps, you can resolve most USB connection issues between your Sony A6000 and your computer. If problems persist, consider consulting Sony’s customer support for further assistance.
How to Use Sony A6000 as a Webcam
Using your Sony A6000 as a webcam can significantly enhance your video conferencing and livestreaming quality. This section provides a step-by-step guide to set up your A6000 as a high-quality webcam for your computer.
- Check for Necessary Software: Ensure you have the latest version of Sony’s Imaging Edge Webcam software installed on your computer. This software enables your A6000 to function as a webcam.
- Prepare Your Camera: Fully charge your Sony A6000 or connect it to a power source using an AC adapter to ensure it doesn’t run out of battery during use.
- Connect Your Camera to the Computer: Use a USB cable to connect your A6000 to your computer. Turn on your camera after establishing the connection.
- Set Your Camera to Movie Mode: Rotate the mode dial on your camera to the movie camera icon to switch it to Movie Mode. This step ensures the best video quality for your webcam use.
- Launch Imaging Edge Webcam Software: Open the Imaging Edge Webcam software on your computer. Follow any on-screen instructions to recognize your camera as a webcam.
- Select Your Camera as the Video Source: In your video conferencing or livestreaming software, go to the settings and select your Sony A6000 as the video source. The exact steps may vary depending on the software you are using.
- Adjust Camera Settings: Adjust the focus, exposure, and other settings on your camera as needed to ensure the best video quality. Using a tripod to stabilize the camera can also improve the video experience.
With these steps, your Sony A6000 is now ready to be used as a webcam, offering superior video quality for all your online interactions. Whether you\"re video conferencing, teaching online, or livestreaming, your A6000 will provide a professional-level video feed.

Best Practices for File Transfer
Transferring files from your Sony A6000 to your computer is a crucial step in the photography workflow. To ensure this process is as efficient and safe as possible, follow these best practices for file transfer.
- Use a High-Quality USB Cable: Ensure the USB cable is in good condition and is compatible with your camera. A faulty or incompatible cable can cause transfer errors or damage your camera’s USB port.
- Turn Off the Camera Before Connecting: To prevent any potential data corruption, it\"s advisable to turn off your camera before connecting it to your computer. Only turn it on once the connection is secure.
- Transfer Files Regularly: Regularly transferring your files not only helps manage your camera\"s storage space but also reduces the risk of data loss due to unforeseen circumstances.
- Organize Files During Transfer: As you transfer files, take the time to organize them into folders on your computer. This can save you a significant amount of time in post-processing and make it easier to locate specific files later.
- Backup Your Files: Always keep backups of your files in a separate storage device or cloud service. This ensures that your data is safe in case of hardware failure or accidental deletion.
- Safely Eject Your Camera: After transferring files, ensure you safely eject your camera from your computer. This step helps prevent data corruption by ensuring all processes are complete before disconnecting.
- Check for Firmware Updates: Regularly check for and install firmware updates for your Sony A6000. Updates can improve the stability and speed of file transfers.
By following these best practices, you can streamline the file transfer process from your Sony A6000 to your computer, ensuring your files are transferred safely and efficiently, ready for the next steps in your workflow.

Advanced Settings and Tips for Efficient Workflow
Maximizing the efficiency of your workflow when using the Sony A6000 and transferring files to your computer involves understanding and utilizing advanced settings and practices. These tips will help you streamline your process, save time, and maintain the integrity of your photos and videos.
- Customize File Naming: Utilize the custom file naming feature in your camera settings to organize your shots more effectively. This can help in sorting and identifying files quickly during post-processing.
- Use RAW Format for Quality: If your workflow involves extensive post-processing, shoot in RAW format. RAW files provide higher quality and more detail for editing, though they require more storage space.
- Enable Tethered Shooting: For studio work, consider tethered shooting using Sony’s Imaging Edge software. This allows you to instantly view and manage photos on your computer, speeding up the selection and editing process.
- Implement a File Backup System: Set up an automatic backup system that copies your files to an external hard drive or cloud storage as soon as they are transferred to your computer. This minimizes the risk of data loss.
- Optimize Your Computer: Ensure your computer is optimized for photo editing. Regularly update your software, clear your cache, and maintain ample free disk space to improve performance and speed.
- Use Keyboard Shortcuts: Learn and utilize keyboard shortcuts in your editing software to speed up your editing process. Shortcuts can significantly reduce the time spent on repetitive tasks.
- Create Presets: Develop presets in your editing software for frequently used settings. This can drastically reduce editing time by applying preferred settings to photos with a single click.
Adopting these advanced settings and tips can lead to a more efficient workflow, allowing you to focus more on the creative aspects of photography while minimizing the time spent on file management and editing.

_HOOK_
READ MORE:
FAQs and Common Problems Solved
Navigating the complexities of connecting your Sony A6000 to your computer can sometimes lead to questions and issues. This section aims to address some of the most frequently asked questions and common problems, providing clear solutions to help you streamline your workflow.
- Why isn\"t my computer recognizing my Sony A6000 when connected via USB?
- Ensure your camera is turned on after connecting it to your computer. Check if the USB cable is properly connected and not damaged. Try using a different USB port or cable if necessary. Additionally, verify that your camera is set to the correct USB connection mode, typically \"Mass Storage\" or \"Auto\".
- How can I transfer photos and videos wirelessly from my A6000 to my computer?
- First, ensure your camera and computer are connected to the same Wi-Fi network. Use Sony\"s Imaging Edge Mobile application to facilitate wireless transfer. For direct transfer to a computer, consider using Sony\"s Imaging Edge Desktop software\"s \"Remote\" or \"Viewer\" functions.
- My photos are not showing up on my computer after transferring them. What should I do?
- Check the destination folder on your computer to ensure it\"s correctly selected during the transfer process. If using a card reader, ensure it\"s compatible with your computer\"s operating system and properly connected. Try transferring a small number of files to rule out storage or format issues.
- Can I use my Sony A6000 as a webcam?
- Yes, by using Sony’s Imaging Edge Webcam software, you can turn your A6000 into a high-quality webcam. Ensure your camera is in Movie Mode and connected via USB, then select it as the video source in your video conferencing or streaming software.
- How do I update the firmware on my Sony A6000?
- Visit the official Sony website to download the latest firmware update for your A6000. Connect your camera to your computer via USB, and run the downloaded file. Follow the on-screen instructions carefully to complete the update.
By addressing these FAQs and common problems, you can enjoy a smoother experience with your Sony A6000, focusing more on capturing and creating stunning images and less on troubleshooting connection issues.
Mastering the connection between your Sony A6000 and computer can significantly enhance your photographic journey, streamlining your workflow for greater creativity and efficiency. Embrace these tips to unlock the full potential of your photography.