Topic sony vegas track motion: Discover the power of Sony Vegas Track Motion to elevate your video projects, enhancing creativity and efficiency in your editing workflow.
Table of Content
- How to use the Track Motion tool in Sony Vegas for creating graphic overlays?
- Understanding Track Motion in Sony Vegas
- Getting Started with Track Motion
- Keyframe Animation with Track Motion
- Advanced Techniques for Track Motion
- Applying Track Motion to Text and Graphics
- Motion Tracking for Video Effects
- YOUTUBE: Vegas Pro 19 Tutorial | Motion Tracking The Easy Way!
- Creating Dynamic Video Compositions
- Tips and Tricks for Smooth Motion Tracking
- Common Issues and Solutions in Track Motion
- Best Practices for Track Motion in Sony Vegas
How to use the Track Motion tool in Sony Vegas for creating graphic overlays?
Using the Track Motion tool in Sony Vegas, you can easily create graphic overlays such as lower-third titles. Here\'s a step-by-step guide on how to use this tool:
- Open Sony Vegas and load your video project.
- Select the video track where you want to add the graphic overlay.
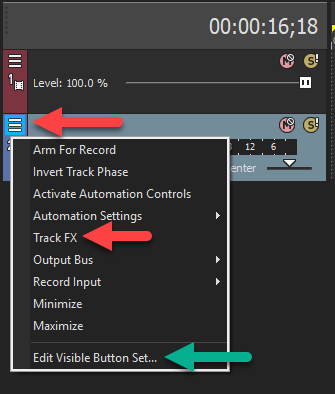
- Right-click on the video track and choose \"Insert/Remove Envelope\" > \"Track Motion\" from the context menu.
- A Track Motion keyframe timeline will appear in the Video Track FX window.
- In the Video Track FX window, click on the \"Track Motion\" button to open the Track Motion window.
- The Track Motion window will show a preview of your video and provide controls for adjusting position, scale, rotation, and other parameters.
- Position the overlay graphic on the video by adjusting the X and Y parameters in the Track Motion window.
- To scale the graphic, adjust the Width and Height parameters.
- If needed, you can also rotate the graphic using the Rotation parameter.
- In addition to basic position, scale, and rotation, you can explore other parameters like opacity and composite mode to further enhance the overlay.
- Once you are satisfied with the placement and appearance of your graphic overlay, click \"OK\" to close the Track Motion window.
That\'s it! You have successfully used the Track Motion tool in Sony Vegas to create a graphic overlay for your video project.
READ MORE:
Understanding Track Motion in Sony Vegas
Track Motion in Sony Vegas is a powerful feature that allows editors to animate an object\"s position, scale, and rotation across the video frame, offering dynamic effects and precise control over video elements. It\"s essential for creating engaging videos with motion graphics and layered compositions.
- Introduction to Track Motion: Learn the basics of track motion and how it differs from event pan/crop for animating objects.
- Accessing Track Motion: Instructions on where to find the track motion window and an overview of its interface.
- Keyframe Animation: Step-by-step guide on setting keyframes to animate an object’s movement over time.
- Adjusting Parameters: How to manipulate position, scale, and rotation parameters for creative effects.
- Utilizing Parent-Child Tracks: Advanced techniques for complex animations using parent-child track relationships.
- Practical Applications: Examples of track motion in action, such as text animation, picture-in-picture, and logo animation.
By mastering track motion, you can significantly enhance the visual appeal of your video projects, making them more dynamic and engaging for your audience.

Getting Started with Track Motion
Embarking on your journey with Track Motion in Sony Vegas opens up a world of creative possibilities. This section guides you through the initial steps to harness this powerful tool effectively.
- Open Your Project: Begin by launching Sony Vegas and opening the project you wish to edit.
- Locate the Track Motion Button: Find the Track Motion button on the timeline for the video track you want to animate. It\"s usually represented by a motion tracking icon.
- Familiarize with the Track Motion Interface: Upon clicking the Track Motion button, you\"ll be presented with the Track Motion window. Take a moment to familiarize yourself with its layout, including the position, scale, and rotation controls.
- Set Your First Keyframe: Move the playhead to the position where you want your animation to start, and adjust the controls to set the starting point of your animation. This creates your first keyframe.
- Create Movement: Move the playhead to another point on the timeline where you want to change the position, scale, or rotation of your object, and adjust the controls accordingly to create your animation path.
- Preview Your Animation: Use the preview function to play back your animation and make any necessary adjustments to ensure smooth motion.
- Experiment and Learn: Track Motion is a versatile tool. Experiment with different settings and keyframe placements to understand how each adjustment affects your animation.
With these steps, you\"ll have set the foundation for your Track Motion journey in Sony Vegas, paving the way for more complex and creative video editing projects.

Keyframe Animation with Track Motion
Keyframe animation is a cornerstone of creating dynamic movements in Sony Vegas through Track Motion. This technique allows for precise control over the animation of video elements, offering a blend of creativity and technicality.
- Understanding Keyframes: Keyframes mark the start and end points of any animation in Track Motion, defining the position, scale, and rotation of an element at specific times.
- Adding Keyframes: In the Track Motion window, move the playhead to the desired time, then adjust your video element to set a keyframe automatically or click the \"Add Keyframe\" button.
- Manipulating Keyframes: Once keyframes are set, you can adjust them to change the timing and nature of the animation. Click and drag keyframes on the timeline for precise positioning.
- Interpolation Methods: Sony Vegas offers different interpolation methods for keyframes, such as linear, smooth, and fast or slow fades. Experiment with these to achieve the desired motion effect.
- Previewing Animations: Regularly preview your animations to ensure the motion paths are as intended. Adjust keyframes as necessary for smoother transitions.
- Advanced Techniques: Explore advanced techniques like using bezier handles in the Track Motion window to create more complex motion curves for your animations.
Mastering keyframe animation in Track Motion unlocks the full potential of Sony Vegas, allowing you to create professional and captivating video content with ease.
Advanced Techniques for Track Motion
Delving deeper into Track Motion in Sony Vegas unveils a suite of advanced techniques that can transform your video projects into cinematic masterpieces. This section explores some of the more sophisticated methods.
- Parent-Child Tracking: Learn to link tracks together, using a parent track to control the motion of one or more child tracks, enabling complex animations and effects.
- 3D Track Motion: Sony Vegas supports 3D track motion, allowing for the manipulation of video elements in a three-dimensional space for immersive effects.
- Masking with Track Motion: Combine track motion with masking to create sophisticated visual effects, such as having objects move in and out of view seamlessly.
- Using Bezier Curves: For smoother transitions and more natural movements, employ bezier curves in keyframe adjustments, offering finer control over the animation path.
- Syncing Motion to Audio: Explore techniques for syncing your animations with audio cues to create videos that not only look good but also sound perfectly timed.
- Animating Text: Apply track motion to text elements to bring static titles to life, creating dynamic and engaging openers or lower thirds.
- Custom Presets: Save your frequently used motion settings as custom presets for quick application in future projects, enhancing efficiency and consistency.
By mastering these advanced techniques, you can elevate your video editing skills to new heights, pushing the boundaries of creativity with Sony Vegas\"s Track Motion feature.

_HOOK_
Applying Track Motion to Text and Graphics
Track Motion in Sony Vegas is not limited to video clips; it’s equally powerful when applied to text and graphics, bringing them to life with dynamic movements. This section guides you through the process of animating these elements.
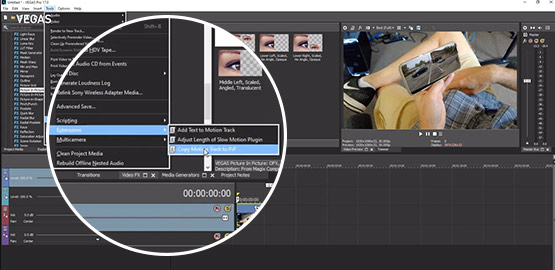
- Adding Text/Graphics: Start by adding your text or graphic element to the timeline. Use the Media Generators tab for text and import graphics through the Project Media tab.
- Accessing Track Motion: Select the track containing your text or graphic. Click on the Track Motion icon to open the Track Motion window.
- Setting Initial Position: Place the playhead at the beginning of your text/graphic event. Adjust the position, scale, or rotation to set the starting point of your animation.
- Animating Your Element: Move the playhead to where you want the animation to end, and adjust the position, scale, or rotation again to create motion. Sony Vegas automatically creates keyframes for these changes.
- Preview and Adjust: Use the preview function to watch your animation. Adjust the keyframes as needed for timing and smoothness.
- Experiment with Effects: Combine track motion with other video effects for creative results. For instance, animate a text to fly in from the side and then apply a blur effect as it moves.
- Layering Elements: Utilize track motion to layer text over video clips in creative ways, such as having text follow an object within the video.
Applying track motion to text and graphics can significantly enhance your videos, making them more engaging and professional. With practice, these techniques can become a staple in your video editing toolkit.
Motion Tracking for Video Effects
Motion tracking in Sony Vegas allows for the automatic movement of text, graphics, or effects to follow a particular object within a video clip. This technique enhances storytelling and adds a professional touch to your projects.
- Understanding Motion Tracking: Motion tracking analyzes video to follow the movement of an object. It then applies the tracked data to other elements.
- Choosing the Right Clip: Select a video clip with a clear object to track. The object should have distinct color or shape contrast from the background for more accurate tracking.
- Accessing the Motion Tracking Tool: While Sony Vegas Pro does not have a built-in motion tracker, third-party plugins or external software can be used in conjunction with Vegas for motion tracking tasks.
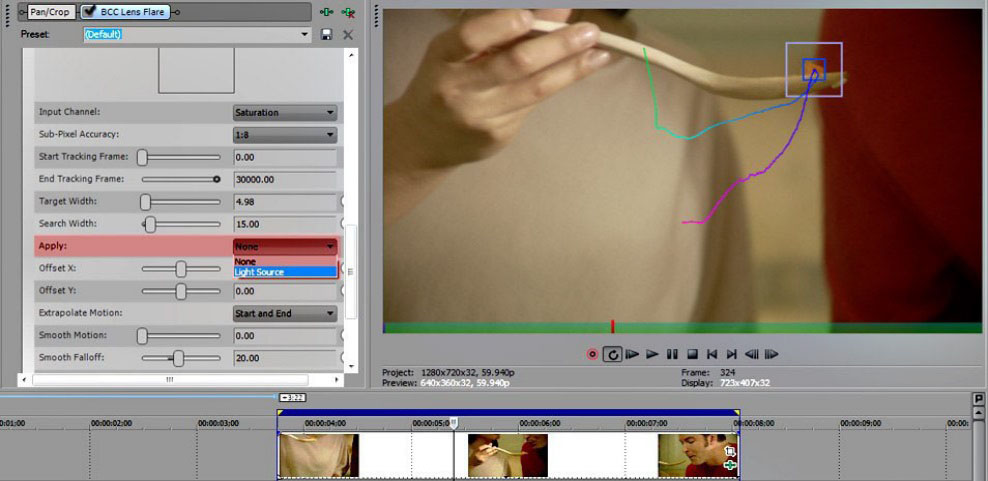
- Setting Up Your Track: In your third-party tool, define the object to be tracked. This usually involves drawing a box or mask around the object.
- Tracking the Object: Run the tracking process. The software will generate keyframe data that matches the movement of your selected object through the video.
- Applying Tracked Data: Export the tracking data and apply it to your element in Sony Vegas. This could be text that follows a person walking or an effect that highlights an object.
- Refining the Track: Adjust the applied track as necessary in Vegas, ensuring that the text or effect seamlessly follows the object throughout the clip.
Though requiring an extra step outside of Sony Vegas, motion tracking is a powerful tool for creating visually compelling video effects that are synchronized with the action in your scenes.

Vegas Pro 19 Tutorial | Motion Tracking The Easy Way!
Sony Vegas Pro 18: Dive into the next level of professional video editing with Sony Vegas Pro
Motion Tracking Title & Text in Sony Vegas Pro 18.
Experience a seamless and powerful editing software that offers unparalleled features and precision. Watch our video tutorial to unleash your creativity and master the art of video editing with Sony Vegas Pro 18.
Creating Dynamic Video Compositions
Dynamic video compositions in Sony Vegas leverage track motion to combine multiple layers of video, text, and graphics, creating rich, engaging content. This section explores how to build complex scenes that captivate your audience.
- Layering Your Elements: Start by arranging your video clips, graphics, and text elements on different tracks within the timeline. Consider the visual hierarchy of your composition.
- Applying Track Motion: Use track motion to animate individual elements. This could involve moving text across the screen, scaling video clips, or rotating graphics to enhance visual interest.
- Using Keyframes: Keyframe animation is crucial for creating smooth transitions between elements. Adjust keyframes for each track to control the timing and speed of animations.
- Incorporating 3D Space: Take advantage of Sony Vegas\"s capability to work in 3D space by positioning elements at different depths. This adds a layer of sophistication to your compositions.
- Experimenting with Effects: Apply effects selectively to your tracks. Blending modes, color corrections, and special effects can dramatically alter the mood and feel of your composition.
- Preview and Refine: Regularly preview your composition to ensure that the elements work well together. Use this as an opportunity to tweak animations, adjust timings, and refine effects.
- Mastering the Art of Storytelling: Remember, the goal of dynamic compositions is not just to dazzle viewers with motion but to enhance the storytelling aspect of your videos. Every movement should have a purpose and contribute to the narrative.
By mastering these techniques, you can create dynamic video compositions that are not only visually appealing but also emotionally resonant with viewers.
Tips and Tricks for Smooth Motion Tracking
Achieving smooth motion tracking in Sony Vegas requires a mix of technical skill and creative insight. Here are some tips and tricks to enhance the quality and fluidity of your motion-tracked projects.
- Start with High-Quality Footage: Smooth motion tracking begins with high-resolution and high-frame-rate footage. This provides more data for tracking and results in smoother animations.
- Use Manual Tracking for Complex Scenes: While automatic tracking works well for straightforward tasks, manual keyframe adjustments may be necessary for complex scenes with occlusions or rapid movements.
- Apply Motion Blur: Adding motion blur to moving elements can make track motion appear more natural and reduce the jarring effect of sharp movements.
- Optimize Keyframe Placement: Place keyframes strategically to avoid unnecessary changes in speed or direction. This ensures a more consistent and smooth motion path.
- Leverage Bezier Handles: Use bezier handles in the track motion window to fine-tune the motion curve, allowing for smoother transitions between keyframes.
- Preview Regularly: Frequently preview your work to catch and correct any issues early on. This helps in maintaining the fluidity of the motion throughout the project.
- Learn from Tutorials and Practice: Take advantage of online tutorials specific to Sony Vegas motion tracking. Practice with different types of footage to gain experience and confidence.
By following these tips, you can significantly improve the smoothness and realism of your motion-tracked elements, making your videos more polished and professional.
Common Issues and Solutions in Track Motion
Even the most seasoned editors can encounter challenges with track motion in Sony Vegas. This section outlines some common issues and their solutions, ensuring a smoother editing process.
- Issue: Keyframes Not Behaving as Expected
- Solution: Double-check the interpolation method between keyframes. Adjusting from linear to smooth or vice versa can often resolve unexpected motion.
- Issue: Motion Blur Not Applying Correctly
- Solution: Ensure that motion blur is enabled in both the project settings and on the individual track. Increase the blur amount for more noticeable effects.
- Issue: Difficulty Aligning Text or Graphics Precisely
- Solution: Use the grid and snapping features within the track motion window to align elements more accurately. Zooming in on the timeline can also help with precise placement.
- Issue: Animations Look Too Mechanical
- Solution: Use bezier handles to adjust the speed and easing of your animations. This can make movements appear more natural and fluid.
- Issue: Track Motion Affects Whole Track Instead of Individual Clips
- Solution: To apply track motion to individual clips, consider splitting the track into separate sections or using composite child tracks for more granular control.
With these solutions, most common track motion issues can be effectively managed, allowing for a more productive and creative video editing workflow.

_HOOK_
READ MORE:
Best Practices for Track Motion in Sony Vegas
Maximizing the effectiveness of Track Motion in Sony Vegas involves adhering to best practices that ensure high-quality results and efficient workflows. Here are essential guidelines to follow:
- Plan Your Motion Paths: Before adjusting any settings, visualize or sketch out the motion path you want to achieve. Planning ahead can save time and ensure smoother animations.
- Start with Simple Movements: If you\"re new to Track Motion, begin with basic movements and gradually experiment with more complex animations as you become more comfortable.
- Use Keyframes Sparingly: While it might be tempting to use many keyframes for precision, too many can make adjustments cumbersome. Use just enough to define the motion clearly.
- Maintain Consistency with Motion Blur: Consistent use of motion blur can make your animations feel more natural. Adjust the amount according to the speed of movement.
- Utilize the Preview Function: Regularly preview your animations to ensure they match your vision. Adjust as necessary for timing and smoothness.
- Organize Your Project: Keep your project file organized, especially if you\"re working with multiple tracks and animations. Labeling tracks and using color coding can help manage complexity.
- Learn from Tutorials: There\"s a wealth of knowledge available online. Watching tutorials can introduce you to new techniques and inspire creative uses of Track Motion.
By following these best practices, you can leverage Track Motion to create professional, dynamic video content that stands out.
Embrace the power of Sony Vegas Track Motion to transform your video projects into captivating masterpieces, unlocking endless creative possibilities with ease and precision.