Topic sony vegas crashing: Experiencing Sony Vegas crashing issues? Discover expert tips and solutions to enhance your video editing workflow and ensure a seamless creative process.
Table of Content
- How can I fix Sony Vegas crashing issue?
- Understanding Why Sony Vegas Crashes
- Top Fixes for Sony Vegas Crashing Issues
- Updating Graphics Card Drivers
- Optimizing Sony Vegas Pro Settings
- Clearing Temporary Files to Prevent Crashes
- Setting Sony Vegas Pro Priority High
- YOUTUBE: How To Fix 99% of Sony Vegas Crashes & Freezes! Fix Sony Vegas Tutorial
- Checking for Software Conflicts
- Repairing Corrupted Vegas Pro Files
- Adjusting Video Preview Settings
- Reinstalling Sony Vegas Pro
- Seeking Professional Help for Persistent Issues
How can I fix Sony Vegas crashing issue?
To fix the Sony Vegas crashing issue, you can try the following steps:
- Delete temporary files on your PC by following these steps:
- Open the Run dialog box by pressing the Windows key + R.
- Type \"%temp%\" (without quotes) and press Enter.
- Locate the temporary files folder and delete all its contents.
- Set priority for Sony Vegas to high by doing the following:
- Open Sony Vegas on your PC.
- Go to the Task Manager by pressing Ctrl + Shift + Esc.
- In the Processes tab, find the Sony Vegas process.
- Right-click on it and select \"Set Priority\". Choose \"High\".
- Scan and repair system files by using the System File Checker tool. Follow these steps:
- Open the Command Prompt as an administrator.
- Type \"sfc /scannow\" (without quotes) and press Enter.
- Wait for the scan to finish and let the tool repair any corrupted system files.
- Restart your PC.
- Update your graphics card driver to the latest version. Here\'s how:
- Open the Device Manager by right-clicking on the Start button and selecting \"Device Manager\".
- Expand the \"Display adapters\" category.
- Right-click on your graphics card and select \"Update driver\".
- Choose the option to search automatically for updated driver software.
- Follow the on-screen instructions to complete the update process.
After performing these steps, restart Sony Vegas and check if the crashing issue is resolved. If the problem persists, you may need to seek further assistance from Sony support or consider reinstalling the software.
READ MORE:
Understanding Why Sony Vegas Crashes
Sony Vegas crashing can stem from various issues, making it essential to understand the root causes for effective troubleshooting. Here’s a comprehensive breakdown:
- Incompatible Hardware: Insufficient system resources or outdated hardware may not meet Sony Vegas\"s requirements.
- Outdated Software: Running an outdated version of Sony Vegas or operating system can lead to compatibility issues.
- Corrupt Files: Damaged project files or media can cause Sony Vegas to crash unexpectedly.
- Driver Conflicts: Outdated or corrupt graphics card drivers can interfere with the software’s performance.
- Third-Party Plugins: Incompatible or faulty plugins can cause instability and crashes.
- Software Conflicts: Other applications running in the background may conflict with Sony Vegas.
Addressing these factors can significantly reduce the occurrence of crashes, enhancing your video editing experience.
Top Fixes for Sony Vegas Crashing Issues
Encountering crashes with Sony Vegas can be frustrating. Here are effective strategies to resolve these issues and enhance your editing experience:
- Update Sony Vegas and Your Operating System: Ensure you have the latest version of Sony Vegas and your OS to fix known bugs.
- Upgrade Graphics Card Drivers: Download and install the latest drivers for your graphics card from the manufacturer\"s website.
- Optimize Preferences: Adjust Sony Vegas settings for performance. Lower the video preview quality and disable GPU acceleration if necessary.
- Clear Cache and Temporary Files: Regularly clear your cache and temporary files to prevent crashes due to system overload.
- Check for Plugin Compatibility: Remove or update any third-party plugins that may not be compatible with your version of Sony Vegas.
- Reinstall Sony Vegas: A fresh install can resolve underlying issues caused by corrupted installation files.
- Verify Media Files: Ensure your media files are not corrupted. Convert them to a different format if issues persist.
- Run as Administrator: Launch Sony Vegas with administrative privileges to ensure it has access to necessary system resources.
- Set High Priority in Task Manager: Give Sony Vegas high priority via the Task Manager to allocate more system resources to it.
- Consult Sony Vegas Support: If problems continue, reach out to Sony Vegas support for professional advice and solutions.
By systematically applying these fixes, you can significantly reduce or eliminate crashes, leading to a more stable and efficient editing process.
Updating Graphics Card Drivers
Outdated or corrupt graphics card drivers can often lead to Sony Vegas crashing. Updating your drivers is a crucial step to ensure optimal performance and stability. Follow these steps to update your graphics card drivers effectively:
- Identify Your Graphics Card Model: Go to Device Manager > Display adapters to find out the model of your graphics card.
- Visit the Manufacturer\"s Website: Navigate to the official website of your graphics card\"s manufacturer (e.g., NVIDIA, AMD, Intel).
- Find the Drivers Section: Locate the \"Drivers\" or \"Support\" section on the website.
- Select Your Graphics Card Model: Enter your graphics card details to find the latest drivers for your model.
- Download the Latest Driver: Choose the most recent driver compatible with your operating system and download it.
- Install the Driver: Run the downloaded installer and follow the on-screen instructions to complete the installation.
- Restart Your Computer: After installation, restart your computer to ensure the new drivers are correctly applied.
Regularly updating your graphics card drivers can prevent many issues, including crashes in Sony Vegas, providing a smoother editing experience.
Optimizing Sony Vegas Pro Settings
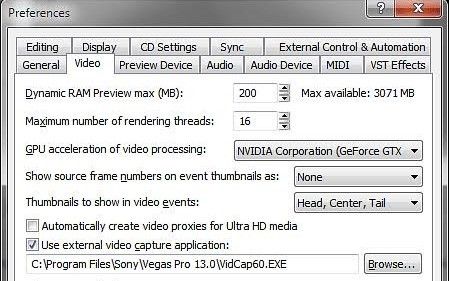
Optimizing the settings in Sony Vegas Pro can greatly enhance performance and reduce the likelihood of crashes. Here are steps to fine-tune Sony Vegas Pro for optimal operation:
- Adjust Dynamic RAM Preview: Go to Options > Preferences > Video and reduce the Dynamic RAM Preview size to free up memory.
- Disable GPU Acceleration: Navigate to Options > Preferences > Video and set GPU acceleration to \"Off\" if you experience instability.
- Set Preview Quality: Lower the preview quality to \"Draft\" or \"Preview\" to reduce strain on your system during editing.
- Manage Background Rendering: In Preferences, adjust the background rendering options to limit the number of simultaneous renders.
- Configure Audio Settings: In Preferences > Audio, reduce the audio preview quality if necessary to save system resources.
- Limit Video Track Layers: Work with a minimal number of video track layers simultaneously to reduce system load.
- Close Other Applications: Ensure no other resource-intensive applications are running in the background.
By tailoring these settings, you can significantly improve the stability and performance of Sony Vegas Pro, leading to a smoother editing process and fewer crashes.

_HOOK_
Clearing Temporary Files to Prevent Crashes
Accumulated temporary files can slow down Sony Vegas Pro and lead to crashes. Regularly clearing these files can enhance performance. Follow these steps to clear temporary files effectively:
- Close Sony Vegas Pro: Ensure Sony Vegas Pro is closed before starting the cleanup process.
- Open Run Dialog: Press Windows Key + R to open the Run dialog box.
- Type \"%temp%\": Enter \"%temp%\" in the Run dialog box and press Enter. This opens the folder containing temporary files.
- Select and Delete Files: Press Ctrl + A to select all temporary files and then press Delete to remove them. If some files can\"t be deleted because they\"re in use, skip them.
- Empty Recycle Bin: Right-click on the Recycle Bin on your desktop and select \"Empty Recycle Bin\" to permanently remove the deleted temporary files.
- Clean Prefetch Folder: Again, open the Run dialog, type \"prefetch\", and press Enter. Select all files and delete them. Administrator permission may be required.
- Restart Your Computer: After clearing the temporary and prefetch files, restart your computer for the changes to take effect.
Performing this simple maintenance routine can prevent crashes and improve the overall performance of Sony Vegas Pro.
Setting Sony Vegas Pro Priority High
Adjusting the priority of Sony Vegas Pro in the system can help ensure it receives more CPU resources, potentially reducing crashes. Here\"s how to set Sony Vegas Pro\"s priority to high:
- Open Task Manager: Launch Sony Vegas Pro, then press Ctrl + Shift + Esc to open Task Manager.
- Find Sony Vegas Pro: In the Processes tab, look for Sony Vegas Pro or its process name (e.g., \"vegaspro.exe\").
- Change Priority: Right-click on the Sony Vegas Pro process, hover over \"Set priority,\" then select \"High.\" Do not choose \"Realtime\" as this could make your system unstable.
- Confirm the Change: If prompted, confirm that you want to change the process priority. This will allocate more CPU resources to Sony Vegas Pro.
Note: You\"ll need to set the priority every time you launch Sony Vegas Pro, as the setting reverts to default upon closing the application. Adjusting priority can lead to a smoother editing experience, especially for resource-intensive projects.

How To Fix 99% of Sony Vegas Crashes & Freezes! Fix Sony Vegas Tutorial
Sony Vegas crashes: Learn how to troubleshoot and fix Sony Vegas crashes with this informative video! Discover helpful tips and tricks to ensure smooth editing and uninterrupted creative flow.
How To Fix Sony Vegas Crashes & Freezes!
Python programming tutorials: Take your coding skills to the next level with these engaging Python programming tutorials! From the basics to advanced concepts, this video series will guide you through and help you become a proficient Python developer.
Checking for Software Conflicts
Software conflicts can often cause Sony Vegas Pro to crash. Identifying and resolving these conflicts is key to ensuring stable performance. Follow these steps to check for and address software conflicts:
- Perform a Clean Boot: Use the System Configuration tool (msconfig) to perform a clean boot. This starts Windows with a minimal set of drivers and startup programs, helping identify if background software is causing issues.
- Isolate the Issue: After performing a clean boot, gradually enable services and startup items, rebooting each time, to pinpoint the source of the conflict.
- Update Conflicting Software: If you identify specific software causing conflicts, check for updates or patches that might resolve the issue.
- Disable Unnecessary Background Applications: Use Task Manager to disable applications that you do not need during your editing sessions.
- Check for Antivirus Interference: Sometimes, antivirus software can interfere with Sony Vegas Pro. Try disabling your antivirus temporarily to see if it resolves the crash issues. Remember to re-enable it afterward.
- Consider Compatibility Mode: If an older software version conflicts with Sony Vegas Pro, running it in compatibility mode for an earlier version of Windows may help.
Identifying and resolving software conflicts can dramatically improve Sony Vegas Pro\"s stability and performance, leading to a more efficient editing process.
Repairing Corrupted Vegas Pro Files
Corrupted Vegas Pro project files can cause the program to crash. Here\"s a step-by-step guide to repair corrupted files and recover your projects:
- Backup Your Files: Before attempting any repairs, make sure to back up your original files to avoid data loss.
- Try Opening Other Projects: Determine if the issue is with a specific file or the program itself by trying to open different projects.
- Use Auto-Save Versions: Sony Vegas Pro automatically saves backup versions of your projects. Locate these in the \"Auto-Save\" folder within the Vegas Pro file directories and try opening them.
- Clear the Cache: Sometimes, clearing the cache can resolve issues with corrupted files. Go to Options > Preferences > General and click on \"Clean Cache\" to remove temporary files.
- Repair Vegas Pro Installation: If the issue persists, the problem might be with the Vegas Pro installation itself. Use the program\"s installation manager to repair or reinstall the software.
- Seek Professional Software: There are third-party software tools designed to repair corrupted video files, which might be helpful if the above steps fail.
Repairing corrupted files can be a tedious process, but these steps can help you salvage your project and get back to editing smoothly in Sony Vegas Pro.

Adjusting Video Preview Settings
Optimizing the video preview settings in Sony Vegas Pro can significantly improve performance and reduce crashes, especially on less powerful systems. Follow these steps to adjust your video preview settings:
- Open Video Preview Preferences: Go to Options > Preferences and select the Video tab.
- Lower Preview Quality: In the preview window, select a lower quality setting such as \"Draft\" or \"Preview\" to reduce the load on your system.
- Adjust Dynamic RAM Preview: Decrease the amount of Dynamic RAM used for previewing video in Preferences > Video to free up memory for other tasks.
- Disable GPU Acceleration: If you\"re experiencing crashes related to video rendering, try disabling GPU acceleration in the Video Preferences.
- Preview on External Monitor: If available, use an external monitor for previewing. This can be configured in the Preview Device tab under Preferences.
- Close Other Applications: Ensure that no unnecessary applications are running in the background to allocate more system resources to Sony Vegas Pro.
By adjusting these settings, you can achieve a smoother editing experience in Sony Vegas Pro without compromising on the quality of your final project.
_HOOK_
Reinstalling Sony Vegas Pro
If you\"ve tried troubleshooting and still experience crashes with Sony Vegas Pro, reinstalling the software can often resolve persistent issues. Here\"s how to properly reinstall Sony Vegas Pro:
- Backup Your Projects: Save and backup all your Sony Vegas Pro projects and custom settings.
- Uninstall Sony Vegas Pro: Go to Control Panel > Programs and Features, find Sony Vegas Pro, and click on Uninstall.
- Remove Remaining Files: After uninstallation, delete any remaining files in the installation directory (usually located in C:Program Files) and clear temporary files using the \"%temp%\" command in the Run dialog.
- Restart Your Computer: Reboot your computer to ensure all changes are applied and no residual files are locked.
- Download the Latest Version: Visit the official Sony Vegas Pro website or your software provider to download the latest version of the software.
- Install Sony Vegas Pro: Run the installer and follow the on-screen instructions to install Sony Vegas Pro on your computer.
- Restore Your Projects: Once reinstallation is complete, restore your projects and custom settings.
- Update Drivers: Ensure your graphics card and other relevant drivers are up to date to avoid compatibility issues.
Reinstalling Sony Vegas Pro can refresh the software environment, potentially resolving crashing issues and improving performance.

READ MORE:
Seeking Professional Help for Persistent Issues
If you\"ve tried all the troubleshooting steps and Sony Vegas Pro is still crashing, it may be time to seek professional help. Here are steps to get the support you need:
- Contact Sony Vegas Support: Visit the official Sony Vegas Pro support page to find contact information for customer support. Prepare to provide details about your issue, system configuration, and what troubleshooting steps you\"ve already attempted.
- Consult Online Forums: Online forums such as the Vegas Creative Software official forum can be valuable resources. Post your issue there, as other users may have experienced similar problems and can offer solutions.
- Check for Software Updates: Ensure your software is up to date. Sometimes, a patch or update is available that can resolve your issue.
- Consider Hiring a Technician: If the problem seems to be related to your hardware or if you\"re uncomfortable making system changes, consider hiring a professional technician to examine your setup.
- Explore Alternative Software: If your issues persist and significantly impact your workflow, you may need to consider using alternative video editing software that may be more compatible with your system.
Seeking professional help can save you time and frustration, ensuring you get back to editing your projects as smoothly and quickly as possible.
Overcoming Sony Vegas crashing issues enhances your video editing journey, ensuring creativity flows uninterrupted. Follow these expert tips for a smoother experience and rediscover the joy of seamless video production.