Topic sony vegas 10: Discover the power of Sony Vegas 10, a leading video editing software that offers unparalleled tools and features for professionals and enthusiasts alike.
Table of Content
- How to install Sony Vegas 10?
- Overview of Sony Vegas Pro 10
- Key Features and Enhancements
- Installation and Setup
- Basic Editing Techniques
- Advanced Editing Tools
- Audio Editing and Mixing
- YOUTUBE: Sony Vegas Pro 10 Tutorial: The Basics
- Effects and Transitions
- 3D Editing Capabilities
- Rendering and Exporting
- Customizing the Workspace
- Keyboard Shortcuts and Efficiency Tips
- Common Issues and Troubleshooting
- Comparison with Other Editing Software
- Community and Resources
How to install Sony Vegas 10?
- Step 1: Download the Sony Vegas 10 installation file from a trusted source.
- Step 2: Locate the downloaded file on your computer.
- Step 3: Double-click on the file to start the installation process.
- Step 4: Follow the on-screen instructions to proceed with the installation.
- Step 5: Select the desired installation location for Sony Vegas 10.
- Step 6: Choose any additional options or features you would like to install along with Sony Vegas 10.
- Step 7: Click on the \"Install\" or \"Next\" button to begin the installation.
- Step 8: Wait for the installation process to complete.
- Step 9: Once the installation is finished, you may be prompted to restart your computer. If so, go ahead and restart.
- Step 10: After restarting, you should be able to launch Sony Vegas 10 and start using it for your video editing needs.
READ MORE:
Overview of Sony Vegas Pro 10
Sony Vegas Pro 10 represents a significant leap forward in video editing software, combining powerful tools with an intuitive interface. Designed for professionals and enthusiasts alike, it caters to a wide range of video editing needs. Here’s a closer look at its core features:
- Enhanced Editing Tools: Offers a comprehensive suite of editing tools, including advanced options for video and audio editing, color correction, and special effects.
- Robust Audio Mixing: Comes with a powerful audio mixer that allows for intricate audio editing, mixing, and mastering.
- Visual Effects: Features a vast array of visual effects to enhance your video projects, from simple color correction to complex compositing and 3D effects.
- 3D Editing: Supports stereoscopic 3D editing, allowing users to create immersive 3D content with ease.
- Multiple Format Support: Offers extensive file format support, ensuring compatibility with a wide range of video and audio formats.
- User-Friendly Interface: Boasts a customizable interface that can be tailored to suit your workflow, making it accessible for users of all skill levels.
- Rendering and Exporting: Provides fast and flexible rendering options, enabling users to export their projects in various formats without compromising on quality.
Sony Vegas Pro 10 continues to be a favorite among video editing professionals and hobbyists for its powerful features and flexibility, making it the go-to choice for high-quality video production.
Key Features and Enhancements
Sony Vegas Pro 10 introduces a host of new features and enhancements that elevate the video editing experience to new heights. These improvements are designed to streamline workflows, enhance creativity, and deliver unparalleled performance. Key features include:
- Enhanced Interface: A more intuitive and customizable interface that improves editing efficiency and workflow.
- Improved Video Engine: Offers faster processing and rendering, supporting complex projects and high-resolution formats with ease.
- Dynamic Content Creation: Advanced tools for creating dynamic titles, motion graphics, and 3D effects to add professional polish to your videos.
- Stereoscopic 3D Editing: Comprehensive tools for editing 3D video, including adjustments for disparity and depth, making 3D video production more accessible.
- Broad Format Support: Extended support for leading video and audio formats, including HD, 4K, and stereoscopic 3D content.
- Audio Enhancement Tools: Robust audio editing features with support for VST plug-ins, surround sound mixing, and more for cinematic sound quality.
- GPU Acceleration: Leverages the power of the GPU for faster rendering and playback, significantly reducing project completion times.
- Comprehensive Color Correction: Sophisticated color correction tools for achieving the perfect look for your video, including color matching and LUT import.
- Advanced Stabilization: Improved video stabilization tools for smoothing out shaky footage, ensuring professional results.
These enhancements make Sony Vegas Pro 10 an incredibly powerful tool for video editors seeking to push the boundaries of creativity and efficiency in their projects.
Installation and Setup
Getting started with Sony Vegas Pro 10 is straightforward, allowing you to dive into your creative projects quickly. Follow these steps for a smooth installation and setup process:
- System Requirements Check: Ensure your computer meets the minimum system requirements for Sony Vegas Pro 10, including operating system compatibility, processor speed, RAM, and graphics card specifications.
- Download Software: Purchase or find your Sony Vegas Pro 10 download link. Download the installation file from the official website or authorized distributor.
- Run Installation: Double-click the downloaded file to start the installation process. Follow the on-screen instructions, accepting the license agreement and selecting your preferred installation directory.
- Activation: Upon completion of the installation, launch Sony Vegas Pro 10. You will be prompted to enter your serial number for activation. Follow the prompts to activate your software online.
- Update Software: After activation, check for any available updates to ensure you have the latest version and features. Updates can be found within the software under the Help menu or on the official website.
- Customize Preferences: Before starting your first project, take some time to customize your preferences. This can include setting up your default project properties, audio device settings, and interface layout to suit your workflow.
- Explore Tutorials: If you\"re new to Sony Vegas Pro, consider exploring available tutorials and guides. These resources can provide valuable insights into the software\"s capabilities and help you start your projects with confidence.
By following these steps, you\"ll be well on your way to producing high-quality video content with Sony Vegas Pro 10.
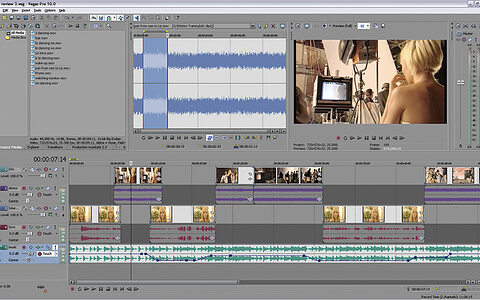
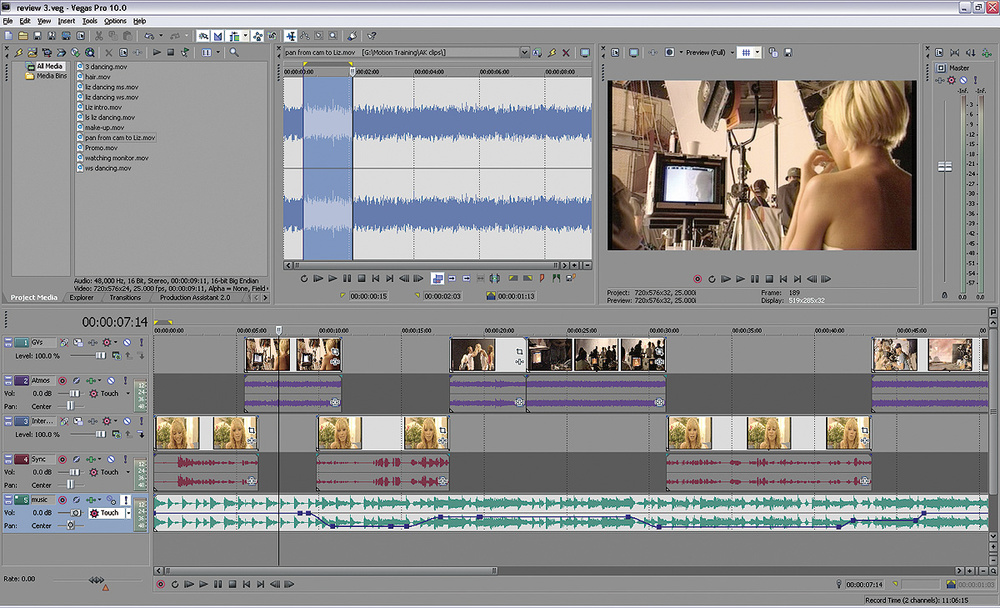
Basic Editing Techniques
Mastering basic editing techniques in Sony Vegas Pro 10 is essential for creating compelling video content. Here are foundational steps to get you started:
- Importing Media: Start by importing your video, audio, and image files into the project media section. You can drag files directly from your computer or use the \"Import Media\" option.
- Timeline Navigation: Learn to navigate the timeline efficiently. Use the zoom tool to adjust your view, and the hand tool to move along the timeline.
- Adding Clips to the Timeline: Drag your media files from the project media bin to the timeline to start assembling your video.
- Trimming and Splitting Clips: Use the trim tool to cut the beginning or end of a clip to fit your project. Split clips by placing the cursor where you want the split and pressing \"S\" on your keyboard.
- Adding Transitions: Enhance your video by adding transitions between clips. Select a transition from the transitions tab and drag it between two clips on the timeline.
- Video and Audio Levels: Adjust the video and audio levels to ensure a balanced mix. Click on the audio track to adjust volume levels or use the video track controls to adjust brightness, contrast, and more.
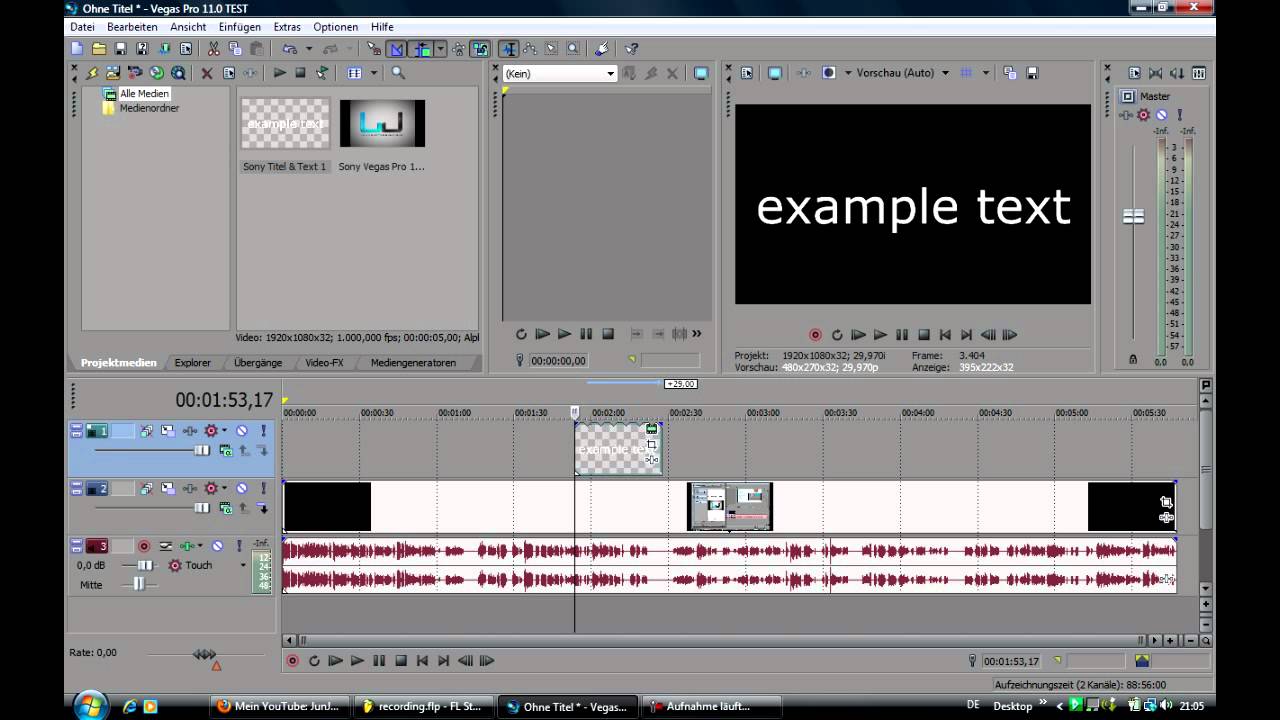
- Adding Text and Titles: Use the media generators tab to add text and titles to your video. Customize the font, size, color, and position of your text.
- Basic Color Correction: Improve the look of your video with basic color correction. Use the video FX tab to apply color correction filters and adjust the settings to match your desired look.
- Exporting Your Project: Once you are satisfied with your edit, export your project. Choose your desired format and settings, then render your video to create the final product.
With practice, these basic editing techniques will become second nature, allowing you to efficiently produce professional-quality videos with Sony Vegas Pro 10.

_HOOK_
Advanced Editing Tools
Sony Vegas Pro 10 is equipped with a range of advanced editing tools that allow for more complex projects and creative possibilities. These tools enable editors to refine their work with precision and creativity:
- Multi-Camera Editing: Sync footage from multiple cameras and switch between angles seamlessly in real-time to enhance storytelling.
- Compositing and Masking: Utilize sophisticated compositing and masking tools to create stunning visual effects and blend different elements of your video together.
- Motion Tracking: Apply motion tracking to follow moving objects in your video, allowing for dynamic text placement or applying effects that follow the movement.
- High Dynamic Range (HDR) Support: Edit and produce videos in HDR, offering greater color depth and contrast to your projects.
- 360° Video Editing: With support for 360° video editing, you can dive into the world of VR and immersive video content creation.
- Advanced Audio Editing: Leverage powerful audio editing features, including surround sound mixing and the ability to extract audio from video.
- Color Grading: Access advanced color grading tools to fine-tune the colors of your video, achieving professional cinematic looks with precision.
- LUTs and Color Match: Easily apply look-up tables (LUTs) to match colors between different video clips and create a cohesive visual style across your project.
- Bezier Masking: Create detailed masks with Bezier curves for intricate compositing, effects application, and object removal.
- Plugin Support: Extend the functionality of Vegas Pro 10 with third-party plugins, offering additional effects, transitions, and enhancements.
These advanced tools in Sony Vegas Pro 10 empower editors to push the boundaries of video production, enabling the creation of complex, high-quality projects that stand out.
Audio Editing and Mixing
Sony Vegas Pro 10 offers comprehensive tools for audio editing and mixing, enabling users to achieve professional sound quality in their video projects. Whether you\"re working on a simple vlog or a complex cinematic production, these features help you manage and enhance audio effectively:
- Robust Audio Mixer: Utilize the built-in audio mixer to control levels, apply effects, and mix audio tracks with precision. It offers extensive control over each track’s volume, pan, and effects.
- Audio Effects: Apply a wide range of audio effects, including EQ, reverb, delay, and more to enhance the quality of your soundtracks. Customizable presets allow for quick adjustments and fine-tuning.
- Voice Over Recording: Record voice-overs directly within the software using the built-in recording feature. This is ideal for adding narration or commentary to your videos.
- Audio Restoration Tools: Clean up your audio tracks with noise reduction, click removal, and audio restoration tools. These features are invaluable for improving the clarity and quality of your sound.
- Surround Sound Mixing: Create immersive audio experiences by mixing and editing in 5.1 surround sound, providing viewers with a richer audio experience.
- Audio Synchronization: Automatically sync audio from different sources or recordings, perfect for multi-camera shoots where audio and video need to be synchronized.
- Envelope Automation: Use audio envelopes to automate volume, pan, and effects parameters over time, allowing for dynamic audio transitions and effects.
- Support for VST Plugins: Enhance your audio editing capabilities with support for third-party VST audio plugins, offering endless possibilities for sound manipulation and enhancement.
- Audio Extraction: Extract audio from video clips easily, allowing you to edit or replace the sound without affecting the video.
- Batch Rendering: Export audio and video separately or together in multiple formats, streamlining your workflow and saving time on rendering.
With these powerful audio editing and mixing features, Sony Vegas Pro 10 stands out as a comprehensive solution for video editors looking to produce high-quality audio and video content seamlessly.

Sony Vegas Pro 10 Tutorial: The Basics
Need step-by-step guidance on how to ace that tricky task? Our insightful tutorial video has got you covered! Discover easy-to-follow instructions and expert tips to help you conquer any challenge with confidence.
Sony Vegas Pro 10 Tutorial: Rendering and Exporting
Dive into the captivating world of rendering with our mesmerizing video! Experience the magic as images transform into stunning lifelike visuals right before your eyes. Let your imagination soar and be amazed by the power of rendering.
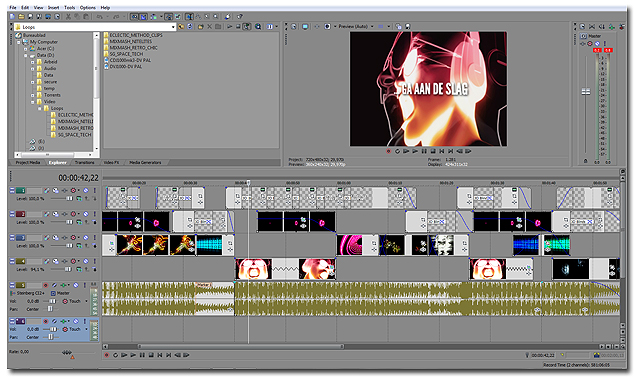
Effects and Transitions
Sony Vegas Pro 10 enriches your video projects with an extensive collection of effects and transitions, offering endless creative possibilities. These features allow editors to enhance visuals, set the mood, and improve storytelling through dynamic visual elements:
- Wide Range of Video Effects: Choose from hundreds of built-in video effects, including color correction, light leaks, particle effects, and more to enhance the visual appeal of your videos.
- Customizable Transitions: A vast library of transitions for smoothly moving between clips. Customize the duration and properties of each transition to match the pace and style of your project.
- 3D Effects: Utilize 3D effects to add depth and dimension to your projects, including 3D transformations, titling, and compositing capabilities.
- Comprehensive Color Grading: Advanced color grading tools enable precise control over the color palette, helping you achieve the desired look and feel for your video.
- Motion Graphics: Create dynamic titles and motion graphics using the built-in tools, enhancing your video\"s professionalism and engagement.
- Chroma Keying: Use the chroma key feature to remove backgrounds and composite video layers effectively, perfect for green screen projects.
- Masking and Compositing: Advanced masking tools allow for intricate compositing, enabling you to blend layers, create vignettes, and apply targeted effects.
- Audio Effects: Pair your visual effects with audio effects to enhance the overall impact of your video, including sound design elements that complement the visuals.
- Animation and Keyframing: Animate effects and transitions using keyframes, offering precise control over the timing and progression of visual elements.
- Plugin Support: Extend your effects and transitions library with third-party plugins, offering additional creative options and enhancements.
With Sony Vegas Pro 10\"s rich set of effects and transitions, editors can unleash their creativity, adding polish and dynamic elements to every video project.
3D Editing Capabilities
Sony Vegas Pro 10 breaks new ground with its 3D editing capabilities, allowing filmmakers and video editors to delve into the realm of 3D content creation. These features are designed to facilitate the production of high-quality 3D videos, adding depth and life to your projects:
- Stereoscopic 3D Editing: Easily import, edit, and adjust stereoscopic 3D footage directly in the timeline. Sony Vegas Pro 10 supports a variety of 3D formats, including side-by-side, top/bottom, and line-alternate methods.
- 3D Adjustments: Control and adjust the depth of 3D elements to ensure a comfortable and immersive viewing experience. Tools are available for correcting discrepancies in 3D footage and enhancing the 3D effect.
- 3D Effects: Apply video effects to 3D projects without compromising the 3D experience. Effects are adapted to work seamlessly with 3D footage, adding flair and visual interest to your 3D content.
- Titling for 3D: Create dynamic 3D titles and text to complement your 3D video content. Titles can be positioned within the 3D space, adding depth and engagement to your projects.
- 3D Transitions: Utilize transitions specifically designed for 3D content to smoothly move between scenes, enhancing the 3D storytelling experience.
- Export Options: Sony Vegas Pro 10 offers comprehensive export options for 3D content, ensuring compatibility with a range of 3D playback devices and formats.
- Preview and Monitoring: Preview your 3D content in real-time using compatible 3D monitors or anaglyphic red/cyan glasses, allowing for accurate editing and adjustments.
With these 3D editing capabilities, Sony Vegas Pro 10 empowers editors to push the boundaries of traditional video production, offering tools to create engaging and immersive 3D content for a variety of platforms.

Rendering and Exporting
Rendering and exporting in Sony Vegas Pro 10 are crucial steps in the video editing process, allowing you to share your creative work with the world. This section outlines how to finalize your projects, ensuring they are ready for distribution and playback on a variety of platforms:
- Selecting Render Options: Choose the appropriate format and settings for your project. Sony Vegas Pro 10 supports a wide range of video and audio formats, including popular options like MP4, AVI, WMV, and MOV for video, as well as MP3 and WAV for audio.
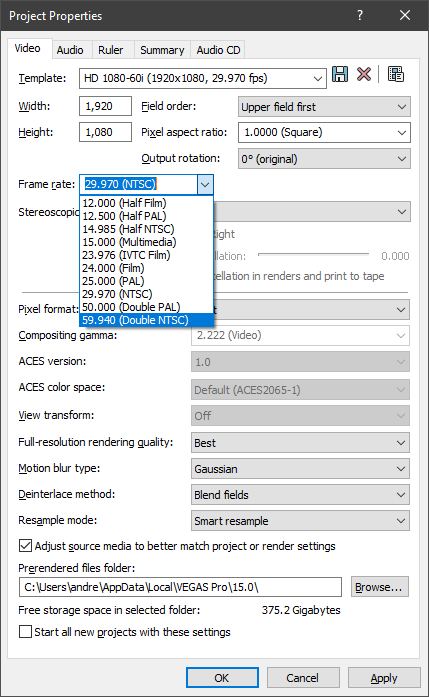
- Customizing Render Settings: Adjust the render settings to optimize quality and file size. This includes options for video bitrate, frame rate, resolution, and audio quality. Utilize the project properties and template options to match your delivery platform’s specifications.
- Using Render Templates: Take advantage of the preset render templates designed for specific outputs, such as web streaming, DVD, or Blu-ray production, ensuring compatibility and reducing the need for manual adjustments.
- Batch Rendering: Save time by rendering multiple projects or sections of a project simultaneously. This is particularly useful for large projects or when producing content in different formats.
- Preview Before Rendering: Utilize the preview function to check your project before rendering, ensuring that the video plays back as expected and that there are no errors or issues.
- Rendering Queue: Add your projects to the rendering queue, allowing you to continue working on other tasks within Vegas Pro 10 while your projects render in the background.
- Exporting for Social Media: Use the specific export options tailored for social media platforms to ensure your videos meet the platform requirements, making it easier to share your content online.
By following these steps, you can efficiently render and export your projects in Sony Vegas Pro 10, ensuring they look their best on whatever platform they are viewed.
_HOOK_
Customizing the Workspace
One of the strengths of Sony Vegas Pro 10 is its highly customizable workspace, which can be tailored to fit your editing style and project needs. Customizing your workspace enhances efficiency and makes the editing process more intuitive. Here\"s how you can optimize your workspace:
- Adjusting the Layout: Rearrange the layout by dragging and dropping panels to different locations. You can create a setup that prioritizes the tools you use most frequently, such as the timeline, preview window, and media bins.
- Saving Custom Layouts: Once you\"ve found a configuration that works for you, save it as a custom layout. Sony Vegas Pro 10 allows you to save multiple layouts and switch between them depending on the task at hand.
- Dual Monitor Setup: If you work with a dual monitor setup, optimize your workspace by extending the interface across two screens. Place the timeline and editing tools on one screen and the preview window on the other for a more expansive view of your project.
- Keyboard Shortcuts: Customize keyboard shortcuts to speed up your workflow. Assign shortcuts to your most-used actions and tools for quick access.
- Using Window Docking Options: Take advantage of window docking options to keep essential tools accessible. You can dock and group windows together for a streamlined workspace.
- Adjusting Toolbars: Show, hide, or customize toolbars to keep your workspace clutter-free. Focus on the tools you need and remove the ones you rarely use.
- Color Schemes: Change the color scheme of the interface to reduce eye strain or simply to match your personal preference. Sony Vegas Pro 10 offers several pre-set color schemes.
By customizing the workspace in Sony Vegas Pro 10, you create an environment that suits your editing style, helping you work more efficiently and comfortably on your video projects.
Keyboard Shortcuts and Efficiency Tips
Maximizing efficiency in Sony Vegas Pro 10 is crucial for a smooth editing process. Utilizing keyboard shortcuts and adopting certain efficiency tips can significantly speed up your workflow. Here are essential shortcuts and tips for enhancing your productivity:
- Basic Editing Shortcuts: Use \"S\" to split clips, \"Ctrl + Z\" to undo actions, and \"Spacebar\" to play/pause the timeline. These basic shortcuts are fundamental for rapid editing.
- Timeline Navigation: \"Arrow keys\" move the playhead frame by frame, while \"Ctrl + Arrow keys\" jump between edit points or markers, facilitating quick navigation through your project.
- Quick Ripple Editing: \"Ctrl + Shift + Q\" enables ripple editing, allowing you to adjust all subsequent clips on the timeline simultaneously, saving time when making global adjustments.
- Adding Markers: Press \"M\" to add markers to your timeline. Markers are invaluable for highlighting important points or sections that require further attention.
- Zoom In/Out: Use \"Ctrl + Mouse Wheel\" to zoom in and out of the timeline. This allows for precise editing and a better overview of your project layout.
- Efficiency Tips:
- Organize your media bins by categorizing clips, audio, and images for easy access.
- Use the auto-save feature to prevent data loss. Customize the auto-save interval to suit your workflow.
- Pre-render portions of your timeline for smoother playback, especially when working with effects-heavy sections.
- Customize your workspace and save layouts for different stages of your editing process, such as cutting, color grading, or audio mixing.
- Custom Shortcuts: Customize your keyboard shortcuts through the preferences menu to align with your editing style and frequently used commands, further enhancing your efficiency.
By mastering these keyboard shortcuts and implementing efficiency tips, you can significantly reduce editing time in Sony Vegas Pro 10, allowing you to focus more on the creative aspects of your projects.
Common Issues and Troubleshooting
While Sony Vegas Pro 10 is a robust video editing platform, users may occasionally encounter issues. Here are some common problems and solutions to help ensure a smooth editing experience:
- Crashes and Stability Issues: Ensure your computer meets the minimum system requirements. Update your graphics drivers and Vegas Pro to the latest version. Disable third-party plugins to see if they are causing the issue.
- Video Playback Problems: If playback is laggy or unresponsive, try pre-rendering your timeline (Shift+B) for smoother preview playback. Also, adjust the preview quality settings to a lower resolution.
- Audio Sync Issues: Verify that your project\"s frame rate matches your video\"s frame rate. Use the \"Quantize to Frames\" option to ensure audio and video alignment.
- Exporting Errors: Check disk space to ensure you have enough room for your rendered file. Close any unnecessary programs to free up system resources and try rendering to a different format or location.
- Missing Media Files: Reconnect missing media through the \"Project Media\" window by right-clicking the missing file and selecting \"Replace\". Ensure all media files are stored in a consistent location.
- Plugin Compatibility: If you\"re experiencing issues with third-party plugins, ensure they are compatible with Sony Vegas Pro 10. Update or reinstall plugins if necessary.
- Rendering Quality Issues: Check your project settings and render settings to ensure they match. Use templates for specific outputs like YouTube to ensure optimal quality.
- Unresponsive Software: Reset Sony Vegas Pro 10 to default settings by holding down \"Ctrl+Shift\" while launching the program. This can resolve many issues related to corrupted settings.
Addressing these common issues can help maintain a productive editing workflow in Sony Vegas Pro 10, ensuring your projects progress smoothly from conception to completion.
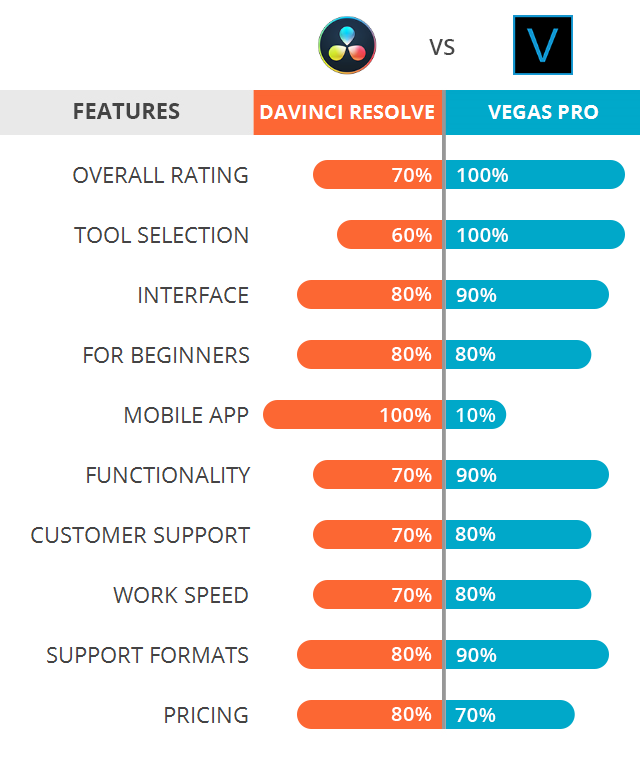
Comparison with Other Editing Software
When choosing a video editing software, it\"s essential to consider how Sony Vegas Pro 10 stacks up against its competitors. Here’s a comparison with other popular editing software to help you make an informed decision:
- User Interface: Sony Vegas Pro 10 is renowned for its intuitive and customizable interface, making it accessible for beginners while offering advanced features for professionals. This contrasts with software like Adobe Premiere Pro, which has a steeper learning curve but offers deep integration with other Adobe applications.
- Performance: Vegas Pro 10 offers robust performance and efficient rendering times, thanks to its GPU acceleration features. It compares favorably to Final Cut Pro, which is optimized for Mac and also offers excellent performance but is not available for Windows.
- Editing Features: While Vegas Pro 10 is packed with advanced editing tools, including 3D editing and comprehensive audio editing capabilities, software like DaVinci Resolve goes further with industry-leading color grading and audio post-production tools integrated into the software.
- Price: Sony Vegas Pro 10 presents a one-time purchase option, which can be more cost-effective in the long run compared to subscription-based models like Adobe Premiere Pro. However, options like DaVinci Resolve offer a powerful free version with the option to upgrade for additional professional features.
- Compatibility and Format Support: Vegas Pro 10 supports a wide range of formats and codecs, making it highly versatile for various projects. This is comparable to Avid Media Composer, known for its broad format support, especially in professional broadcast environments.
- Community and Learning Resources: Vegas Pro benefits from a vibrant community and a wealth of online tutorials and resources, similar to Premiere Pro and Final Cut Pro, ensuring users can quickly learn to use the software effectively.
In summary, Sony Vegas Pro 10 is a strong contender in the video editing software market, offering a balance of user-friendly interface, powerful features, and cost-effectiveness. Its suitability depends on your specific needs, preferences, and whether you prioritize certain features over others.
Community and Resources
The Sony Vegas Pro 10 community and the wealth of resources available to users are invaluable for both beginners and seasoned editors. Here’s how you can engage with the community and find the support and inspiration you need:
- Online Forums: Join online forums and communities dedicated to Sony Vegas Pro users. Sites like the Vegas Creative Software official forums and the Vegas Pro Reddit are great places to ask questions, share tips, and connect with other users.
- Tutorial Websites: There are numerous websites and YouTube channels offering tutorials ranging from basic editing techniques to advanced visual effects. These resources are perfect for self-learning and improving your skills.
- Social Media Groups: Facebook, LinkedIn, and other social media platforms have groups and communities focused on Sony Vegas Pro, where users share their work, offer advice, and provide feedback.
- Webinars and Online Workshops: Keep an eye out for webinars and workshops hosted by experienced editors and the Vegas Creative Software team. These events are excellent opportunities for direct learning and interaction with experts.
- Plugins and Add-ons: Explore the vast ecosystem of third-party plugins and add-ons to enhance your editing capabilities. Many developers and the community itself offer tools that extend the functionality of Vegas Pro 10.
- User Guides and Documentation: Don’t forget the official Sony Vegas Pro user guides and documentation. These resources are comprehensive and provide detailed information on every aspect of the software.
Leveraging these community resources and engaging with other users can greatly enhance your editing process, provide solutions to common problems, and inspire creative ideas for your projects with Sony Vegas Pro 10.
Embrace the power of Sony Vegas Pro 10 and unleash your creative potential. With its comprehensive features, user-friendly interface, and supportive community, it\"s the perfect tool to transform your video projects into masterpieces.
_HOOK_