Topic best sony vegas render settings: Discover the best Sony Vegas render settings to elevate your video editing projects. Unlock the secrets to achieving crisp, professional-quality videos with ease, enhancing your creative workflow and output.
Table of Content
- What are the best Sony Vegas render settings for optimal video quality?
- Understanding Render Settings and Templates
- Optimal Video Quality Settings
- Frame Rate and Resolution Best Practices
- Advanced Video Codec Options
- Audio Configuration for Clarity
- YOUTUBE: Sony Vegas Pro 16: Best Render Settings MP4 HD 1080p 60fps
- Export Settings for Different Platforms
- Customizing Render Settings for Special Effects
- GPU Acceleration and Performance Optimization
- Common Rendering Issues and Solutions
- Finalizing and Exporting Your Video
What are the best Sony Vegas render settings for optimal video quality?
When it comes to achieving optimal video quality with Sony Vegas, the following render settings are commonly recommended:
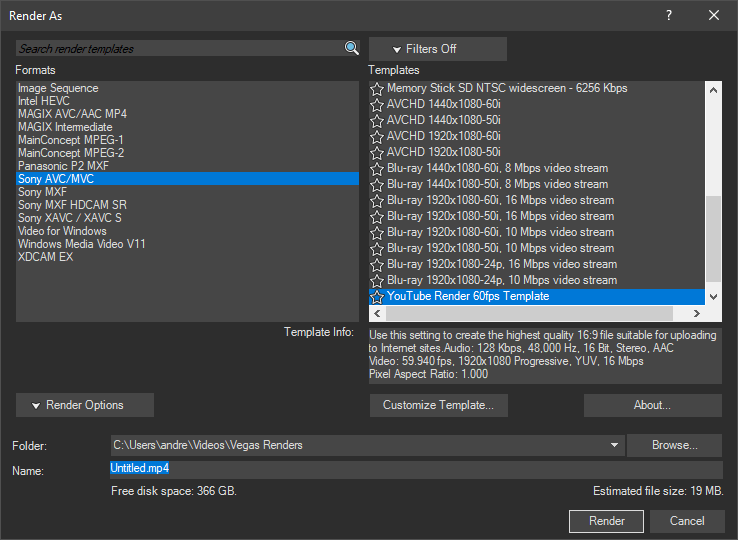
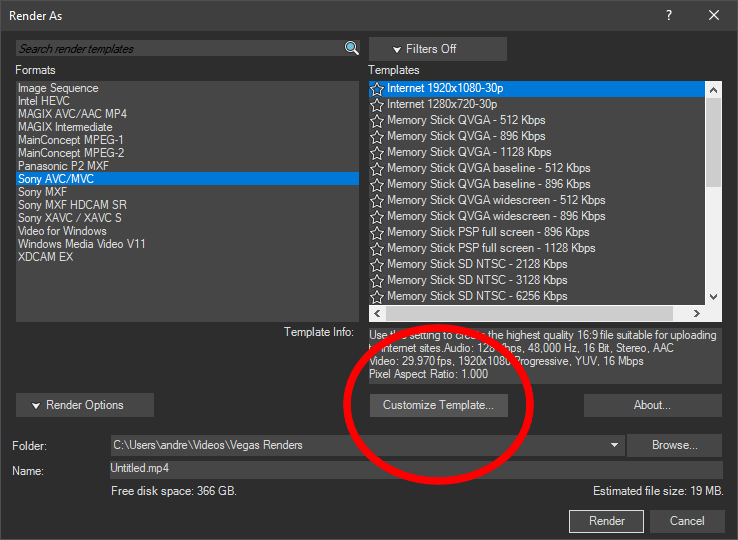
- Open Sony Vegas and click on \"File\" in the top menu bar.
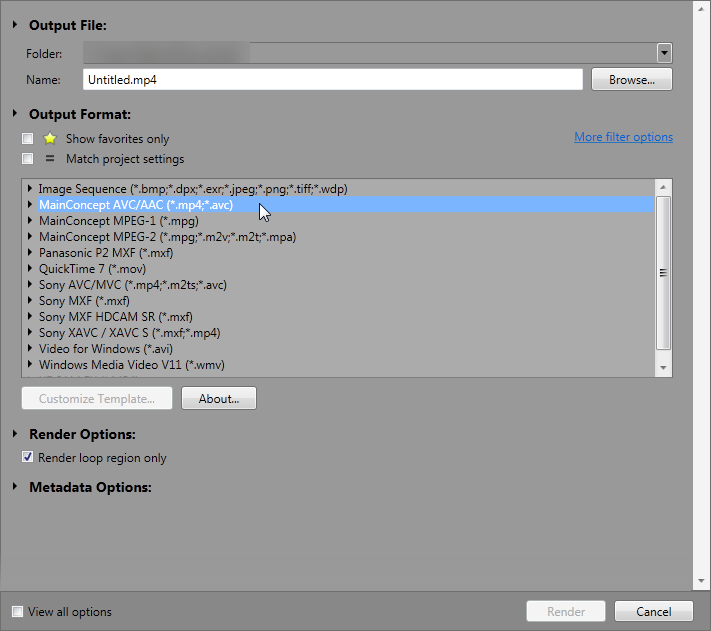
- Select \"Render As...\" to open the rendering options.
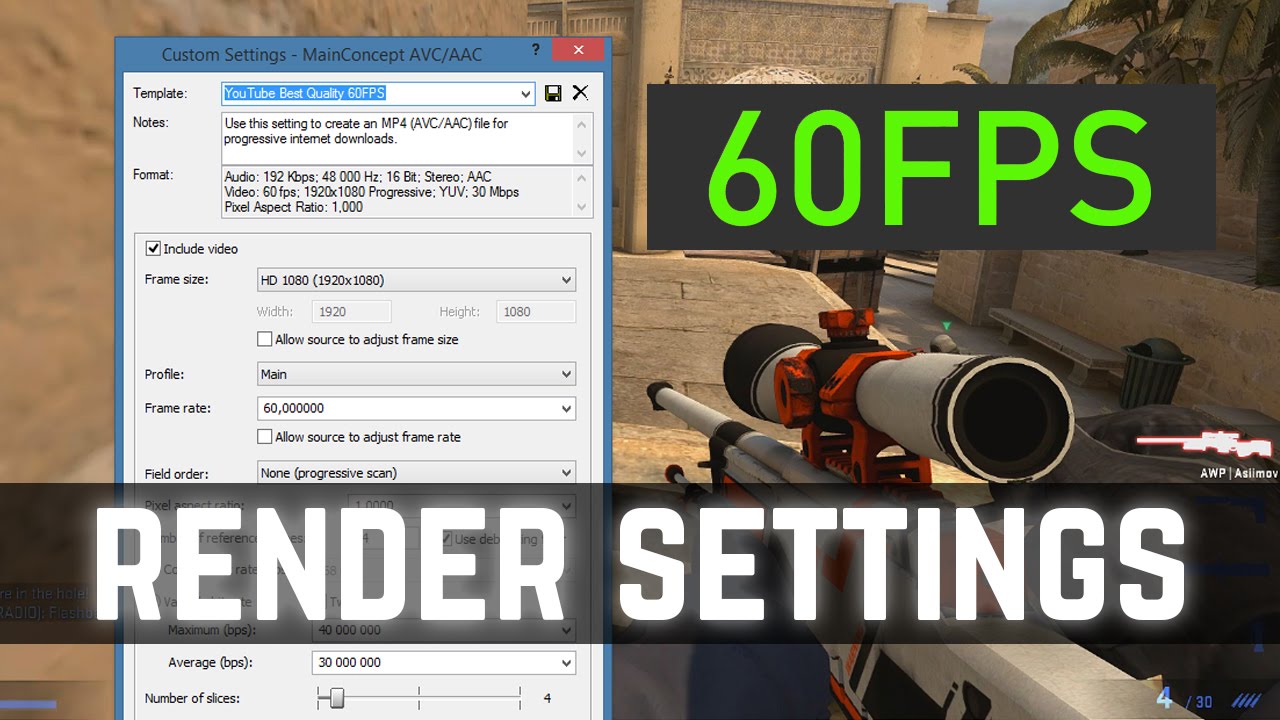
- In the \"Template\" dropdown, choose \"MAGIX AVC/AAC MP4\"
- Under \"Customize Template\", click on the \"Custom\" button.
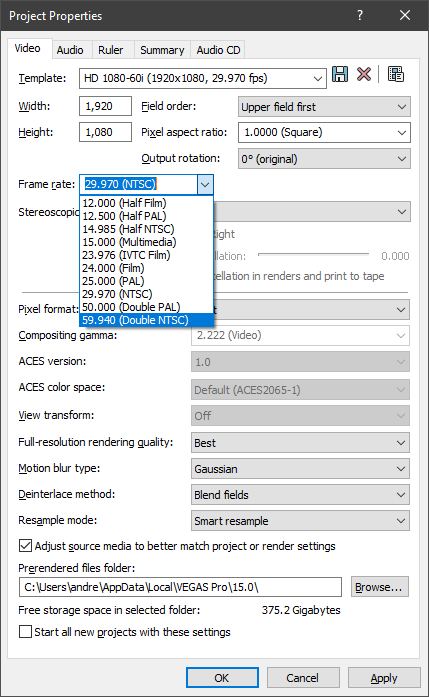
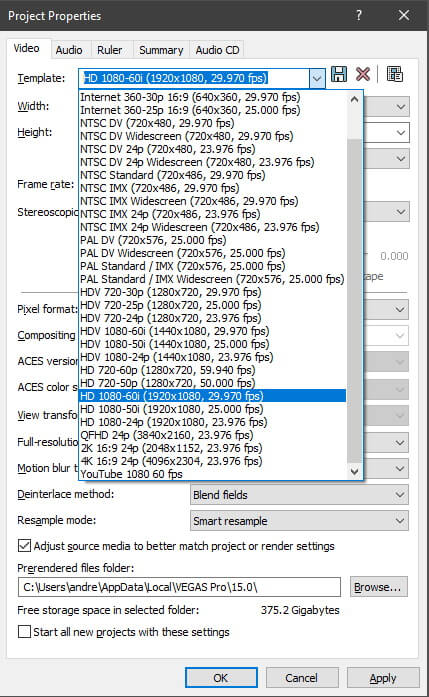
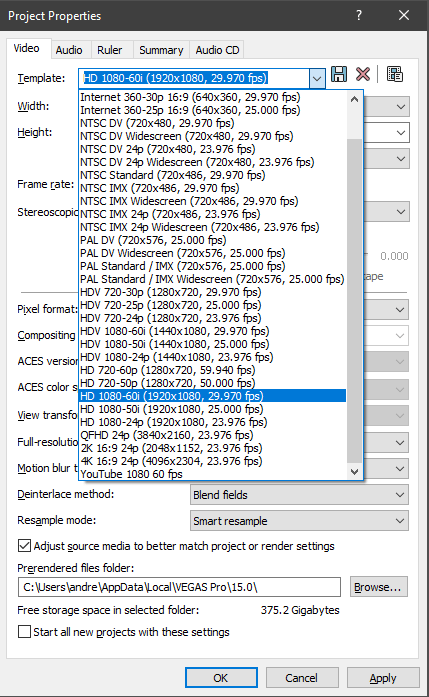
- In the \"Project Video Settings\" section, set the following:
- Frame size: HD 1080-60p (1920x1080)
- Frame rate: 29.970
- Keep the \"Field order\" set to \"None (Progressive scan)\" for the best quality.
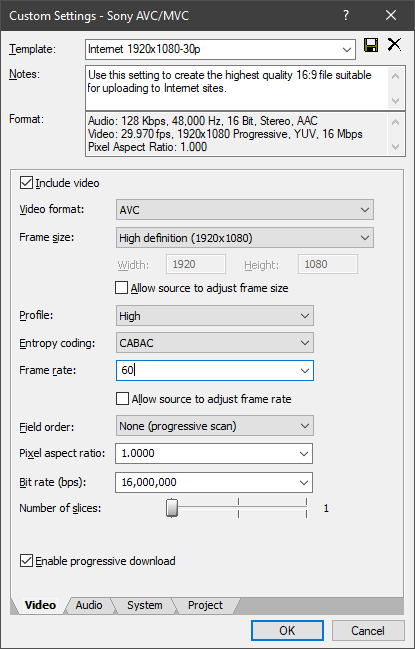
- In the \"Video\" tab, make sure the following settings are selected:
- Bit rate: Automatic
- Profile: Main
- Enable progressive download: Checked
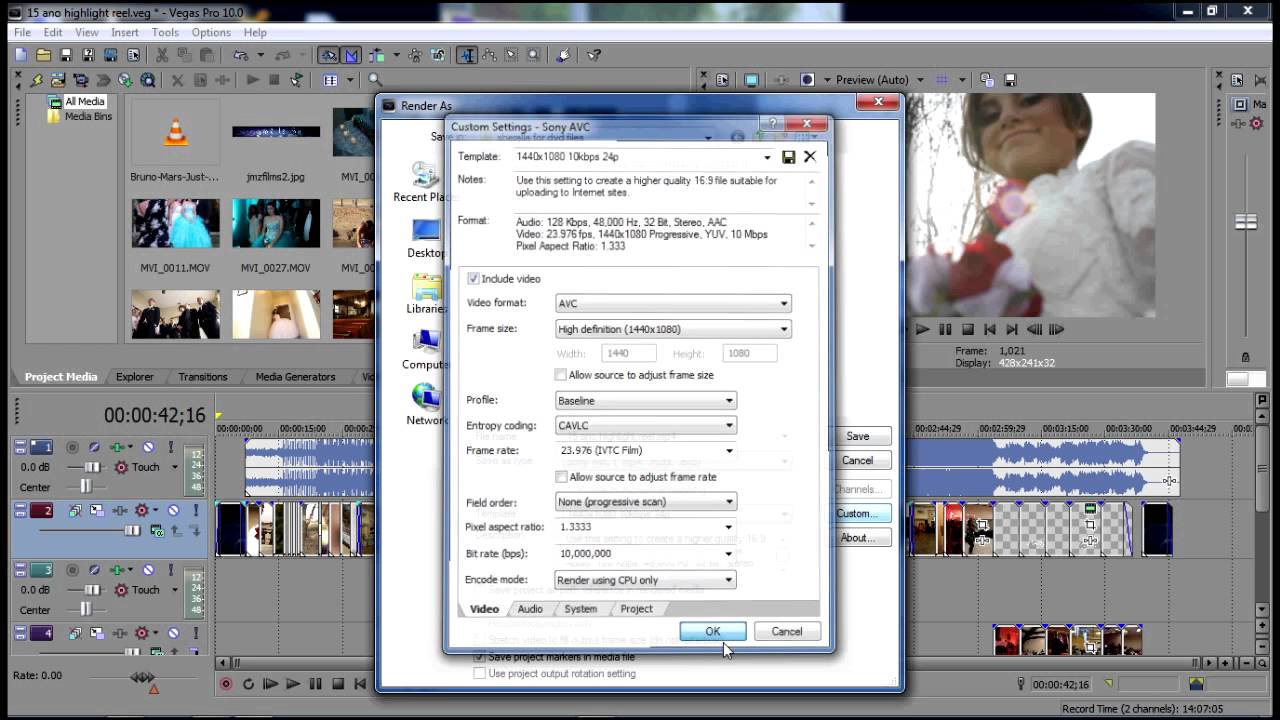
- Adjust the \"Audio\" settings according to your preference. You can keep the default settings or customize them as needed.
- Click on the \"Save\" button to save these settings as a custom template for future use.
- Finally, click \"Render\" to start the rendering process with the selected settings.
By following these steps, you will be able to achieve optimal video quality when rendering your projects in Sony Vegas. Adjustments can be made based on your specific requirements and preferences.
READ MORE:
Understanding Render Settings and Templates
Render settings and templates in Sony Vegas are crucial for optimizing video output quality and efficiency. By understanding how these settings impact your final product, you can significantly enhance the visual appeal of your videos, reduce rendering times, and ensure compatibility across various platforms and devices.
- Resolution and Frame Rate: These settings determine the clarity and smoothness of your video. Higher resolutions and frame rates offer better quality but increase file size and render time.
- Bitrate: Affects video quality and file size. A higher bitrate means higher quality and larger files. It\"s important to balance quality with file size, especially for online sharing.
- Format and Codec: Choosing the right format and codec is essential for compatibility and quality. MP4 format with H.264 codec is widely recommended for its balance of quality and compatibility.
- Audio Settings: Don\"t overlook audio quality. A higher sample rate and bitrate for audio can improve the overall experience of your video.
- Templates: Sony Vegas offers pre-configured templates that are optimized for various uses, such as web streaming or DVD. Starting with a template can save time and ensure you\"re using settings that are appropriate for your project\"s intended platform.
Experimentation and understanding the purpose of your video are key. Different projects may require different settings, so it\"s worth exploring and testing various configurations to see what works best for your specific needs. Remember, the goal is to achieve a balance between quality, file size, and render time.
Optimal Video Quality Settings
To achieve the best video quality in Sony Vegas, it\"s essential to understand and adjust various settings precisely. Optimal settings ensure your videos look professional, crisp, and clear, regardless of where they\"re viewed. Here\"s a guide to configuring your project for superior output quality.
- Choose the Right Resolution: For most projects, a resolution of 1920x1080 (Full HD) is recommended. If you\"re working on high-end projects, consider 4K resolution, but be mindful of the increased render times and file sizes.
- Frame Rate: 24fps is the cinematic standard, while 30fps is common for TV and online content. For smooth motion, especially in action scenes or video games, 60fps may be preferable.
- Bitrate: A higher bitrate improves video quality but increases file size. For Full HD, aim for a bitrate of 10-20 Mbps for a good balance between quality and size. For 4K, bitrates between 30-60 Mbps are common.
- Codec: H.264 is widely used for its balance of quality and compatibility. For even better quality, consider H.265, which offers similar quality at lower bitrates but may not be as widely supported.
- Aspect Ratio: Ensure your project matches the intended display aspect ratio. The most common aspect ratio is 16:9. Adjusting your project\"s aspect ratio incorrectly can result in black bars or stretched images.
- Audio Quality: Don\"t neglect audio settings. A bitrate of 320 kbps for AAC audio ensures clear and high-quality sound.
- Render Options: Use the \"Best\" render setting for your project\"s render quality. This may increase render times but will result in the highest quality output.
Remember, the optimal settings depend on your project\"s needs, the intended audience, and where the video will be displayed. Experimenting with different settings and conducting test renders can help you find the perfect balance for your specific project.
Frame Rate and Resolution Best Practices
Choosing the right frame rate and resolution is pivotal for achieving the desired visual impact and ensuring smooth playback across various devices. Here are best practices for selecting frame rate and resolution settings in Sony Vegas to enhance your video production quality.
- Resolution Considerations:
- For web content and general viewing, 1920x1080 (Full HD) is widely accepted and offers a good balance between quality and file size.
- For professional or cinematic projects, 4K resolution (3840x2160) provides exceptional detail and clarity but requires more powerful editing hardware and larger storage.
- Adjust resolution based on your target audience\"s typical viewing devices to ensure compatibility and optimal viewing experiences.
- Frame Rate Guidelines:
- 24 fps is the traditional frame rate for cinema, offering a filmic look.
- 30 fps is standard for television and online videos, providing a balance between smooth motion and file size.
- 60 fps is ideal for sports, gaming content, and any project requiring ultra-smooth motion.
- Consider the content and purpose of your video when choosing a frame rate. Higher frame rates are better for dynamic scenes, while lower frame rates may suffice for interviews or static shots.
- Matching Frame Rate and Resolution: Ensure that your project\"s frame rate and resolution settings are consistent throughout the editing process to avoid unnecessary rendering and ensure the highest quality output.
- Test Renders: Conduct test renders with different settings to find the best combination of frame rate and resolution for your project. This helps in identifying potential issues before the final render.
Ultimately, the choice of frame rate and resolution should align with your project\"s goals, the narrative style, and the expected viewing platforms. By adhering to these best practices, you can significantly improve the visual quality of your videos and ensure they meet professional standards.

Advanced Video Codec Options
When rendering videos in Sony Vegas, selecting the right codec is essential for balancing quality, compatibility, and file size. Advanced codecs can provide superior video quality at lower bitrates, making them ideal for both online streaming and high-quality archiving. Here’s a look at some advanced codec options and best practices for their use.
- H.264/AVC: Widely used for its excellent balance of high quality and compression efficiency. Ideal for web videos, it offers good compatibility across devices and platforms.
- H.265/HEVC: Offers up to 50% better compression than H.264, meaning higher quality at lower bitrates. Best for 4K content, but ensure your target audience has compatible hardware for playback.
- AV1: An emerging codec designed for internet video streaming, offering superior compression efficiency compared to H.264 and H.265. However, it requires more computational power for encoding and decoding.
- ProRes: A codec favored in professional post-production environments. It\"s ideal for editing and color grading due to its high-quality, lossy video compression. Use it for intermediate renders or final output when file size is not a constraint.
- DNxHD/DNxHR: Developed by Avid for high-quality, efficient editing workflows. Similar to ProRes, it\"s used for intermediate rendering and is well-suited for projects that require extensive post-production work.
Each codec has its strengths and considerations. For instance, H.264/AVC is a great all-rounder, while H.265/HEVC and AV1 offer better compression for high-resolution videos but require more processing power. ProRes and DNxHD/DNxHR provide excellent quality for professional editing but result in larger file sizes. When choosing a codec, consider your project\"s needs, the platforms where the video will be displayed, and the capabilities of your editing hardware.
Finally, always conduct test renders to assess the quality, compatibility, and file size of your videos with different codecs. This will help you make an informed decision that best suits your project\"s requirements.
_HOOK_
Audio Configuration for Clarity
Audio quality is as crucial as video quality in creating an impactful viewing experience. Proper audio configuration in Sony Vegas ensures clarity, depth, and a professional touch to your projects. Here are steps and tips to optimize your audio settings.
- Sample Rate: Set your project\"s sample rate to 48,000 Hz. This is the industry standard for video production, offering high quality while maintaining compatibility with most platforms.
- Bit Depth: A bit depth of 24 bits is recommended for professional-quality audio. It provides a higher dynamic range, allowing for more detailed sound recording and editing.
- Audio Codec: Choose AAC for a good balance between quality and file size. It\"s widely supported and offers excellent audio quality for both web and broadcast.
- Bitrate: For AAC, a bitrate of 320 kbps ensures high-quality audio. This setting is crucial for preserving the clarity and richness of the sound, especially in music or dialogue-heavy videos.
- Normalization: Use the Normalize function to even out audio levels across your project. This ensures consistent volume, preventing some parts from being too loud or too quiet.
- Noise Reduction: Apply noise reduction effects sparingly to remove unwanted background noise without compromising the natural quality of your audio tracks.
- Dynamic Range Compression: Utilize dynamic range compression to balance the loud and soft sounds in your audio, making it easier to hear on various playback systems.
Remember, the goal is to achieve clear, balanced, and professional-sounding audio that complements your video content. Experiment with different settings, and always preview your audio after adjustments to ensure the best quality.
Sony Vegas Pro 16: Best Render Settings MP4 HD 1080p 60fps
Learn how to optimize your render settings with our expert tips and tricks! Enhance the quality of your visuals and create stunning videos that leave a lasting impression on your audience. Watch now!
Export Settings for Different Platforms
Exporting your project with the correct settings in Sony Vegas is crucial for ensuring optimal playback quality on different platforms. Each platform has its preferred formats and specifications to provide the best viewer experience. Here’s a guide to help you navigate these settings for popular platforms.
- YouTube:
- Format: MP4
- Codec: H.264
- Resolution: 1920x1080 for HD, 3840x2160 for 4K
- Frame Rate: Match source (usually 24, 25, or 30 fps)
- Bitrate: 8 Mbps for HD, 45-68 Mbps for 4K
- Audio: AAC, 320 kbps, 48 kHz
- Vimeo:
- Format: MP4
- Codec: H.264
- Resolution: 1920x1080 for HD
- Frame Rate: Match source
- Bitrate: 5-10 Mbps for HD
- Audio: AAC, 320 kbps, 48 kHz
- Instagram:
- Format: MP4
- Codec: H.264
- Resolution: 1080x1080 for square videos, 1080x1350 for portrait, 1920x1080 for landscape
- Frame Rate: 30 fps
- Bitrate: 5 Mbps
- Audio: AAC, 128 kbps, 44.1 kHz
- Facebook:
- Format: MP4 or MOV
- Codec: H.264
- Resolution: 1280x720
- Frame Rate: 30 fps
- Bitrate: 3-6 Mbps for HD
- Audio: AAC, 128 kbps, 44.1 kHz
- Twitter:
- Format: MP4
- Codec: H.264
- Resolution: 1280x720 for landscape, 720x720 for square
- Frame Rate: 30 fps
- Bitrate: 5 Mbps for HD
- Audio: AAC, 128 kbps, 44.1 kHz
These settings are a general guideline and should provide a solid starting point for exporting your videos. However, always check the current specifications recommended by the platform as they can change over time. Additionally, consider the content of your video and your audience\"s viewing habits when choosing your settings.
VEGAS Pro 20: Best Render Settings For YouTube 1080p Tutorial 585
Looking to master YouTube? Our tutorial covers everything from content creation to channel optimization, growth strategies, and engaging with your viewers. Unlock the secrets to success and become a YouTube sensation today. Don\'t miss out, click to watch!
Customizing Render Settings for Special Effects
Special effects in video projects can significantly enhance the viewer\"s experience, but they also require careful consideration during the rendering process to maintain quality. Customizing render settings in Sony Vegas for projects with special effects involves a few key steps to ensure the effects are delivered as intended, without losing detail or causing playback issues.
- Increase Bitrate: Special effects, especially those involving fast motion or complex visuals, can benefit from a higher bitrate. This ensures that the details of the effects are preserved and reduces artifacts.
- Choose Appropriate Codec: Some codecs handle motion and effects better than others. For instance, H.264 is versatile and efficient, but for high-quality effects, consider using H.265/HEVC, which offers better compression and quality for detailed visuals.
- Render Quality: Set your project to render at the highest quality setting. While this may increase render times, it ensures that your special effects are as sharp and clear as possible.
- Frame Rate: If your effects involve motion, consider rendering at a higher frame rate. This can make motion smoother and more fluid, enhancing the impact of your effects.
- Use Pre-Renders: For complex effects, pre-render these sections at high quality. This allows you to focus on getting these elements perfect before integrating them into the larger project.
- Consider Color Depth: Increasing color depth can improve the fidelity of color-related effects, such as gradients or color transitions. If supported, opt for 10-bit color depth over the standard 8-bit.
- Test Renders: Always perform test renders of effect-heavy segments. This allows you to adjust settings and ensure that the final output meets your expectations without needing to render the entire project repeatedly.
Customizing render settings for special effects is a balancing act between maintaining high quality and managing file sizes and render times. By adjusting these settings in Sony Vegas, you can achieve professional-looking effects that elevate your project.
GPU Acceleration and Performance Optimization
Utilizing GPU acceleration in Sony Vegas can drastically improve rendering times and overall performance, especially for projects with high-resolution video and complex effects. Here\"s how to optimize your settings for GPU acceleration and enhance performance.
- Enable GPU Acceleration: First, ensure that GPU acceleration is enabled in Sony Vegas. Go to Options > Preferences > Video and select your GPU from the \"GPU acceleration of video processing\" dropdown menu.
- Compatible Formats and Codecs: Use formats and codecs that benefit from GPU acceleration, such as H.264 and H.265/HEVC. These codecs are designed to take advantage of GPU hardware encoding capabilities, reducing render times.
- Adjust Preview Quality: Lower the preview quality when editing to reduce strain on your GPU. This allows for smoother playback and faster editing, especially in complex projects. You can adjust this in the Video Preview window.
- Close Background Applications: Maximize available GPU resources by closing unnecessary background applications. This ensures that Sony Vegas has access to the maximum amount of GPU processing power.
- Update Drivers: Keep your GPU drivers up to date. Manufacturers frequently release updates that improve performance and compatibility with video editing software like Sony Vegas.
- Optimize Project Settings: Match your project settings to your output format to minimize unnecessary processing. For example, if your final video will be in 1080p, edit in 1080p rather than a higher resolution.
- Batch Rendering: For multiple projects, consider using batch rendering. This allows you to render projects one after the other automatically, optimizing the use of your system\"s resources.
By following these steps, you can significantly enhance the performance of Sony Vegas, making your video editing process smoother and faster. Remember, the effectiveness of GPU acceleration will vary depending on your specific GPU model, project complexity, and specific render settings.
Common Rendering Issues and Solutions
Even with the best settings, rendering in Sony Vegas can sometimes present challenges. Here are some common issues and their solutions to help ensure a smooth rendering process.
- Issue: Long Render Times
- Solution: Reduce video resolution for previews, close unnecessary applications to free up system resources, and check the \"Dynamic RAM Preview max\" setting under Preferences > Video to ensure it\"s not set too high.
- Issue: Crashes During Rendering
- Solution: Update Sony Vegas and your computer\"s drivers, especially the GPU driver. Also, try rendering to a different format or codec to see if the issue persists.
- Issue: Video and Audio Out of Sync
- Solution: Check the frame rate of your project and ensure it matches the source video. Misaligned frame rates can lead to sync issues.
- Issue: Poor Video Quality After Rendering
- Solution: Increase the bitrate and check your codec settings. Using a higher bitrate can significantly improve video quality but will increase file size.
- Issue: Render Stuck or Freezes
- Solution: Try rendering in smaller sections to identify if a particular clip or effect is causing the issue. Additionally, clear the cache and reset Sony Vegas settings to default.
- Issue: Black Screen in Rendered Video
- Solution: This can occur if media files are offline or missing. Ensure all files are correctly linked and available. Also, check for any muted tracks or disabled video layers.
Identifying the root cause of rendering issues can often require a process of elimination. Always keep your software up to date, maintain regular backups of your work, and consider rendering test segments before exporting the entire project to save time.
_HOOK_
Finalizing and Exporting Your Video
Finalizing and exporting your video in Sony Vegas involves several key steps to ensure your project is polished and ready for audience viewing. This phase is crucial, as it encapsulates all your hard work into the final product. Here are the steps to take for a successful export.
- Final Checks: Review your entire project for any missing media, unsynchronized audio, or unrendered effects. Ensure all tracks are properly enabled and visible.
- Color Correction and Grading: Perform any last-minute color adjustments to ensure consistency and visual appeal across your video.
- Audio Mixing: Make sure your audio tracks are balanced, clear, and free of any unwanted noise. Adjust levels, effects, and fades as needed.
- Render Settings: Choose the appropriate format and settings based on your target platform. Common formats include MP4 for web and MPEG2 for DVD productions. Adjust bitrate, resolution, frame rate, and codec according to your needs.
- Save Your Project: Before rendering, save your project to avoid any loss of work in case of software crashes.
- Rendering: Go to File > Render As, and select your desired output format and settings. Use the \"Render Loop Region Only\" if you\"re only exporting a section of your timeline.
- Review: After rendering, review your exported video thoroughly to ensure there are no issues with video quality, audio sync, or encoding errors.
- Backup: It\"s advisable to keep a backup of your project files and the final rendered video in multiple locations for safety.
Exporting your video is the final step in the video production process. Taking the time to carefully review and adjust your project before this stage can significantly impact the quality and success of your final product.
Mastering Sony Vegas render settings enhances your video production, ensuring crisp visuals and professional output. Embrace these insights to elevate your projects, captivating your audience with unparalleled quality and creativity.