Topic sony vegas best render settings: Discover the ultimate Sony Vegas best render settings guide to elevate your video editing to professional standards effortlessly, ensuring your projects shine with unparalleled quality and efficiency.
Table of Content
- What are the best render settings for Sony Vegas?
- Optimal Project Settings for High-Quality Outputs
- Understanding Sony Vegas Render Options
- Recommended Settings for 1080p and 4K Quality
- Utilizing GPU Acceleration for Faster Rendering
- Customizing Render Templates for Specific Needs
- Best Practices for Rendering for YouTube and Other Platforms
- YOUTUBE: Sony Vegas Pro 16 Best Render Settings MP4 HD 1080p 60fps
- Advanced Tips for Video and Audio Quality Enhancement
- How to Manage Render Times Effectively
- Rendering Settings for Mobile Devices
- Common Issues and Solutions in Rendering Processes
What are the best render settings for Sony Vegas?
When it comes to the best render settings for Sony Vegas, there are a few recommendations that can help you achieve high-quality output:
- Open Sony Vegas and go to the Timeline.
- Select the portion of your project you want to render. If you want to render the entire timeline, you can skip this step.
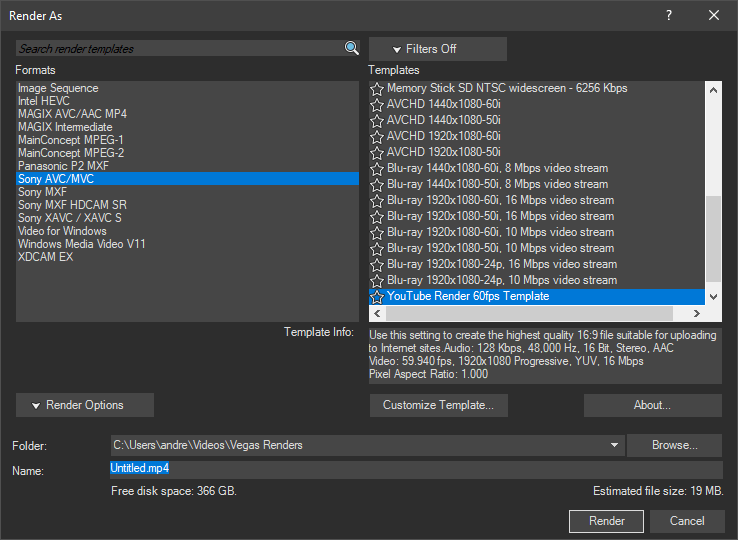
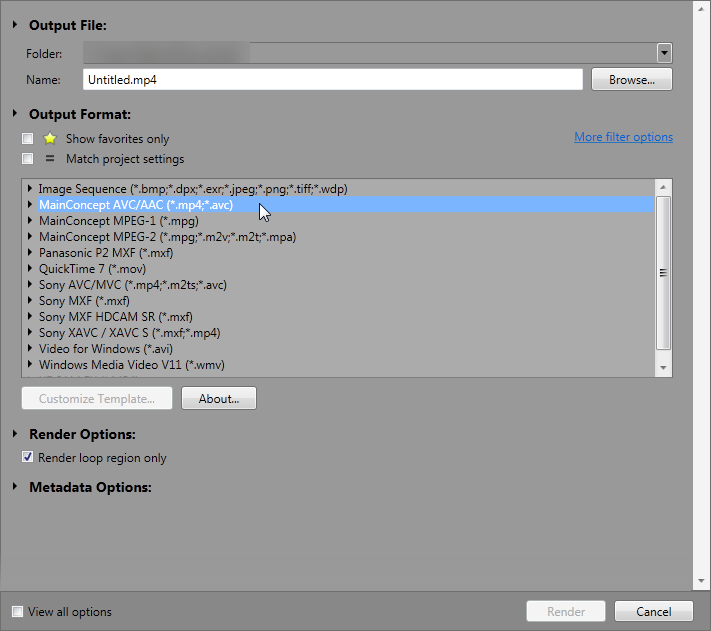
- Click on the \"File\" tab at the top of the window and select \"Render As...\" from the dropdown menu.
- In the \"Save As\" field, specify the name and location where you want to save the rendered file.
- Under the \"File Type\" dropdown menu, choose the recommended format, which is usually MAGIX AVC/AAC MP4 for YouTube.
- Set the \"Template\" to a suitable option, such as \"Internet 1920x1080-30p\" if you want to render a 1080p video.
- Adjust the settings within the selected template:
- Ensure the \"Full-resolution render quality\" is set to the highest quality available (often referred to as \"Best\").
- Set the \"Motion blur type\" to \"Gaussian\" for smoother motion.
- Choose the appropriate \"Deinterlace method\" based on your source footage.
- Adjust any additional settings based on your project requirements. For YouTube, maintain a suitable bitrate, frame rate, and resolution.
- Once you are satisfied with the render settings, click on the \"Save\" button to begin the rendering process.
- Wait for Sony Vegas to complete the rendering, which may take some time depending on the length and complexity of your project.
- Verify the rendered video for quality and make necessary adjustments if needed.
These steps provide a general guideline for achieving optimal render settings in Sony Vegas. However, keep in mind that the specific settings may vary depending on your project requirements and target platform.
READ MORE:
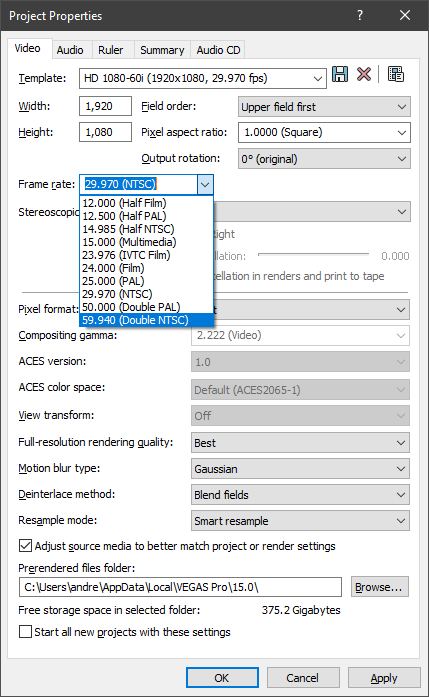
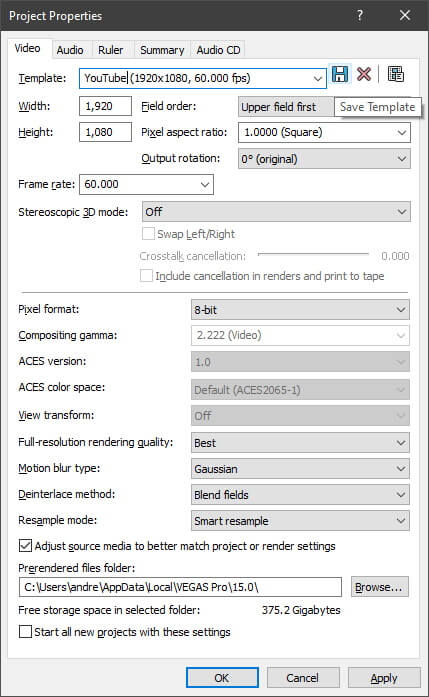
Optimal Project Settings for High-Quality Outputs
To achieve the highest quality output in Sony Vegas, it\"s crucial to adjust your project settings meticulously. This ensures your videos look professional, with crisp visuals and clear audio. Follow these steps to set up your project for success:
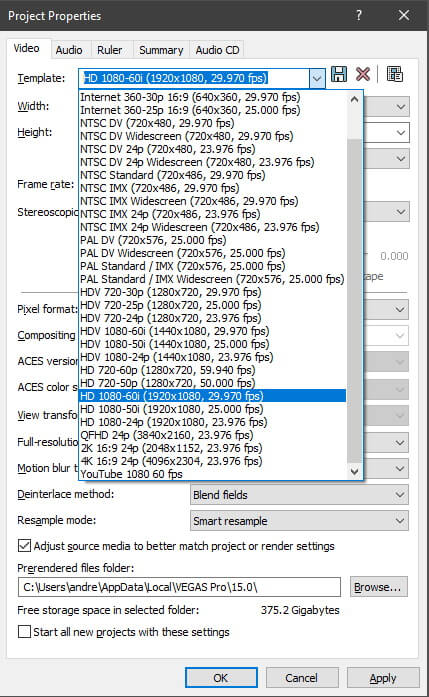
- Set Project Video Properties: Begin by setting your project video properties to match your source footage or your final output requirement. For most projects, HD 1080p (1920x1080) at 30fps or 60fps is a standard choice. Ensure the pixel aspect ratio is set to 1.000 (Square Pixels).
- Choose the Right Template: Select a template that matches your intended delivery format. For YouTube or web videos, the \"Internet HD 1080p\" template is a good start.
- Full Resolution Rendering Quality: Set this to \"Best\" to ensure the highest quality during the rendering process. This option can be found under the \"Video\" tab in the \"Project Properties\" dialog.
- Adjust Audio Settings: For optimal audio quality, set the sample rate to 48,000 Hz and bit depth to 24 bits in the project properties.
- Disable Resample: To avoid unnecessary frame blending which can cause a ghosting effect, disable resample for all clips in your timeline. Right-click each clip, go to \"Switches\", and select \"Disable Resample\".
- Use GPU Acceleration: If your system supports it, enable GPU acceleration in the \"Preferences\" under the \"Video\" tab to speed up rendering times without compromising quality.
Remember, these settings are a starting point. Depending on your specific project requirements, such as output format, frame rate, and resolution, adjustments may be needed. Experimenting with different settings and rendering small sections of your video is a great way to find what works best for you.
Understanding Sony Vegas Render Options
Rendering in Sony Vegas involves converting your project into a finalized video file. Understanding the various render options is key to achieving the desired quality and file size for your output. Here\"s a breakdown of the essential render settings and options in Sony Vegas:
- Format Selection: Sony Vegas supports a wide range of video formats. The most common formats include MP4 (using AVC codec), WMV, and AVI. MP4 is widely recommended for its balance between quality and file size, making it ideal for online sharing.
- Bitrate: Bitrate affects video quality and file size. A higher bitrate results in better quality but larger files. For HD videos, a bitrate of 8-12 Mbps is generally a good balance for 1080p content.
- Frame Rate: Match the frame rate to your source video or the standard of your target platform. Common frame rates include 24 fps for film-like quality, 30 fps for standard video, and 60 fps for smooth motion.
- Resolution: Ensure the resolution matches your project settings. For HD content, 1920x1080 is standard. For 4K, it\"s 3840x2160.
- Audio Settings: For most projects, AAC audio codec with a bitrate of 128-320 kbps will provide good quality sound.
- Render Range: You can choose to render your entire project or a specific region. Selecting a specific region is useful for exporting short segments of your project.
- Render Loops: If your project involves repeating content, Sony Vegas offers an option to render loops, saving time in post-production.
Each project may require different settings based on the intended use of the final video. Experimentation and experience will guide you to the best settings for your needs. Remember, rendering is the final step in your video production workflow, so take the time to review all settings carefully before finalizing your video.
Recommended Settings for 1080p and 4K Quality
When rendering videos in Sony Vegas for 1080p or 4K quality, selecting the right settings is crucial for achieving the best balance between video quality and file size. Here are the recommended settings for both resolutions:
- 1080p HD Quality:
- Format: MainConcept AVC/AAC (*.mp4)
- Frame Rate: 29.97 fps (for NTSC) or 25 fps (for PAL)
- Bitrate: 16 Mbps for high quality
- Audio: AAC, 48,000 Hz, 320 Kbps, Stereo
- Resolution: 1920x1080
- Render Options: Check \"Render using CPU only\" if GPU acceleration is not available or causes issues.
- 4K UHD Quality:
- Format: Sony XAVC S
- Frame Rate: 29.97 fps (for NTSC) or 25 fps (for PAL)
- Bitrate: 60-100 Mbps for professional-quality results
- Audio: AAC, 48,000 Hz, 320 Kbps, Stereo
- Resolution: 3840x2160
- Render Options: Utilize \"Render using GPU if available\" for faster rendering, if supported.
It\"s important to tailor these settings based on the specific requirements of your project and the capabilities of your editing system. For instance, adjusting the bitrate can help manage file size without significantly compromising video quality. Also, always preview your rendered video to ensure it meets your expectations before finalizing the project.
Utilizing GPU Acceleration for Faster Rendering
GPU acceleration in Sony Vegas significantly reduces rendering times, leveraging the power of your graphics card to process videos more efficiently than using the CPU alone. Here’s how to enable and make the most out of GPU acceleration for faster rendering:
- Enable GPU Acceleration: Go to Options > Preferences > Video, and in the \"GPU acceleration of video processing\" dropdown, select your NVIDIA or AMD graphics card. This setting allows Vegas to utilize your GPU for rendering, besides just the CPU.
- Choose the Correct Renderer: When rendering, choose a format that supports GPU acceleration, such as MainConcept AVC/AAC or Sony AVC/MVC. These formats have options to enable rendering using the GPU.
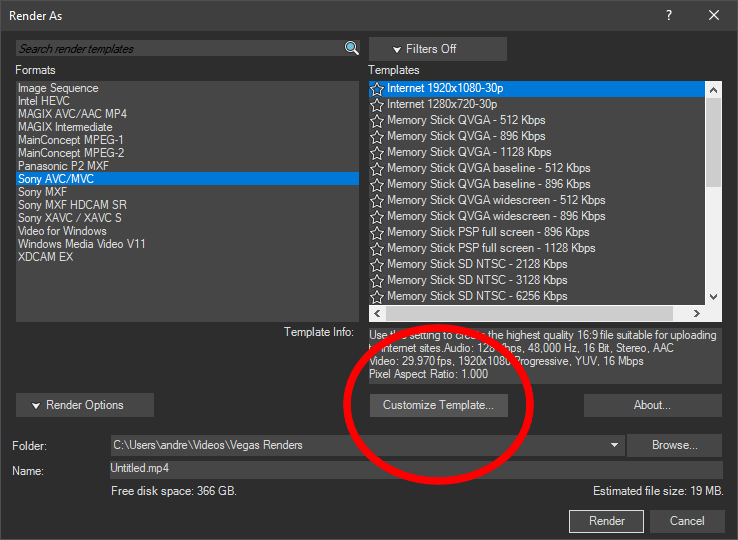
- Adjust Rendering Templates: After selecting the renderer, click on \"Customize Template\", and ensure \"Render using GPU if available\" is selected. This option maximizes the use of your GPU\"s capabilities.
- Update Your Graphics Drivers: Keeping your graphics card drivers up to date is crucial for GPU acceleration. Updated drivers improve performance and compatibility with Sony Vegas.
- Monitor GPU Usage: Use task manager or a third-party application to monitor your GPU\"s usage during rendering. This helps you understand how effectively Sony Vegas is utilizing your GPU.
Remember, while GPU acceleration can significantly speed up rendering times, the final output quality and render speed will also depend on the complexity of your project and the specific settings used. Some projects, especially those with extensive effects and higher resolutions, will benefit more from GPU acceleration.
_HOOK_
Customizing Render Templates for Specific Needs
Customizing render templates in Sony Vegas is essential for tailoring output settings to meet the specific needs of your project. Whether you\"re aiming for high-quality uploads to YouTube, creating content for social media, or needing specific video formats for broadcast, here’s how to customize your render templates effectively:
- Access Render Settings: After completing your project, go to File > Render As to access the render settings. Here, you\"ll find a list of formats and templates.
- Select Your Format: Choose the format that best suits your project\"s needs. Popular formats include MP4 (MainConcept AVC/AAC) for web and Sony XAVC S for 4K video.
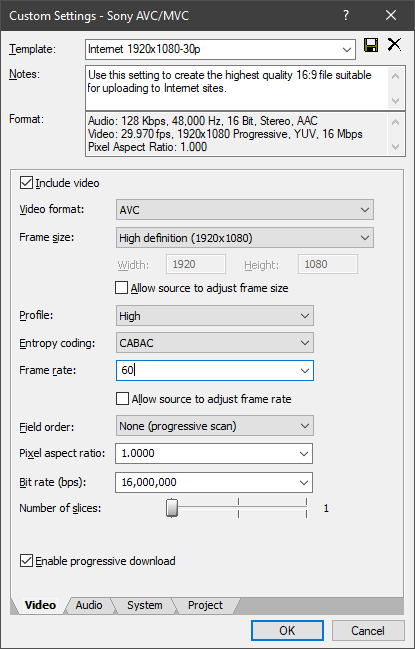
- Customize Template: Once you\"ve selected a format, click on \"Customize Template\" to modify its settings. Here, you can adjust video bit rate, frame rate, resolution, audio settings, and more.
- Adjust Bitrate for Quality and Size: Higher bitrates mean better quality but larger file sizes. Adjust the bitrate to balance quality and size based on your distribution channel.
- Frame Rate and Resolution: Ensure these match your project settings or your target platform\"s requirements. For example, 1080p at 30 fps is standard for YouTube, while 4K content may require a higher frame rate.
- Audio Settings: Adjust the audio codec, bit rate, and sample rate. For most web content, AAC audio at 320 kbps is sufficient.
- Save Custom Template: After adjusting your settings, save your template by naming it according to its purpose (e.g., \"YouTube 1080p30\"). This allows you to quickly access these settings for future projects.
Customizing render templates allows for greater control over the final output of your project, ensuring the best quality for your intended audience or platform. Always test a small segment of your video with your custom settings to ensure the quality meets your expectations before rendering the entire project.

Best Practices for Rendering for YouTube and Other Platforms
Rendering your videos for YouTube and other platforms requires attention to specific settings to ensure optimal quality and compatibility. Here\"s a guide to the best practices for rendering your projects for online sharing:
- Choose the Right Format: For YouTube and most other platforms, MP4 format with the H.264 codec is recommended due to its balance of quality and file size.
- Resolution and Frame Rate: Render your videos in the highest resolution you edited them in. For YouTube, 1080p (1920x1080) or 4K (3840x2160) are standard resolutions. Match the frame rate of your source footage, commonly 24, 25, or 30 fps for standard video, and up to 60 fps for high-motion content.
- Bitrate Settings: Use a higher bitrate for higher resolution videos. For 1080p, aim for a bitrate between 8-12 Mbps. For 4K videos, 45-68 Mbps is recommended. Higher bitrates improve quality but increase file size.
- Audio Quality: Choose AAC format with a bitrate of at least 128 kbps for stereo audio. For projects with high-quality audio, 320 kbps is preferable.
- Aspect Ratio: Maintain an aspect ratio of 16:9, which is the standard for YouTube and most video platforms. If your video uses a different aspect ratio, consider adding letterboxing to avoid cropping or stretching in the player.
- File Size and Length: Be mindful of the platform\"s limitations. YouTube allows for up to 12 hours of video length or a file size of 128GB, whichever is less. Adjust your render settings accordingly if your video approaches these limits.
- Test Before Uploading: Render a short segment of your video first to check the quality on your platform of choice. This can save you time if adjustments are needed.
Following these practices ensures your videos look their best on YouTube and other platforms, providing your audience with high-quality content. Adjust these guidelines as needed based on your specific project requirements and the latest platform specifications.
Sony Vegas Pro 16 Best Render Settings MP4 HD 1080p 60fps
\"Discover the ultimate render settings that will bring your videos to life! Learn how to optimize your footage with the perfect settings to achieve stunning visuals. Watch our video tutorial now and take your video editing skills to the next level!\"
Best Render Setting Sony Vegas Pro 17 2022 AMD NVIDIA
\"Unlock the full potential of Sony Vegas Pro with our expert tips and tricks! From advanced techniques to hidden features, our video tutorial will empower you to create professional-grade videos effortlessly. Don\'t miss out on this chance to elevate your editing game!\"
Advanced Tips for Video and Audio Quality Enhancement
Enhancing the quality of both video and audio in your projects goes beyond basic render settings. Utilize these advanced tips to elevate your production value in Sony Vegas:
- Color Correction and Grading: Use the color correction tools within Sony Vegas to adjust white balance, contrast, and saturation to enhance your video’s visual appeal. Color grading can set the mood and improve consistency across clips.
- Use High-Quality Source Footage: The quality of your final render is heavily dependent on your source footage. Always shoot and edit in the highest quality format your equipment and storage allow.
- Optimize Audio Levels: Utilize the audio meters and normalize audio levels across your project to ensure clear and consistent sound. Avoid peaking to prevent distortion.
- Advanced Audio Editing: Use noise reduction, equalization, and compression effects sparingly to enhance the audio quality without making it sound over-processed.
- Sharpness and Noise Reduction: Apply sharpening filters judiciously to enhance details without introducing noise. Use noise reduction tools to clean up grainy footage, especially in low-light conditions.
- Render in Sections: For large projects, consider rendering in sections to maintain quality and manage file sizes efficiently. This approach also allows for more focused quality checks and adjustments.
- Experiment with Bitrates: While higher bitrates generally mean better quality, they also result in larger files. Experiment to find the optimal balance for your project\"s needs, especially when targeting specific platforms like YouTube or Vimeo.
These advanced techniques require practice and experimentation to master. By incorporating them into your workflow, you can significantly enhance the audio and video quality of your projects, making them stand out to your audience.

How to Manage Render Times Effectively
Efficient management of render times in Sony Vegas is crucial for a productive editing workflow. Here are strategies to minimize render times without compromising on quality:
- Pre-Render Video Previews: Use the pre-render functionality to generate video previews of effects-heavy sections. This allows you to check the quality and make adjustments before the final render.
- Close Unnecessary Programs: Before rendering, close other applications to free up your computer’s resources. This ensures Vegas has access to the maximum amount of RAM and CPU power available.
- Optimize Project Settings: Match your project settings to your source footage and final output. Avoid unnecessary upscaling or downscaling, as this can increase render times.
- Use GPU Acceleration: If your graphics card supports it, enable GPU acceleration in the Vegas preferences. This can significantly reduce render times for video effects and transitions.
- Adjust Render Quality: For drafts or previews, consider rendering at a lower quality or resolution. Save full quality renders for the final export only.
- Split Large Projects: Break down large projects into smaller sections and render them individually. This not only speeds up rendering but also makes it easier to manage and edit large projects.
- Selective Rendering: Render only the portions of your timeline that have been changed or need review. You can select specific regions to render instead of the entire project.
Managing render times effectively requires a balance between quality and efficiency. By implementing these strategies, you can streamline your rendering process in Sony Vegas, saving time and improving your overall productivity.
Rendering Settings for Mobile Devices
When preparing videos for playback on mobile devices using Sony Vegas, it’s crucial to balance quality with file size to ensure smooth playback on a variety of devices, including smartphones and tablets. Below are detailed steps and recommendations to optimize your render settings specifically for mobile devices.
Step 1: Selecting the Right Format
Begin by choosing a format that is widely supported across mobile platforms. The Magix AVC/AAC MP4 format is recommended due to its broad compatibility and balance between quality and file size.
Step 2: Video Settings
- Frame Size: 1920x1080 or 1280x720 for HD quality. For lower-end devices, 854x480 may provide a good balance between quality and performance.
- Bitrate: Aim for a bitrate of 2-5 Mbps for 1080p content. For 720p, 1-3 Mbps should suffice. This ensures a good quality to size ratio.
- Frame Rate: 30 fps is suitable for most mobile devices and provides smooth playback without unnecessary file size increase.
- Aspect Ratio: 16:9 is the standard aspect ratio for mobile screens.
Step 3: Audio Settings
- Format: AAC is recommended for its efficiency and compatibility.
- Bitrate: A bitrate of 128-192 Kbps should provide clear audio without significantly increasing the file size.
- Sample Rate: 48,000 Hz is a common choice that balances quality and compatibility.
Step 4: Utilizing GPU Acceleration
If your version of Sony Vegas supports GPU acceleration, enabling it can significantly reduce render times without sacrificing quality. This is especially useful when working with high-resolution video files intended for mobile devices.
Step 5: Customizing Templates
For recurring projects, consider creating and saving custom render templates. This will save time and ensure consistency across your mobile-optimized videos.
Conclusion
By following these steps, you can create high-quality videos optimized for mobile devices using Sony Vegas. Remember to test your rendered videos on different devices to ensure compatibility and satisfactory playback quality.
_HOOK_
Common Issues and Solutions in Rendering Processes
Rendering videos in Sony Vegas can sometimes present challenges. Here are common issues encountered during the rendering process and their respective solutions to ensure smooth and efficient video production.
Issue 1: Sony Vegas Not Rendering the Entire Video
Solution: Ensure that you haven\"t accidentally enabled the \"Render Loop Region Only\" option. Always double-check your render selection before starting the rendering process.
Issue 2: Video Rendering Takes Too Long
- Solution 1: Disable resampling to reduce render times without significantly affecting video quality.
- Solution 2: Utilize GPU acceleration if your hardware supports it, as this can drastically reduce rendering times.
Issue 3: Poor Video Quality After Rendering
- Solution 1: Increase the bitrate in your render settings. While this will increase file size, it significantly improves video quality.
- Solution 2: Ensure your project settings match your video\"s properties to avoid unnecessary conversion and quality loss.
Issue 4: Sony Vegas Crashes During Rendering
Solution: This could be due to insufficient system resources or outdated drivers. Close unnecessary applications to free up resources, update your graphics drivers, and consider increasing your system\"s RAM.
Issue 5: Audio and Video Out of Sync
Solution: Check your project\"s frame rate settings and ensure they match your video\"s frame rate. Inconsistencies between the two can lead to synchronization issues.
Issue 6: Black Screen or Missing Video Components
- Solution 1: Verify that all video tracks are enabled and not accidentally muted or hidden in the timeline.
- Solution 2: Re-import your footage to ensure there wasn\"t a loading error with your clips.
Conclusion
Encountering issues during the rendering process can be frustrating, but most problems have straightforward solutions. By understanding these common issues and how to address them, you can streamline your workflow in Sony Vegas and achieve high-quality results with minimal setbacks.
Mastering Sony Vegas render settings can elevate your video projects to new heights. Explore our comprehensive guide to unlock the full potential of your creations, ensuring stunning visuals and optimal performance across all platforms.